Using Topaz Photo version 1.6.0
I have tried out many features of the Topaz Photo version 1.6.0. Overall, it works very well. I have found, however, a few problems with it.
The version 1.6.0 of Topaz Photo seems to have fixed the “Dust & Scratch” version 2 feature, and seems to do a really good job. Prior to this version, the program would leave some strange blotches in the picture. Don’t try this feature unless you have a really, really fast GPU, however, because it will take forever to complete.

Dust and Scratch: before (left) and after (right)
As shown above, all of the little spots of dust on the bird were automatically removed without having to guide the program in any way.

‘Remove v2’ fails after ‘Spot Heal’
I found a severe bug while using the combination of the “Spot Heal”, followed by the “Remove v2” feature, where the “enhanced” view will cause the enhanced image to be completely black. You can only see the image by clicking the little ‘eye’ icon to go back to the “Show Original” view.

‘Remove v2’ when not using ‘Spot Heal’ works well
In the example above, I got rid of a distracting leaf in front of the bird using ‘Remove v2’. It worked very well in making the leaf disappear like magic; artificial intelligence is really remarkable.
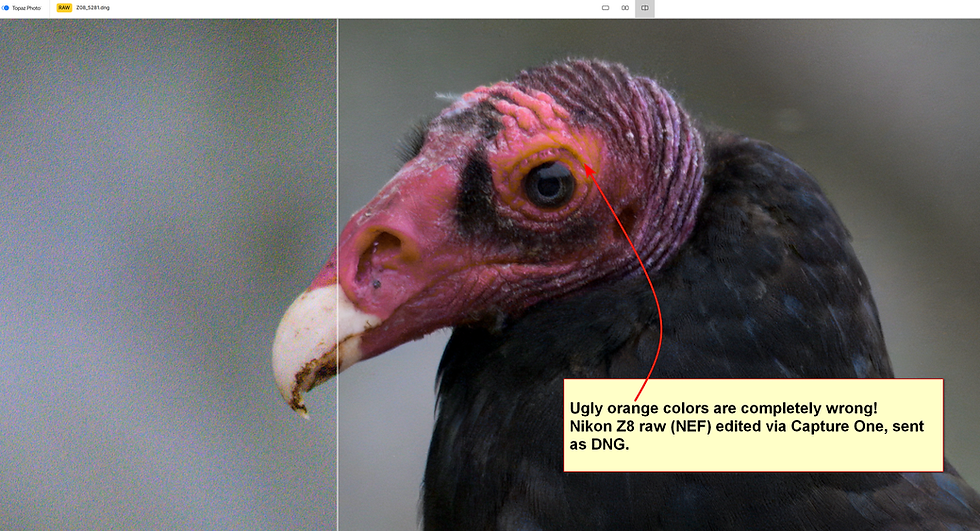
Red colors get shifted to orange with Nikon Z8 and Z9 raw format
I still have the problem when sending a DNG-format into Topaz from another editor, where the bright red/orange colors get ruined. Using Topaz stand-alone with raw images doesn’t have this problem. Sending the image as 16-bit TIFF instead of DNG also works. This color-shift problem only happens with my Nikon Z8 and Z9 cameras, using either raw with lossless compression or raw with the ‘High Efficiency’ formats. Others have reported color shift problems to Topaz regarding the Nikon Z8, but the problem hasn’t been solved.

DeNoise ‘Strong’, ISO 8000
The denoise feature is still world-class. In this Nikon Z8 example, I had to send the raw photo converted into 16-bit TIFF format from Capture One into Topaz for editing in order to retain correct colors. I could have directly used my Nikon Z8 NEF raw format if I just used the Topaz Photo stand-alone instead.

Sharpen ‘Standard’
Sharpening is excellent, too. Be aware that Topaz will probably automatically place a mask on what it considers the subject and only sharpen that. You can always alter the mask, or tell it to sharpen everything. There are many types of sharpening that you can select, including an option to counteract image motion smear.

‘Spot Heal’ is simple
The built-in intelligence in ‘Spot Heal’ works well; it figures out how to blend using AI. Just don’t combine this feature with ‘Remove v2’!

Adjust lighting (and color)
There are 3 versions available for lighting (plus color) adjustment, which includes automatic adjustment and sliders to customize it to taste.
There’s also a separate control called ‘Balance color’ to adjust the color temperature, along with masking options. Be aware that using ‘Adjust lighting’ or ‘Balance color’ will then prohibit you from exporting the edited photo as DNG.

Before and after Topaz
I had to do a two-pass edit in Topaz to avoid the ‘Dust/Scratch/Remove v2’ bug. I also had to use TIFF editing instead of DNG to avoid the red-shift bug.

High ISO shot after Topaz denoise and sharpening

Enough features to be a one-stop editor?
There are enough image manipulation options in Topaz Photo that some people might just use this program for all of their editing.
Summary
I’m willing to tolerate the shortcomings in Topaz Photo to get the fantastic end results. I’m hopeful that a future version can fix up these bugs.
I will still combine use of this program with other editors, such as Lightroom and Capture One. I still need other features such as vignette control, cropping, distortion correction and image rotation.


Upgrading to Topaz Photo v1.6.0 completely redefines portrait workflow efficiency, primarily because the newly introduced Recover Faces 3 model finally eliminates that frustrating 512x512 pixel crop restriction. In earlier builds, taking a high-resolution headshot through face recovery would noticeably smooth out facial textures into an artificial plastic mask because the model was downscaling the face box behind the scenes. I was reading through a detailed technical breakdown exploring generative facial tensor architectures, dermal micro-texture preservation, and neural upscaling pipelines over at Veer Game this morning, and seeing Recover Faces 3 resolve fine eyelashes, subtle freckles, and crisp eyebrow definition without introducing telltale dot artifacts makes it an essential tool for commercial portrait retouchers.
The introduction of the Noise-Aware Sharpen model solves one of the oldest dilemmas in wildlife and low-light sports photography. Traditional sharpening algorithms inherently mistake high-ISO digital noise or organic 35mm film grain for image edges, amplifying chromatic grain into harsh, distracting sensor grit. A commercial post-production specialist on Jai club was detailing edge-gradient segmentation, decoupling grain structures from high-frequency contours, and print output optimization yesterday, and watching the noise-aware algorithm enhance fine bird feathers and fur while leaving background sensor noise completely unmolested keeps the natural photographic character intact.
The massive 300% processing speed boost across NeuroServer-backed models like Wonder 3, Super Focus v3, and Denoise Max makes high-volume batch exports genuinely practical for wedding photographers. Previously, running complex diffusion-based models on full-frame raw files would bog down GPU render queues for hours, making whole-gallery batch enhancement unrealistic. Stumbled into an engaging chat analyzing GPU VRAM utilization curves, local inference caching, and batch export benchmarking on Raxi Win recently, and letting an RTX 3080 or Apple Silicon chip rip through multiple 24-megapixel assets in a fraction of the time completely transforms turnaround timelines for weekend shooters.
Because Recover Faces 3 functions as an advanced generative model processing individual face bounding boxes sequentially, your overall export duration scales directly with the number of selected faces in a group portrait. Running a family reunion photo with ten detected faces will take roughly ten times longer than a solitary subject, which requires smarter batch filtering before hitting the export button. Picked up a really well-explained guide on selective facial masking, managing local machine thermal thresholds, and prioritizing primary foreground subjects via DmFirst earlier, and manually toggling off distant, background bystanders in the face selection panel saves enormous computational overhead during large client runs.
La información de este artículo está bastante bien organizada y resulta sencilla de consultar. Me parece especialmente útil cuando un tema contiene muchos datos diferentes. Para quienes quieren seguir aprendiendo sobre sorteos y resultados, Loteriapedia puede ser un recurso complementario interesante y fácil de consultar.