Using Retinex in RawTherapee
- Ed Dozier
- Apr 3
- 5 min read
Here’s a tool that applies sophisticated technology to remove atmospheric haze from your landscapes and bring out details in images that are severely back-lit. RawTherapee is a free editor found here.
RawTherapee is an editor meant for raw-format photos. If your camera raw format isn’t supported (it uses the LibRaw library), then use the free Adobe DNG Converter to make a DNG file that it can use.

A hazy valley
Retinex in RawTherapee is an advanced image processing tool based on the Retinex theory (short for Retina + Cortex). It models how the human visual system perceives color and lightness under varying lighting conditions, such as poor light, colored surroundings, or atmospheric haze/fog.
What It Does
The human eye adapts well to uneven lighting and haze, but cameras often produce flat, veiled, or low-contrast results. Retinex tries to mimic this biological adaptation by analyzing the image at multiple spatial scales (MultiScale Retinex or MSR algorithm).
It estimates the "illumination" component of the scene and removes or reduces its uneven effects.
This leads to better local contrast, restored details in shadows and highlights, reduced haze/veil, and more natural-looking colors without globally shifting the overall tone.
In practice, it acts like a sophisticated local tone mapper or dehaze tool. It can:
Cut through atmospheric haze or fog.
Reveal hidden details in backlit or high-dynamic-range scenes.
Improve perceived depth and separation in flat-looking images.
Preserve original colors better than some other contrast-boosting tools (unless you deliberately adjust chroma).
It is not a simple brightness/contrast slider — it works by comparing each pixel to its neighbors across different scales (similar in concept to a Difference of Gaussians).
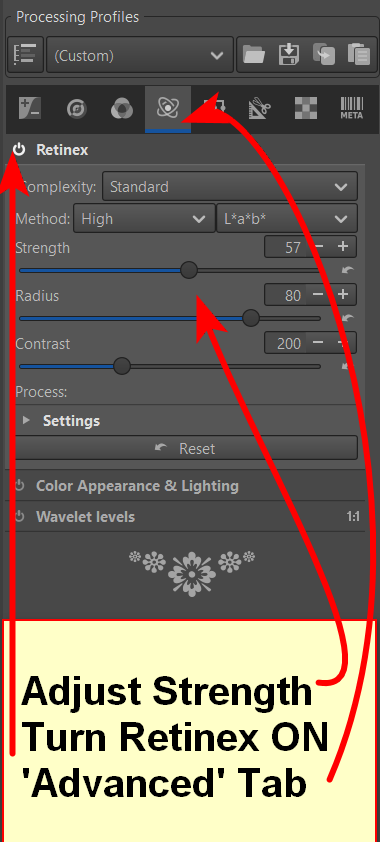
Where to Find Retinex in RawTherapee
Main pipeline — Advanced tab → Retinex (appears early in the processing chain, right after demosaicing).
Local Adjustments (Selective Editing / RT-spots) — Available as Dehaze & Retinex or Soft Light & Original Retinex (with simplified controls in some modes).
There is also a version integrated with Wavelets (in older branches or specific panels) for more complex control.
Common Uses
Dehazing — Especially effective on landscape photos with atmospheric veil (e.g., distant mountains, foggy scenes).
Recovering details in high-contrast or backlit scenes without creating an artificial "HDR look" (when used moderately).
Local contrast enhancement that feels more natural than global curves or simple clarity sliders.
Astronomy or medical-style enhancement (revealing faint structures), though most users apply it to everyday photography.
Key Controls (in the main Retinex tool)
Strength / Gain / Offset — Controls the overall intensity.
Variance / Threshold — Affects how aggressively local differences are enhanced.
Transmission map — Central to the algorithm (represents the estimated haze/illumination layer); you can adjust its curve for finer control.
Chroma slider (in some RawTherapee versions) — Lets you decide whether to affect color saturation along with luminance.
Method options (e.g., normal vs. inverse).
There is also a Local Retinex in selective editing with fewer sliders but applied later in the pipeline.
Tips for Best Results
Start with low-to-moderate strength to avoid halo artifacts or unnatural looks.
Combine with Haze Removal (Detail tab) for stronger dehaze effects.
Use alongside Wavelets (for multi-scale contrast) or Local Adjustments for targeted application.
It works best on RAW files but can be used on JPEG/TIFF too.
Watch for noise amplification in shadows — pair it with good noise reduction.
Retinex vs. Similar Tools in RawTherapee
Haze Removal — Simpler dedicated dehaze.
Tone Equalizer / Log Encoding — More modern tone-mapping approaches.
Wavelets / Local Contrast — Good for detail-level contrast but less "perceptual" than Retinex.
Dynamic Range Compression — More global.

Processed with Retinex. looks washed-out but less haze.
Add Retinex to rid haze

Add saturation, lighten shadows, increase color temperature
In the same ‘Advanced’ tab, you might want to try out “Color Appearance & Lighting”. Adjusting Chroma and Temperature can really enhance and/or recover what Retinex does to the photo.

Hazy mountains

Mountains with just adding Retinex defaults
Just activating Retinex really clears up much of the haze.

Retinex control settings for mountain shot above
There are several other settings that you can play with here, but I generally just adjust the “Strength” slider. Note that there is “Process: Settings” that can be expanded in Retinex for even more control.

Retinex after increasing Strength from 21 to 40
You might have noticed that there are a few undesired artifacts that have been added to the sky in the shot above, which look like faint squares. To fix this, I’d rather send the shot to another editor that has a healing brush. RawTherapee does have a ‘Spot Removal’ feature in the Detail tab, but fixing the sky using that tool would be very tedious. Occasionally, Retinex adds wierd artifacts that are only noticeable in blank skies.

Hazy waterfall
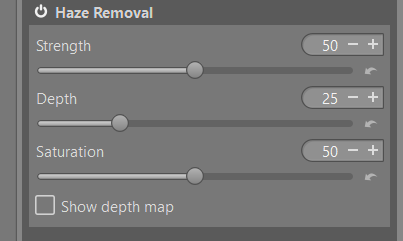
Haze Removal tool with defaults (Detail tab)
For comparison purposes, the “Detail” tab offers “Haze Removal”.

Haze removed using ‘Haze Removal’ tool using defaults

Haze Removal using Strength 75, Depth 69, Saturation 74

'Retinex' tool instead of 'Haze Removal' tool, plus increasing color temperature
Given the right kind of shot that has a lot of haze, Retinex can do a truly amazing job that looks like no other editor “dehaze” tool that I’ve used. I’m willing to put up with having to fix up some shots to get the ‘sky defect’ corrected.
The Retinex tool definitely falls into the category of “niche”, but I think you’ll find that sometimes it can be golden.
Using Topaz Photo AI (or another editor) via RawTherapee
When it becomes necessary to do some extra operations in another editor outside of RawTherapee, there’s a way to make that job easier.
To process the edited photo using Topaz Photo AI, you will first need to configure the use of Topaz:

Click on the ‘Equalizer’ icon to get at ‘Preferences’.
Scroll down the ‘General’ tab to locate ‘External Editor’
Click Change Executable
Browse to TopazPhotoAI.exe, usually located here:
C:\Program Files\TopazLabsLLC\TopazPhotoAI\TopazPhotoAI.exe
Assign a name, such “Topaz”.
If you select Native command, then you can return back to RawTherapee after editing in Topaz.
Click OK to save the assigned external editor.
Finish all desired edits in RawTherapee.

Click the ‘down arrow’ (bottom-left, near the ‘Save current image’ icon for ‘Edit current image in external editor’ and then select the “Topaz” or whatever you named the external editor when ‘Change Executable’ was set up.

When ready, click the icon just to the left of the down-arrow, which should now be assigned to ‘Topaz’ Photo AI editor. You can also use the Ctrl+e shortcut. It should then execute Topaz and send the edited file to that editor.
Export the finished photo, and then exit Topaz.
Return to RawTherapee, if you want to do further editing.
You can use a similar procedure to send a photo from RawTherapee to any other editor.
To save an edited photo as a jpeg from RawTherapee, do this:
Quick Single-Image Save (Recommended for one photo)
Finish editing your image in the Editor tab.
Click the hard disk / Save icon at the bottom-left of the preview area (just below the image). Or press the keyboard shortcut: Ctrl + S (Cmd + S on macOS).
In the Save current image window that appears:
Choose the folder where you want to save the file.
Enter a file name (RawTherapee will automatically add .jpg).
Under File format, select JPEG.
Set the Quality slider — default is usually 92 (very good). Use 95–100 for maximum quality (larger file size). Use 85–90 for smaller files with still-good quality.
Subsampling: Leave at Balanced (or try 4:4:4 for best quality if needed).
Optional: Check Automatically add a suffix if the file already exists (so it becomes photo-1.jpg, etc.).
You can also choose to save the processing profile (.pp3) alongside the JPEG.
Click Save immediately (or OK).
The JPEG will be created right away in the chosen folder. Your original RAW file is never changed.


When researching property investments, I tend to focus on details, but I’ve realized that context matters just as much. Taking the time to view our portfolio helped me step back and see the bigger picture instead of getting lost in specifics. It’s a different way of evaluating options that I hadn’t really considered before. That broader view made my decision-making process feel more thoughtful.
I’ve always thought that working in markets like the UAE requires a different perspective, especially when it comes to digital marketing. The audience, the competition, and even the expectations are not exactly the same as in Europe. While reviewing Rhillane Marketing Agency UAE, I found that the content reflects that reality in a subtle way, without trying to force the message. It felt more natural and less scripted than what I usually read elsewhere. This made me think more about how important it is to adapt strategies rather than simply replicate what works in another country without adjustments.