Using the Nikon HDR Overlay for Raw Photos
The newer Nikon Z cameras offer a way to get high dynamic range shots using ‘HDR Overlay’. The HDR photo is actually made from a pair of shots that are taken in quick succession and then automatically combined in-camera. It’s also possible to save the pair of shots that are used to create the HDR photo, if desired. Even if you’re shooting in raw format, the final HDR shot is saved in jpeg format only. The pair of shots used to create the HDR photo, if you opt to save them, are saved in raw format when you shoot in raw format.
Because there are two shots taken to create the HDR photo, this technique only works for static subjects and you’ll need to use a tripod.

HDR Overlay, assigned to the ‘i’ menu
It’s possible, of course, to use any camera to take a series of photos with different exposures and then combine them using an editor. The HDR Overlay technique, however, makes this really easy and nearly instant.
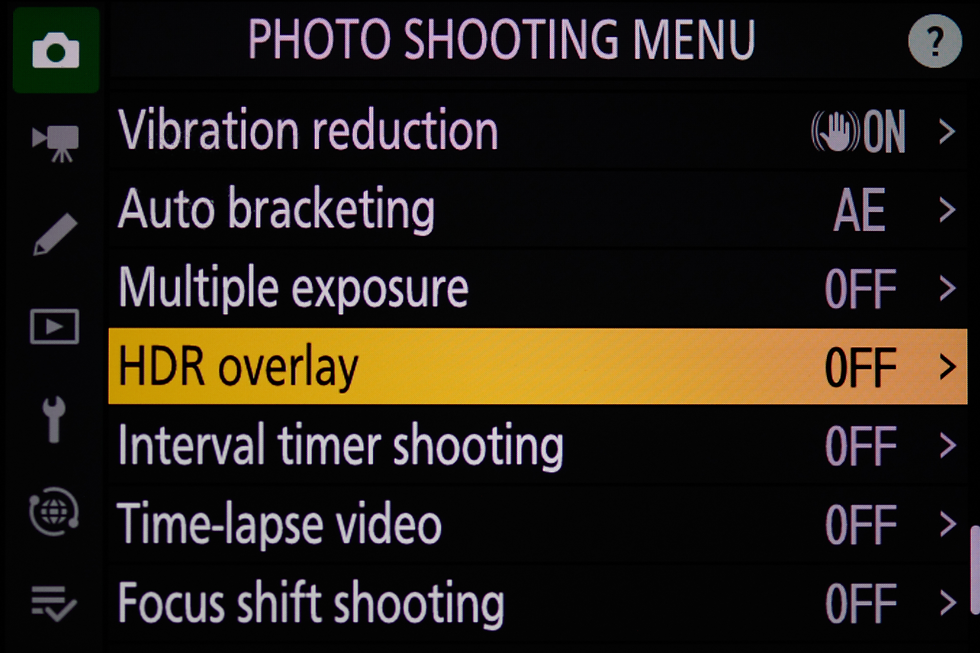
Access HDR Overlay from the Photo Shooting menu
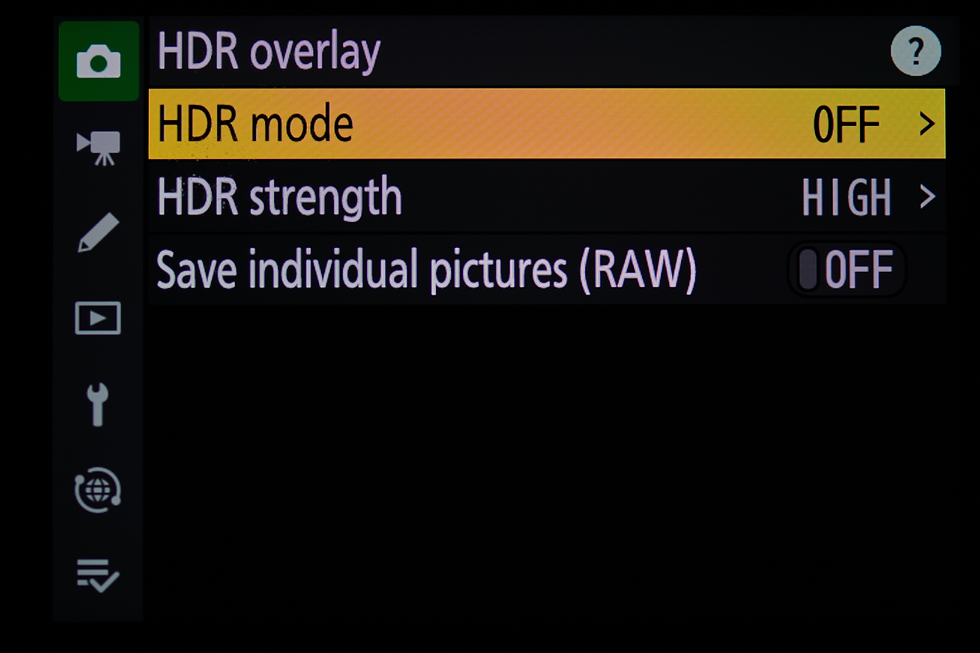
HDR on/off, intensity, and optional saving of shot pair creating the file

HDR mode On/Off, single HDR, or stay in HDR mode
There are options to activate HDR mode and then remain in HDR mode (series) or else immediately exit HDR mode (single photo) after getting the shot.

Assign HDR strength or let the camera choose (Auto)
You might think that it would be optimal to let the camera decide on how strong to make the HDR shot, but I found the ‘Auto’ setting to be nearly useless. I almost always use the ‘High’ setting for the best effect, but your own taste may differ from mine.
For combining the raw shot pair into an HDR shot using an editor, I usually prefer to select the ‘Extra high’ setting. I don’t think the camera-generated jpeg HDR shot using ‘Extra high’ looks very realistic.

No HDR, HDR Auto, and HDR High (left to right)
In the jpeg examples above, the left-hand shot shows how the light areas are blown out and shadows have very little detail. The ‘Auto’ HDR shot looks barely any different from using no HDR at all. The ‘High’ HDR shot has tamed the blown highlights and really brings out shadow detail, too.

Jpeg HDR Extra high vs Capture One HDR DNG from raw shots (right)
The in-camera jpeg HDR ‘Extra High’ setting tends to make that faky HDR look with distorted tones. Taking the same pair of raw-format shots and merging them into HDR using the Capture One editor, I was able to create a DNG-format shot that looks much more realistic. Note that the bright areas aren’t nearly as blown-out, while the shadow areas are more detailed, too.
To get the best quality, I use the option to “Save individual pictures (RAW)”.
I use the HDR jpeg shot that gets created in-camera as just quick feedback. In one of my favorite editors, Capture One, I select the pair of saved raw shots and then choose the feature “Merge to HDR”. I alter highlights, shadows, black level, white level, and exposure in the DNG-format merged HDR shot to get the lighting effect that I want. I can always equal or exceed the visual quality of the in-camera HDR jpeg shot using the Capture One editor, and the HDR result is DNG format instead of jpeg to boot.
If you’re in a hurry, the jpeg HDR shots are totally usable. When you’ve got the time, it’s always best to combine the saved raw-format shots into an HDR shot using a good editor.
Also note that editors such as Capture One are capable of auto-aligning the raw shots while merging them into HDR. This means that you can take the shots hand-held and not need to use a tripod. The in-camera jpeg HDR shot would be ruined without a steady camera, but the raw shots can still be combined without a problem in an editor.
I keep the HDR Overlay assigned to my ‘i’ menu, so that I don’t have to go searching for it inside the menu system. The HDR Overlay feature makes it really quick and easy to get the shot pair needed to later generate quality HDR photos, and the auto-generated jpeg shot looks pretty good as well (if you use a tripod). Most subjects get handled just fine with combining a pair of exposures.
It’s of course possible to just manually take multiple shots at different exposures (like 4 or 5) while using a tripod and combine them using an editor. Many Nikons also have an “Auto bracketing” feature, where you can select “AE” mode (auto-exposure), the number of shots to bracket, and the number of stops of exposure to change between each shot. This is a bit more tedious, and you won’t get any jpeg shot for feedback, either. With these techniques, it’s mandatory to use an editor to combine the shots. You’ll probably have to resort to methods like these for really extreme brightness ranges.

Used Bracketing (5 shots, 2 stops between shots) and Capture One
As shown above, with an extreme brightness range you’ll need more than two shots. The shot above combined 5 shots at -4EV, -2EV, 0EV, +2EV, +4EV beyond normal exposure. This allows the outdoors to get properly exposed along with the indoors. I merged the 5 shots using Capture One.
Remember, the best-looking HDR shots don’t look like they’re HDR. They just look like normal.


Interesting that Nikon’s HDR Overlay combines two quick shots but saves the finished image as JPEG, even when shooting raw. Saving the source pair seems especially useful for experimenting with later—I've been using https://talking-head.online
The HDR Overlay’s two-shot approach is fascinating, especially with the final image limited to JPEG even when shooting raw. I’d love to compare the saved source frames—check out https://meshy-ai.pro
El contenido sobre Magis TV descargar está explicado de manera clara. Para quienes todavía están recopilando información, conocer los requisitos con anticipación puede ser práctico. También conviene verificar la fuente del archivo y confirmar que corresponda al dispositivo.
HDR Overlay sounds useful for high-contrast scenes, especially with the option to preserve the original pair of shots. It’s a shame the combined image is JPEG-only, though. I’ve been using https://viduai.site
The Nikon Z’s HDR Overlay is a fascinating blend of computational science and photo art, though the JPEG-only final file is worth noting for raw shooters. I’ve been using https://docs.google.com/document/d/1gyd6GfO9aufGPpdR6KJ2mA2VwGAmumEcBBopsC2dAL4/view