Topaz DeNoise AI Lens Resolution Enhancement
- Ed Dozier
- Jan 21, 2022
- 5 min read
I thought it would be interesting to see how much sharper Topaz DeNoise AI could make photos appear. I didn’t want to do any hand-waving on this subject, but instead show real measurements to evaluate it.
Since DeNoise AI is able to process raw-format photos directly, I came up with the idea of having DeNoise AI save its sharpening results into another raw-format file. I’m using DeNoise AI version 3.4.2. My (unsharpened) input raw file is from a Nikon D500 (.NEF), and my output raw file is in DNG format. Both of these file formats can be used by the MTFMapper program, which I use to measure lens resolution from special resolution test charts.
An added benefit to this scheme is that it provides a means to actually measure how sharpness changes as the Topaz AI sharpening algorithm input configurations change. This is then an ideal way to know when the input parameters to an AI algorithm are optimized.
Lens resolution is evaluated by measuring how quickly a straight black edge changes into the pure white of its background. Photo sharpening is achieved by reducing the distance it takes to transition subject edges from light-to-dark or dark-to-light, as well.
Normally, web sites that report on lens resolution measurements are using un-sharpened raw-format photos of test charts. Some sites take measurements directly from the lens itself, and bypass the camera sensor. In any case, lens resolution measurements should never be based upon sharpened chart photographs (e.g. jpeg). I’ll show you why this is true in a bit.
I normally use the Topaz DeNoise AI algorithm called “Clear” for my shots with an ISO of 6400 or less. This algorithm works for all of the input camera file formats. I run this artificial intelligence algorithm in “Manual” mode, with input parameters of “Remove Noise”=Medium, “Enhance Sharpness”=Low, “Recover Original Detail”=26, and “Color Noise Reduction”=7. I used to let the algorithm run in “Auto” mode, but I was never pleased with the results.

Topaz DeNoise AI sharpening, “Clear” algorithm
The shot above shows how to convert an un-sharpened raw photo into another raw format (DNG) after applying sharpening and noise removal. The Topaz program has five different AI algorithms to select from, and also provides the option to manually configure the sharpening/noise algorithms.

Topaz DeNoise AI sharpening, “RAW” algorithm
Topaz now has a new algorithm called “RAW” that you can use if you give it a raw-format input file. It’s super-slow to run, but Topaz claims it produces superior results. This is my chance to check the validity of that claim. I am running it in “Auto”, where it chose to use “Remove Noise”=16, “Enhance Sharpness”=46, “Recover Original Detail”=0, and “Color Noise Reduction”=0.
I decided to have a contest between my favorite AI recipe “Clear” and the new “RAW” algorithm. I could then compare these output result files (DNG format) to the resolution of the original raw-format NEF file.
I selected a shot of a resolution test chart using my Sigma 150-600 lens at 300mm f/6.3. Again, this shot was made using my Nikon D500. The ISO was 400, so this is primarily a sharpening contest, versus a noise removal contest. Despite its name, Topaz DeNoise AI is as much a sharpening program as it is a noise-removal program.

Un-sharpened D500 raw (NEF) resolution test
The peak MTF50 resolution in the plot of the un-sharpened test chart shot above is around 57 lp/mm. This is a fairly decent resolution, but can it be improved? Let’s see…

DNG raw file output from Topaz “Clear” algorithm
Wow. The MTF50 resolution measurements more than doubled, up to around 130 lp/mm! Strictly speaking, Topaz Denoise AI can’t manufacture extra resolution out of thin air, but visually it means that photos certainly look much, much sharper. This is why I like my “Clear” algorithm so much, in addition to its ability to get rid of most of the noise from my shots.
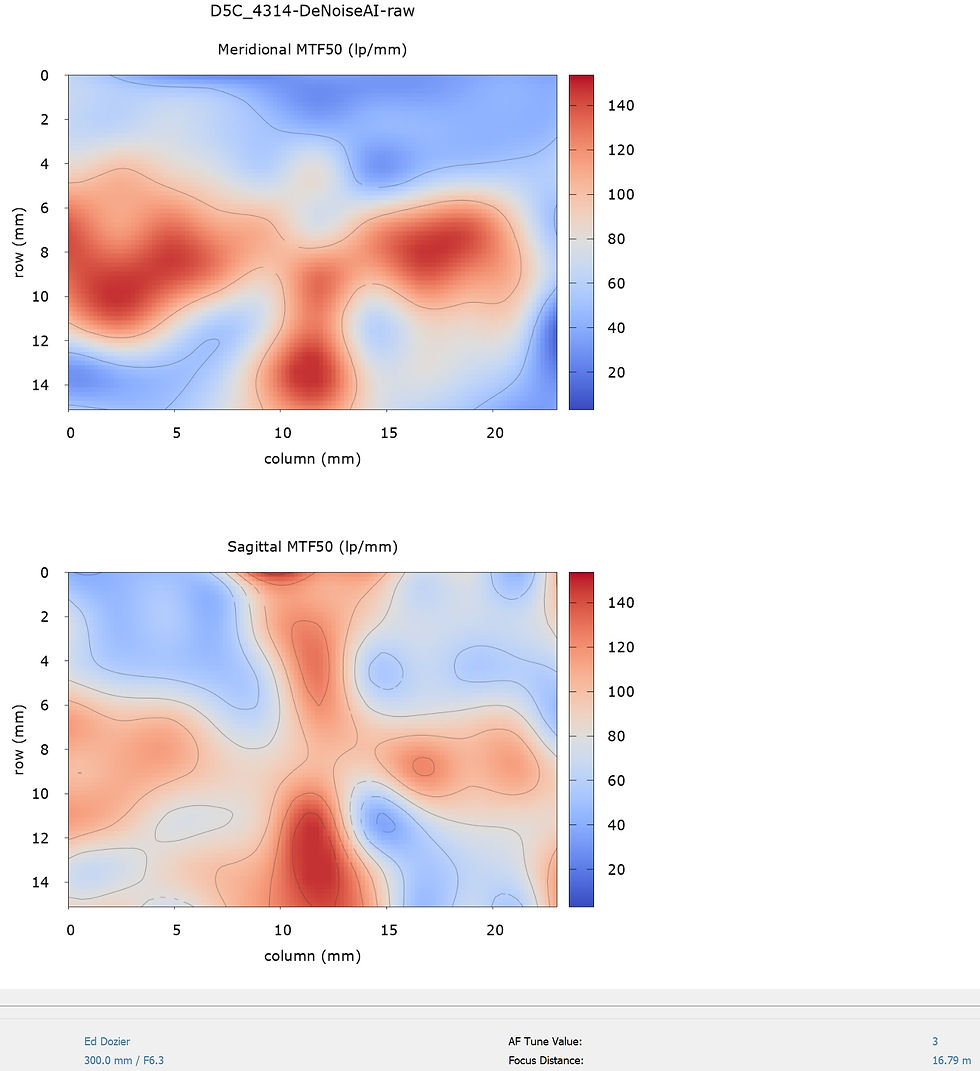
DNG raw file output from Topaz “RAW” algorithm
Now we’re talking. The “RAW” algorithm really did a nice job. Again, I used it with the default “Auto” mode, where it decides how to sharpen and rid the noise on its own. The downside, however, is that the algorithm takes nearly 20 times longer to execute than the “Clear” algorithm. Getting MTF50 resolution numbers of approximately 150 lp/mm is just outrageous, though.

Unsharpened raw (NEF) chart center detail
The shot above shows some of the resolution chart (center) target edge measurements, which are near 57 lp/mm in some spots. This is typical of a “decent”, but not outstanding lens.

Raw (DNG) chart center detail, “Clear” algorithm results
The chart center resolution MTF50 numbers from the “Clear” algorithm shown above are pretty crazy. It doesn’t seem like anything could out-do results like these.

Raw (DNG) chart center detail, “RAW” algorithm results
Lo and behold, the “RAW” algorithm really does get details sharpened up to unbelievably high levels. I have never seen MTF50 numbers like these before. It may be “false detail”, but it looks really, really good. Just as the Topaz people said, the RAW algorithm gives superior results.

Unsharpened raw (NEF) chart corner detail
The unprocessed NEF file gives pretty ho-hum corner results. To be fair, though, MTF50 resolution above 30 lp/mm looks pretty darn good.

Raw (DNG) chart corner detail, “Clear” algorithm results
The “Clear” algorithm corners have jumped to values that go beyond what most lenses look like in their centers. Impressive.

Raw (DNG) chart corner detail, “RAW” algorithm results
Interestingly, the corner results from the “RAW” algorithm aren’t as good as the “Clear” algorithm. They’re still really good, but the “Clear” algorithm beats the “RAW” algorithm here.
AI algorithms work in mysterious ways. Just when you think they have a clear pattern of operation, they’ll surprise you. The same goes for AI-controlled autos; sometimes they have crashed for unknown reasons.

Raw unsharpened NEF file MTF contrast plot

DNG MTF contrast plot from RAW algorithm
The MTF contrast plots show a couple of interesting things. DeNoise AI certainly makes them look better, but the spread of results seems to get larger, too. Those AI algorithms don’t seem to treat every detail or edge in the same way. Some details are improved more than others are, although all details seem to get at least some improvement.

Original NEF without sharpening

“Clear” algorithm

“RAW” algorithm
I processed a very distant plane raw-format photo with both the “Clear” and the “RAW” algorithms. In the original un-sharpened photo, you can’t even perceive many fine details. Both of the processed shots bring out an amazing amount of these “invisible” details. To be honest, I can’t readily tell the difference between the “Clear” and the “RAW” algorithm results; they’re both simply excellent.
It’s amazing to think that the same lens was involved in the three shots shown above. AI sharpening gets shot quality to a whole new level.
Summary
I think you can now see why web site reviewers should never use sharpened test chart photos to evaluate lens resolution. The resolution measurements can be wildly manipulated to make a crummy lens look good.
I do think that resolution-measurement software can be especially useful to evaluate and fine-tune programs like Topaz DeNoise AI. Using a program like MTFMapper, you have the ability to know which AI algorithms work the best, and by how much. You can also fine-tune algorithm input parameters to optimize your results, assuming you’re patient enough to spend the time and energy to do so.
Given the very large difference in processing time between the different AI algorithms, you’ll have to decide if squeezing out a tiny bit of extra sharpness is worth it to you. You should also compare these results to invoking DeNoise AI as a plug-in from your photo editor, which means you won’t have access to the “RAW” algorithm at all.
I have avoided a discussion of photo noise reduction here, since I haven’t yet figured out a good way to “measure” it. It’s easy to note if a photo is less “sandy” looking or has fewer color speckles in it, but it’s a lot trickier to be able to say by “how much”. Also, too much noise reduction inevitably destroys resolution.


Comments