Multi-shot HDR with Nikon DSLRs, Lightroom, and HDR Efex Pro 2
- Ed Dozier
- Oct 24, 2020
- 5 min read
This article details how easy it is to make quality HDR photos using multiple raw shots, Lightroom, and HDR Efex Pro2. Most Nikon DSLRs allow for high-speed, single-shutter-press bracketing. Exposure bracketing, versus single-shot HDR, will greatly expand the range of light that you can record.

Capture a range of light that your own eyes cannot match
I have verified the following procedures on a Nikon D850, D500, D7100, and D610. Chances are that these shooting procedures will work on all of the Nikon enthusiast and pro DSLRs.
A single raw photo can cover at most about 12 stops of exposure range. Theoretically, a 14-bit raw shot can record 14 stops, but today's physical sensors max out at about 12 stops. When you want to go way beyond this restriction, you need multiple shots at different exposures. The last thing you want to have to fuss with is pressing the shutter button over and over to get all of the necessary shots. These cameras let you get the job done with a single shutter button press using the ‘bracket’ feature.
Capture the set of pictures to combine
In order to minimize any subject movement between frames, set the camera on high-speed continuous shooting. Choose Aperture mode, so that the camera will vary the shutter speed between frames.
Set your image capture mode to “raw” (or NEF). Shooting in jpeg format completely defeats the whole concept of capturing a high dynamic range of light.
Set a low ISO value, which will maximize the range of light a single shot can capture. If image motion is a problem, then you’ll need to take more photos at a higher ISO, to help freeze image motion in each frame. The extra photos will compensate for the smaller dynamic range in each shot at the higher ISO.
Press the Bracket button and rotate the rear (main) mode dial to select the number of shots, such as “9F” for 9 frames. Lesser camera models will have fewer options for the number of frames you can bracket.
While still holding the bracket button, rotate the front (sub command) dial and select the exposure value change between shots, such as 1.0 EV.
Note that you can’t have the large number of frames in the bracket sequence if you choose too high of an EV change per shot, so stick to less than 2 EV for 7 or 9 shots.
Set your camera to “Continuous High” shooting, to minimize how long it takes to capture the sequence of shots.
Now, just press and hold down the shutter button to quickly take the whole range of bracketed shots. Your camera will automatically stop after the sequence is finished. If you’re worried about too much subject movement, then take the shots while the camera is mounted on a tripod. You’ll probably be surprised, however, how well both Lightroom and HDR EFEX Pro 2 can hide slight image mis-alignment between each shot.
Remember after you’re all done to change the number of bracket shots back to zero frames (“0F”) to turn off bracketing (via the rear dial and the bracket button). I have forgotten to do this many times, to my chagrin.
How to process the shots entirely inside Lightroom
This procedure shows you how to easily combine your exposure-bracketed shots into a “realistic” HDR rendition. Many photographers actually take offense at the “HDR Look”; I’m not one of those. If your goal is to simply capture a larger range of light similar to what your eyes perceive of the scene, then this procedure is for you. I’m using Lightroom 6, but other versions should have similar procedures.
In the Lightroom Library module, import your shots.
Mouse-click the first shot in the series you want process.
Hold down the ‘shift’ key and click on the last shot in the series.
Select the “Photo | Photo Merge | HDR…” menu options.
Select the desired merge options.
You’ll probably want “Auto Align” and “Deghost Medium”.
Click the “Merge” button.
Wait… then wait some more.

Library module series selection for HDR

Lightroom HDR import options

Lightroom Merge Preview dialog
After the shots are combined, you’ll have a DNG-format HDR photo that you can edit in the Lightroom “Develop” module in the usual way. After you’re happy with it, then export the results to a format like ‘jpeg’.

Finished HDR picture done entirely inside Lightroom
Night photos are especially suitable for HDR processing. You can transform scenes that would be completely drab during the day into something visually exciting at night.
How to process the shots with Lightroom and HDR Efex Pro2
If you like more drama in your HDR shots, then you’ll probably love combining Lightroom with HDR Efex Pro2. Although you can always just process a single shot in HDR Efex Pro2, you will have even more flexibility and light range by processing an exposure-bracketed series of shots instead.
Import the series of shots into Lightroom via “Library” module
Go to the “Develop” module
Mouse-click on the filmstrip first shot in the series
Hold down the shift key, and click the last shot in the series
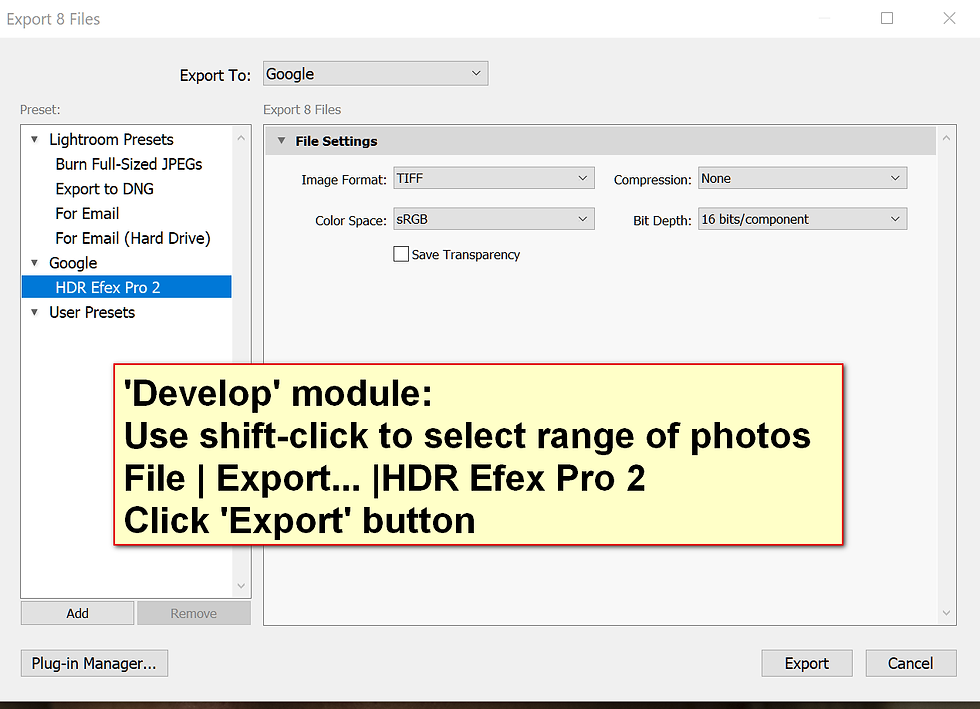
Select File | Export… | HDR Efex Pro 2
Choose your desired options for your (Tiff format) shot
Finally, click the “Export” button.

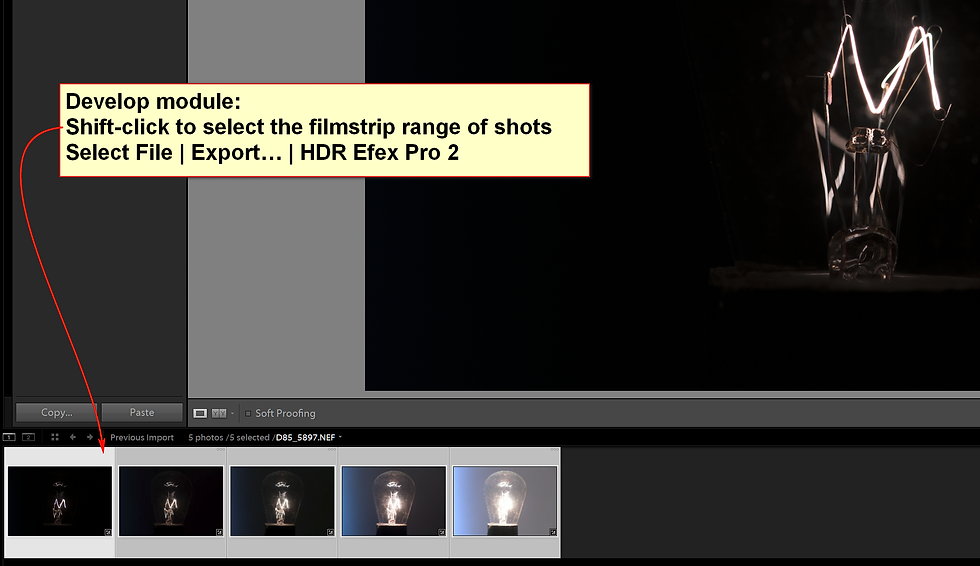
Select your shots in the ‘Develop’ module to export
The screen capture above shows the ‘filmstrip’ selection of 5 shots to export to HDR Efex Pro 2. The shots here are bracketed by 2 stops each. This could mean a dynamic range of up to 20 stops.

Export your shots to HDR Efex Pro 2
After HDR Efex Pro 2 launches, you’ll get a dialog of import options, as shown below.

HDR Efex Pro 2 import options
Just like the Lightroom import options, you’ll probably want to select “Alignment” and “Ghost Reduction”. When you’ve selected your desired options, click “CREATE HDR” to get the combined shot into HDR Efex Pro 2 for the usual HDR editing options. Then have patience, Grasshopper, for the HDR combining to happen.

Finished shot from HDR Efex Pro 2
Multiple shots don’t always work
You’ll find that some subjects don’t work well with a series of shots. Examples that come to mind are ocean waves and campfires. But guess what? You can always just select a single shot from your series to process as HDR instead. Having extra shots doesn’t mean you’re committed to use all of them. Single shot HDR can look better than you might think.
Summary
It’s easier than most people think to quickly capture sequences of bracketed shots for HDR processing. You rarely need a tripod, and it only takes a single shutter button press to get the whole sequence.
If you take a wider exposure range or more shots than you need, you can always delete the extras later. You will mainly pay a price in longer processing time; if you take fewer shots with a larger EV bracket value per shot, your HDR processing time will be drastically reduced.
The quality you get from these bracketing/HDR techniques, especially in landscape shots, is well worth the modest extra effort. This is how you can go well beyond what your own eyes are capable of seeing.


Comments