Using Nik Plug-ins Stand-alone or Inside Nikon Capture NX-D
- Ed Dozier
- Feb 17, 2019
- 5 min read
Updated: Aug 8, 2020
Plugin-ins developed by "Nik", purchased by Google, and presently owned by DxO, are some of my favorite pieces of photo-editing software. Here are a couple of non-standard ways to use the Nik Plug-ins that you probably aren’t aware of. Most people think of plug-ins as being hosted inside applications like Photoshop or Lightroom or maybe Zoner Photo Studio. Did you know that Nikon’s free Capture NX-D can also use them? Did you know that they can also be used without any hosting program at all?
The Nik plug-ins require input files converted into jpeg or (preferably) 16-bit TIF format; they can’t use raw-format files. If you want to use Capture NX-D, you can stick with RAW (NEF) format, and have it automatically convert them into 16-bit TIF as it invokes the plug-ins. If you’re interested in quality results, please skip using either jpeg or 8-bit TIF files. You can always use Capture NX-D to convert the 16-bit TIF results into jpeg as a final step before display. The plug-ins are of course compatible with photos from other camera manufacturers, once they're converted into the neutral TIF format.
Be aware that all of the plug-ins except HDR Efex Pro 2 will overwrite the input TIF file when you save the results via their “Save” button.
Although I’d recommend that you use a plug-in from within the host program (such as Capture NX-D), I’ll also go over the necessary steps if you want to use your plug-ins as stand-alone programs.
Capture NX-D with Plug-ins
Nikon’s Capture NX-D is a somewhat limited, but free program. Because Nikon keeps Capture NX-D current, it knows how to use Raw-format files from its most recent cameras, unlike Capture NX2. Although version 1.5.1 (and beyond) can now support “control points” and a healing brush to increase its power, the plug-ins such as Silver Efex Pro, Viveza 2, Dfine 2, Sharpener Pro 3, and HDR Efex Pro 2 can greatly expand its power.

Register your plug-in first
I am assuming you have already installed your plug-ins. As of this writing, the plug-ins are available from DxO. Prior to DxO, they were offered by Google. Prior to Google, they were offered directly from Nik. Next week, who knows? I wonder if their employees are afraid to unpack their bags. But I digress.
You’ll need to locate where the plug-ins were installed. On my computer, they are installed into folders beneath “C:\Program Files\Google\Nik Collection”.
Before you can start using the plug-ins, you need to register them in Capture NX-D. As shown above, begin with File | Open With | Register…

Add a new plug-in
Highlight “Open With Application”, click “Add…” and then “Other”

Specify where to have the TIF file saved for the plug-in to locate it
Define where you want to have your file saved by Capture NX-D after automatic conversion from NEF into TIF. This TIF file will have all of your edits that have already been made. In this way, Capture NX-D handles converting the RAW file into the format needed by the plug-in, and then calls the plug-in with the passed-in TIF file. Notice the “Conversion Format”, which should be “TIFF (16 bit)” for best quality.
Once again, be aware that the TIF file auto-created by Capture NX-D will be overwritten by the called plug-in when you click the plug-in “Save” button.

Plug-in has been added, but ‘restart’ is needed first
The dialog above shows the successful addition of the plug-in “Viveza 2”. It still isn’t available for use, however. You need to click the “Ok” button in the dialog and then close/open Capture NX-D.

Calling a plug-in after Capture NX-D restart
After Capture NX-D is restarted, the added plug-in is ready for use. Now, after you have completed any edits in your (RAW) file, you can call the plug-in using “File | Open With | Viveza 2” or whatever plug-in you wish. You can also call the plug-in via the “Open With” icon located at the top-right of Capture NX-D. The edited raw file will get auto-converted into TIF and the plug-in will be invoked.

Now you can use the plug-in from within Capture-NX D
You can now use the plug-in as if you’re using Photoshop or Lightroom or whatever application that supports plug-in technology. When you finish, just click “Save”, which will save into the same file as the input file, and it will then close and return you to Capture NX-D.
The rule exception here is when you use HDR Efex Pro 2 and Silver Efex Pro. There are always exceptions. They’re more what you’d call guidelines than actual rules. For those plug-ins, I’d recommend that you avoid the “Save” button, and instead use the top-left option of “File | Save Image As…”. Here, you can specify the output file format of jpeg or tiff, and also browse to where you want the destination to be.
The procedures will need to be repeated for each plug-in to be added to Capture NX-D.
Use your plug-in as a stand-alone program
This discussion applies to all of the plug-ins except HDR Efex Pro 2 and Silver Efex Pro. The general rule for a plug-in is that you can’t specify where to save the results; it will simply overwrite the input file.
For the special case of HDR Efex Pro 2 and Silver Efex Pro, you can tell it where to save the results, and even specify the output file format.

Use drag-drop onto the plug-in executable
For any plug-in, you can just mouse-drag/drop a file (or even a collection of files) onto the plug-in executable. The plug-in will open up, and you can edit and finally hit the “Save” button to save the results and automatically close the plug-in. In the sample picture above, the plug-in name is “Analog Efex Pro 2.exe”.

Multiple files dropped onto plug-in executable
If you drop a collection of files onto the suitable plug-in, then use the “Previous” and “Next” buttons to edit each file in the collection. When ALL edits are complete for all files, hit the
“Save All” button. All files will be saved (overwriting the originals) at once, and the plug-in will automatically close. Notice in the above image that the dialog says “1 of 2 Images”; the plug-in lets you know how many files you dropped onto it.

Run HDR Efex Pro 2 without drag-drop
For the special case of HDR Efex Pro 2 and Silver Efex Pro, just double-click its executable and run it as a stand-alone program. Don’t worry about drag-and-drop for these plug-ins.
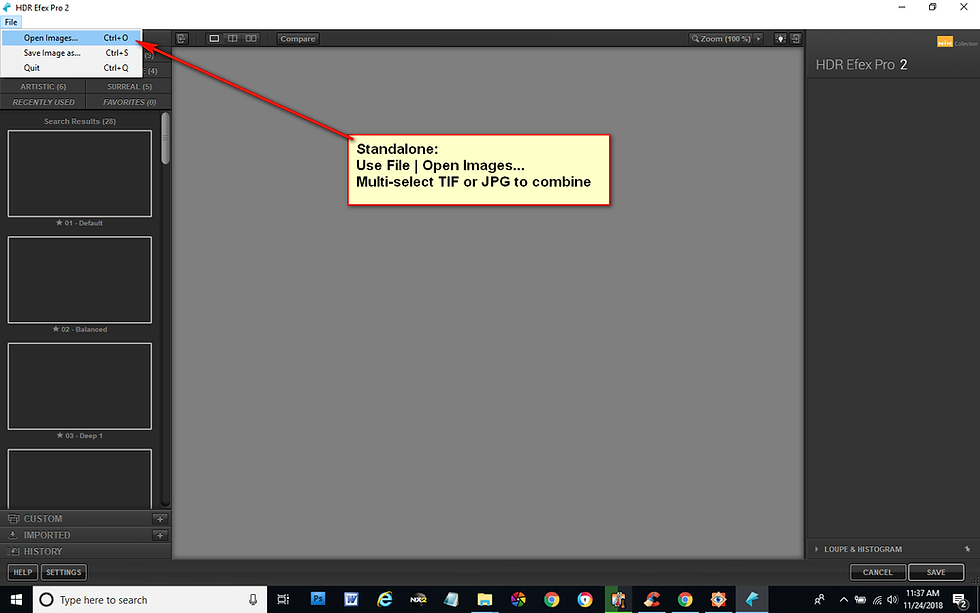
Use the File dialog to manage input and output files
Use the top-left “File | Open Images…” to browse to the source image(s). Select the set of exposure-bracketed files (or a single file) to edit.

The Merge dialog
If you chose more than a single input file for HDR Efex Pro 2, you’ll get the “Merge” dialog, to specify any special input handling.

Use the “File | Save Image as…” when done
After the final edits, use the upper-left “File | Save Image as…” dialog to decide where to save the file, and in what desired image format.
Use the “File | Quit” (or Control-Q) to exit the plug-in.

Incorrect way to save and quit the plug-in
Don’t save and exit the HDR Efex Pro 2 or Silver Efex Pro plug-in by using the “Save” button. This won’t give you the ability to specify the output file image format or where to save the results, either. If you save/exit this way, the output will be placed into the “Documents” folder as 16-bit TIF.
Conclusion
The Nik plug-ins are more generally useful and flexible than most people think. They make a great combination with Capture NX-D, particularly since it’s a bit limited in the editing feature set that it natively offers.
You might want to explore the convenience of being able to use HDR Efex Pro 2 as a stand-alone program for a set of bracketed exposures, as long as you have them pre-converted into 16-bit TIF.


Comments