Monitor Calibration with the Spyder 5 Pro
- Ed Dozier
- Feb 1, 2019
- 5 min read
Updated: Aug 8, 2020
Proper monitor color calibration isn’t as expensive and difficult as many people think. But it does require real hardware to do it. This article shows you how a typical calibration product works.
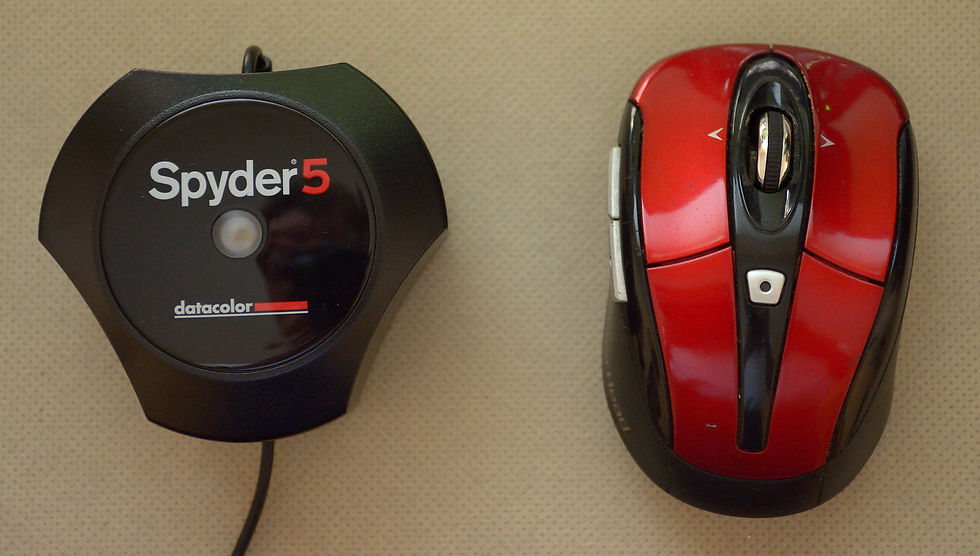
The Spyder and the mouse
This is a shot of the Spyder 5 calibration device in its folded configuration. It’s about the size of a computer mouse. The wire on the Spyder is a USB connection. The little white circle in the middle is a sensor to measure room light conditions.
The idea behind monitor calibration is to measure both ambient room lighting and the colors your monitor(s) makes. The Spyder software will save the required monitor color and brightness adjustments into a file that gets loaded when you start up your computer.
The calibration hardware is separated into two different parts: the ambient lighting sensor and the spectral response sensors. The spectral response sensors measure the red, green, and blue components of your monitor screen. The spectral sensors are hidden inside the device, and you have to pull off its “lens cap” to expose them.
The software will evaluate how bright your monitor is, compared to your room lighting, and guide you in adjusting the monitor brightness to compensate (if your monitor is capable of doing this).
The software will also set different colors on your monitor and then compare them to reference standards. The software will adjust the red, green, and blue levels to match those reference standards. After the correct settings are known, they get saved into files that are used to reprogram the monitor settings each time you restart your computer.

Hanging Spyder
The shot above shows the Spyder hanging from its USB wire connection. It has its lens cap, or “sensor cover” removed (the upper portion). The calibration program draws a target on the monitor being calibrated to indicate where to hang the device during the calibration operation.
Note that you are able to calibrate multiple monitors on your computer; you just have to select which monitor you wish to calibrate. You can also install the software on multiple computers, although the program will request that you input your Spyder license number that you receive when you register your hardware through the web.
You’ll quickly discover that the Spyder program will complain to you about your ambient lighting, unless it’s quite dim. Ambient lighting “pollutes” what you see on your screen, and you’re encouraged to either turn down the lights or use a monitor hood to maintain good quality control over what you see on your screen. The software can try to adjust the screen brightness and contrast to suit your room lighting, but ambient lighting generally degrades your color quality control.
The program suggests that you begin calibration with your monitor set to 6500K if possible, with a gamma of 2.2. You can calibrate against sRGB, AdobeRGB, or NTSC standards. After the calibration is completed, it will let you compare your finished calibration against these calibration standards.
Many monitors are somewhat limited in their brightness capability, especially when competing against bright room lighting. The program will let you ignore this portion of the calibration if your monitor cannot get bright enough or doesn’t even allow brightness adjustments. My own monitors can get to about 200 cd/m^2, which is able to compete against only moderate room lighting. The Spyder software wants room lighting that allows for 120 cd/m^2, which seems a bit dim for my taste.
The software has a “calibration reminder” feature, with a default of 1 month. You should check for calibration drift, and this reminder service makes it easy to keep track of it.
Before performing monitor calibration, you should let your monitor warm up for about a half hour, since cold monitors can exhibit some color and brightness drifting.
Before you perform screen calibration, you’ll need to open up the Spyder and hang it from its USB cable. On a vertical screen, it will probably start sliding down the screen. You can either tilt your monitor back to prevent the Spyder from sliding, or else you can place something on top of the portion of the USB cable that’s laying on your desk that is heavy enough to keep it from moving.
It’s probably better to tilt your monitor back, because you don’t want the sensor to have any ambient light leaks from not laying flat against the screen surface.

The monitor target position indicator
The monitor target location to hang the Spyder is shown above. On a multi-monitor system, this screen should be displayed on the monitor being calibrated.
Before running the calibration, you should un-do any custom settings for the monitor, such as an altered contrast setting.
Also, it is suggested that you use a USB port that’s on your computer; don't use a USB hub, since hubs are notorious for poor USB communications.
There are options for a “full calibration”, “re-calibration”, and a “check calibration” in the program. There are also options for calibrating a laptop versus desktop computer, although if you’re using a laptop docking station with a separate monitor, you should use the “desktop” option.

Display selection for multiple monitors
When you run the Spyder calibration program, it automatically detects multiple monitors. It will display its interface for the screen you select on that monitors’ screen prior to actual calibration.

Mid-calibration screen
The screen above shows one of many calibration screens. Different colors are displayed and then measured against the expected response. After several minutes of different colors and intensities being displayed and measured, the calibration is complete.

Save the calibration measurement results
The screen shot above shows the dialog that gets displayed after all measurements have been taken. The results are saved in a monitor profile name that you can specify. This also where you can specify how often to receive a reminder about monitor calibration verification.

Calibrated versus un-calibrated screen
After calibration, you’re shown a screen that lets you compare the calibrated versus the un-calibrated screen (via the “Switch” button). On my monitors, there was a noticeable difference in skin tones between the calibrated/un-calibrated views.

The calibrated gamut compared to ideal
The “Profile Overview” screen shows how close your monitor comes to the ideal display gamut. This is the last stage of calibration; there’s a button to do more calibrations (“Calibrate Another Display”) if you have a multiple-monitor system.
Conclusion
The Spyder 5 Pro certainly isn’t the most expensive available unit, but it did everything that I could have asked for in monitor calibration. Before calibration, my pair of monitors looked different, but I had no way to know which of the two was “correct”. In the end, I now know that neither monitor was correctly calibrated prior to using the Spyder 5 Pro.


Comments