Search Results
287 results found with an empty search
- Meike 85mm f/1.8 AF SEII Lens Review
Here’s a lens review that I’m excited to present. I have found a lens that really over-performs, given its price. This version of the lens is for the Nikon Z-mount, but Meike also makes it for E (Sony), Leica L, and EF (Canon with RF adapter) mount cameras. I have read that all of these mounts have the same optical design. This is a full-frame lens. Meike 85mm f/1.8 AF SEII lens with hood Minimum focus 0.65m (2.1ft) (22 inches from lens front, measured) STM stepping motor autofocus Aperture range: f/1.8 to f/16 11-blade diaphragm 62mm filter thread 11 elements, 7 groups Length: 100.2mm, Diameter: 76mm Weight: 379 g ( super light) AF/MF focus switch USB-C plug for firmware upgrades Plastic bayonet lens hood, reversible for storage. Weather sealing: only a rubber seal on the lens rear. No lens case included, just a lens cap for the front and rear. Vibration reduction: none. (My mirrorless cameras have IBIS, which means this lens omission is a “don’t care”.) Meike 85mm without bayonet lens hood on Nikon Z8 11-blade diaphragm for great bokeh Lens rear: USB-C plug, rear gold contacts, red weather seal I have had my Nikkor 85mm f/1.4 AF-S G lens for about 13 years, which cost $1800 US (the introduction price was $2,200). This Meike lens beats it in nearly every way, and it costs about $230 US. Almost 10X cheaper than the Nikkor at introduction!! I have found that my Meike 85mm seems closer to 88mm in focal length. My Nikkor 85mm is definitely a bit wider than this Meike lens. This lens feels almost like you don’t even have a lens mounted, because it’s so light. Carry it all day long, and hardly even notice it. It’s probably unwise to use this lens out in the rain. I think that the only weather sealing is at the rear mount of the lens. 85mm f/1.8 1/20,000s ISO 250 Transmission The actual light transmission of a lens is usually different from the stated speed of a lens. For example, my Nikkor 85mm f/1.4 lens is actually a “T1.6” lens, or 1/3 stop dimmer than advertised. Using this Nikkor lens as a reference, I found that in the photograph shown above, the Meike lens shutter was 1/20,000s, while my Nikkor 85mm f/1.4 lens shot at f/1.8 needed a shutter speed of 1/16,000s for the same shot at the same ISO. This would indicate that the Meike 85mm lens transmits about 1/3-stop more light than the Nikkor did, making the Meike close to a true “T1.8” lens. Bokeh In the past, I avoided considering f/1.8 lenses if the f/1.4 equivalent lens was available. After doing comparison tests, I have found that it’s nearly impossible to tell the difference between f/1.4 shots and f/1.8 shots in most conditions. Bokeh looks nearly the same, and the depth of focus is extremely similar. I’m no longer quite so smug about the f/1.4 lenses. The bokeh seems a bit nicer than my Nikkor 85mm lens at equivalent apertures. Due to the extremely small loCA aberration, there’s no purple/green coloration on out-of-focus highlights (especially compared to the Nikkor lens). 85mm f/1.8 1/5,000s ISO 100 (cropped image) Even at f/1.8, this lens is sharp. Stop the lens down for focus depth adjustment, but don’t worry about sharpness at any aperture. Freezing a humming bird’s wings isn’t easy, but f/1.8 helps with being able to use fast shutter speeds. 85mm f/1.8 1/400s ISO 560 Minimum focus 0.65m (26in) f/1.8 Focus Minimum focus is specified to be 0.65meters, or 26 inches. I physically measured minimum focus to have the lens front at 0.56m (22 inches) from the subject. I timed focus, and it took 0.416 seconds to focus from 0.8m (33in) to infinity. Much faster than my Nikkor 85mm lens, which took 0.575 seconds over the same focus range. This is in bright light. I noticed that the Meike autofocus is slightly inaccurate, and it depends upon which direction focus is changing from. You may never notice this inaccuracy, especially if you stop down from maximum aperture. My focus measurement software is really picky, and it consistently shows tiny focus errors that correlate to which direction the lens is focusing from. Manual focus is going to cause people to either love it or hate it. It takes multiple rotations of the focus ring to focus throughout its entire range. This means that you can really fine-tune focus. For speed, stick with autofocus. Vignetting Uncorrected vignetting: noticeable The shot above was done at f/1.8, and you can definitely see vignetting. It’s super easy to fix it using an editor, if it bothers you. The little blue numbers in the chart above are the MTF50 resolution measurements at each black trapezoid edge, measured in line pairs per millimeter. Distortion I look at the edges of my resolution chart for any distortion. I didn’t notice any. Resolution Here’s where this lens really shines. Incredible numbers, given what this lens cost. It smokes my Nikkor 85mm f/1.4 AF-S G lens for sharpness. MTF 50 resolution at f/1.8 (left), f/2.0, f/2.8 (right) Peak center resolution at f/1.8 was 64.8 lp/mm. Best edge was 50.3 lp/mm, and best corner was 36.8 lp/mm. Peak center resolution at f/2.0 was 69.3 lp/mm. Peak center resolution at f/2.8 was 73.8 lp/mm. MTF 50 resolution at f/4.0 (left), f/5.6, f/8.0 (right) Peak center resolution at f/4.0 was 78.2 lp/mm. Peak center resolution at f/5.6 was 75.9 lp/mm. Peak center resolution at f/8.0 was 67.3 lp/mm. MTF 50 resolution at f/11.0 (left), f/16.0 (right) Peak center resolution at f/11.0 was 56.8 lp/mm. Peak center resolution at f/16.0 was 44.5 lp/mm. These numbers are crazy good. I’ll never know if Meike has consistent manufacturing control, or did I just get an amazing anomaly? Lateral Chromatic Aberration (CA) Lateral chromatic aberration (CA) f/1.8, f/2.0, f/2.8 Lateral chromatic aberration (CA) f/4.0, f/5.6, f/8.0 Lateral chromatic aberration (CA) f/11.0, f/16.0 These are some of the lowest amounts of lateral chromatic aberration that I’ve seen in a lens. The camera used here (Nikon Z8) has 4.35 micron pixels, and you basically cannot see CA unless the measurements exceed a pixel in size. This kind of lens defect shows up most clearly as a purple color around tree branches against the sky in the photograph corners. Longitudinal Chromatic Aberration (LoCA) LoCA for Red (left), Green, and Blue (right), f/1.8 The focus-shift along the lens axis for the red, green, and blue light rays is called “longitudinal chromatic aberration” (LoCA). If the focus shift is the same for each color, then there is no LoCA. The red distance from the chart center is 1.2mm nearer. The green distance is 4.8mm nearer. The blue measurement is 4.0mm in nearer. The measurements here are quite astounding for a fast lens. Usually, I see measurement differences in the tens of millimeters between the R,G,B channels. This means you don’t see the green fringe behind and the red/purple fringe in front of a neutral-colored subject. Most photo editors don’t handle LoCA correction very well, if at all. Infrared It depends; there’s a slight hot-spot in the middle of the frame with long-wave IR. Not terrible, but definitely there. It gets worse as you stop down. I tested it with an 850nm filter. 850nm infrared, f/1.8 1.3 seconds ISO 8000 (in wind) Note the light circle in the sky behind the palm. In a pinch, you can use an editor to make it look acceptable. Smaller apertures make the problem much worse. 720nm IR filter works okay. f/5.6 1/30s ISO 8000 For shorter-wavelength IR, the lens seems to work just fine, at any aperture. Flare The lens coatings are pretty good. No fluorine coating, but that would probably drive up the lens cost. 85mm f/16 1/1000s ISO 250 Resistance to lens flare is pretty decent. Leave the lens hood on anyway; it protects the lens front. Spherical Aberration Tons. Every high-speed lens I have ever tested shows this same defect. Focus definitely shifts as you change the aperture on this lens. My Nikon mirrorless cameras (Z8, Z9) focus at the shooting aperture. This then eliminates any missed focus problems due to spherical aberration. Many cameras only focus with the lens aperture wide-open, which is a huge problem when using lenses with spherical aberration. I test this lens issue by only setting focus once at the widest aperture. I then take pictures of my focus chart at each aperture without re-focusing. The MTFMapper program lets me analyze the focus chart choosing either the red, green, or blue sensor pixels. The shots below are measured using the green pixels. Focus position at f/1.8, f/2.0, f/2.8 Focus position at f/4.0, f/5.6, f/8.0 The focus position at the various apertures tested shifted between +6.2mm to -12.9mm, just by changing the aperture. The camera was 1.16m (46 inches) from the focus chart. Lens Firmware Updates The USB-C plug in the back of the lens is used to update the lens firmware, via the Meike website . This is a lot nicer than having to purchase a separate docking station for lens updates. Meike 85mm at f/4.0 1/2500s, ISO 250 Summary Get this lens. I don’t think you can find a better price/performance ratio than this. I don’t get any money from Meike, so I don’t get any kickbacks if you buy their lenses or not. In the future, I'm going to pay a lot more attention to Meike lens offerings.
- All Website Articles Reference, Rev. 4
Photoartfromscience.com The following is a list of all articles published at this website since its beginning. This list should make it easier to locate articles of interest. The “search” widget provided by my website provider is pretty lame, in my opinion. I think that a simple list of all article titles and their links will make it much easier to locate website content of interest. Most browsers should let you use “Control-F” within this article to find specific text. The article list below is sorted by oldest first. The bottom of this website’s home page has a horizontal list of numbers to let you step through the article links sorted from newest to oldest. Options are good. 9-3-2015 Sigma 150-600 f/5-6.3 DG OS HSM C Review https://www.photoartfromscience.com/single-post/2015-9-3-sigma-150600-f563-dg-os-hsm-c-review 9-4-2015 Nikkor 85mm f/1.4 AF-S Review https://www.photoartfromscience.com/single-post/2015-9-4-nikkor-85mm-f14-afs 9-4-2015 MTF Mapper Cliffs Notes https://www.photoartfromscience.com/single-post/2015-9-5-mtf-mapper-cliffs-notes 9-5-2015 Sigma Optimization Pro Review https://www.photoartfromscience.com/single-post/2015/09/05/sigma-optimization-pro-review 9-5-2015 Using the Exif Tool Program https://www.photoartfromscience.com/single-post/2015/09/05/using-the-exiftool-program 9-5-2015 Use “FP” Mode with your Nikon Flash https://www.photoartfromscience.com/single-post/2015/09/05/use-fp-mode-with-your-nikon-flash 12-11-2015 Camera Upgrade Resolution Expectations https://www.photoartfromscience.com/single-post/2015/12/12/camera-upgrade-resolution-expectations 12-13-2015 Micro Nikkor 60mm AF-D Review https://www.photoartfromscience.com/single-post/2015/12/13/micro-nikkor-60mm-afd-review 12-18-2015 Turn off VR with high shutter speeds? https://www.photoartfromscience.com/single-post/2015/12/19/turn-off-vr-with-high-shutter-speeds 12-27-2015 Use your phone for a camera remote https://www.photoartfromscience.com/single-post/2015/12/28/use-your-phone-for-a-camera-remote 12-31-2015 Manual Exposure with External Flash https://www.photoartfromscience.com/single-post/2015/12/31/manual-exposure-with-external-flash 1-9-2016 Nikkor 18-140 f/3.5-5.6 ED VR Review https://www.photoartfromscience.com/single-post/2016-1-9-nikkor-18140-f3556g-ed-vr-review 1-13-2016 Nikkor AF-S Micro 105mm f/2.8G Review https://www.photoartfromscience.com/single-post/2016-1-13-nikkor-afs-micro-105-mm-f28g-review 1-23-2016 Nikkor 35mm f/1.8 AF-S G DX Review https://www.photoartfromscience.com/single-post/2016-1-23-nikkor-35mm-f18-afs-g-dx-review 1-28-2016 Tokina 11-16mm f/2.8 AT-X116 Pro DX Review https://www.photoartfromscience.com/single-post/2016-1-28-tokina-1116mm-f28-atx116-pro-dx 2-6-2016 Rokinon Aspherical IF MC 8mm f/3.5 Fisheye Review https://www.photoartfromscience.com/single-post/2016/02/06/rokinon-aspherical-if-mc-8mm-f35-fisheye 2-29-2016 Nikkor 50mm f/1.8 AF-D FX Review https://www.photoartfromscience.com/single-post/2016/02/29/nikkor-50mm-f18-afd-fx-review 3-9-2016 Does Focus Calibration Make a Difference? https://www.photoartfromscience.com/single-post/2016/03/09/does-focus-calibration-make-a-difference 3-26-2016 Nikkor 55-200 f/4.0-5.6G ED IF AF-S DX VR Review https://www.photoartfromscience.com/single-post/2016/03/26/nikkor-55200-f4056g-ed-if-afs-dx-vr-review 3-29-2016 Nikkor 18-55 f/3.5-5.6G AF-S VR DX Review https://www.photoartfromscience.com/single-post/2016/03/29/nikkor-1855-f3556g-afs-vr-dx-review 4-5-2015 Micro-Nikkor 55mm f/3.5 Review https://www.photoartfromscience.com/single-post/2016/04/05/micronikkor-55mm-f35-review 4-6-2016 Nikkor-PC 105mm f/2.5 Review https://www.photoartfromscience.com/single-post/2016/04/06/nikkorp-c-105mm-f25-review 4-22-2016 Why is My Full-Frame Worse Than My APS-C MTF50 Measurement? https://www.photoartfromscience.com/single-post/2016/04/22/why-is-my-fullframe-worse-than-my-apsc-mtf50-measurement 4-24-2016 Lens Centering Tests https://www.photoartfromscience.com/single-post/2016/04/24/lens-centering-tests 5-21-2016 Use the Nikkor 35mm f/1.8 AF-S DX Lens on FX? https://www.photoartfromscience.com/single-post/2016/05/21/use-nikkor-35mm-f18-afs-dx-lens-on-fx 5-24-2016 Using the Tokina 11-16mm f/2.8 DX Lens on an FX Camera https://www.photoartfromscience.com/single-post/2016/05/24/using-the-tokina-1116mm-f28-dx-lens-on-an-fx-camera 6-12-2016 When is Manual Mode Not Manual? https://www.photoartfromscience.com/single-post/2016/06/12/when-is-manual-mode-not-manual 6-26-2016 D610 VS D7100 VS D7000 Infrared Comparisons https://www.photoartfromscience.com/single-post/2016/06/26/d610-vs-d7100-vs-d7000-infrared-comparisons 7-12-2016 Nikkor 24-70 f/2.8 AF-S E ED VR Review https://www.photoartfromscience.com/single-post/2016/07/12/nikkor-2470mm-f28-afs-e-ed-vr-review 7-22-2016 Nikkor 20mm f/4.0 AI Review https://www.photoartfromscience.com/single-post/2016/07/22/nikkor-20mm-f40-ai-review 8-9-2016 Measure Axial Chromatic Aberration: MTF Mapper Part Deux https://www.photoartfromscience.com/single-post/2016/08/09/measure-axial-chromatic-aberration-mtf-mapper-part-deux 8-21-2016 Sigma 150-600mm Contemporary Lens Firmware Updates https://www.photoartfromscience.com/single-post/2016/08/21/sigma-150-600mm-contemporary-lens-firmware-updates 9-3-2016 Sigma 150-600 Contemporary OS Anti-Vibration Algorithm Comparison https://www.photoartfromscience.com/single-post/2016/09/03/sigma-150-600-contemporary-os-anti-vibration-algorithm-comparison 9-25-2016 The Fallacy of Spray and Pray https://www.photoartfromscience.com/single-post/2016/09/25/the-fallacy-of-spray-and-pray 10-12-2016 MTF Mapper Version 0.5.8 Updates Discussion https://www.photoartfromscience.com/single-post/2016/10/12/mtf-mapper-version-058 11-19-2016 MTF Curves: Theoretical Versus Actual https://www.photoartfromscience.com/single-post/2016/11/19/mtf-curves-theoretical-versus-actual 11-21-2016 Focus Stacking With Combine ZM https://www.photoartfromscience.com/single-post/2016/11/21/focus-stacking-with-combine-zm 12-19-2016 Clean Your Camera Image Sensor Video https://www.photoartfromscience.com/single-post/2016/12/19/clean-your-camera-image-sensor 1-21-2017 The Orton Effect https://www.photoartfromscience.com/single-post/2017/01/21/the-orton-effect 2-12-2017 White Balance Calibration When Colors Go Haywire https://www.photoartfromscience.com/single-post/2017/02/12/white-balance-calibration-when-colors-go-haywire 2-17-2017 Lens Focus Repeatability and Calibration https://www.photoartfromscience.com/single-post/2017/02/17/lens-focus-repeatablity-and-calibration 3-6-2017 “Safe” Storage of Camera Gear https://www.photoartfromscience.com/single-post/2017/03/06/-safe-storage-of-camera-gear 3-16-2017 Test Your Secure Digital Card: Lame and Lamer https://www.photoartfromscience.com/single-post/2017/03/16/test-your-secure-digital-card-lame-and-lamer 3-26-2017 Photo Noise Reduction: Nik Define 2.0 https://www.photoartfromscience.com/single-post/2017/03/26/photo-noise-reduction-nik-dfine-20 4-8-2017 SnapBridge and D500 Remote Control https://www.photoartfromscience.com/single-post/2017/04/08/snapbridge-and-d500-remote-control 4-13-2017 How Bright Is Your Camera Viewfinder? https://www.photoartfromscience.com/single-post/2017/04/13/how-bright-is-your-camera-viewfinder 4-21-2017 Infrared Photography and the Nikon D500 https://www.photoartfromscience.com/single-post/2017/04/21/infrared-photography-and-the-nikon-d500 4-29-2017 Does the D500 Automatic Focus Fine-Tune Calibration Work? https://www.photoartfromscience.com/single-post/2017/04/29/does-the-d500-automatic-focus-fine-tune-calibration-work 5-11-2017 Do Long Lenses Not Like Filters? https://www.photoartfromscience.com/single-post/2017/05/11/do-long-lenses-not-like-filters 5-24-2017 Focus-Stacking: Camera Hardware Suggestions https://www.photoartfromscience.com/single-post/2017/05/24/focus-stacking-camera-hardware-suggestions 6-10-2017 Convert Your Fisheye Lens into a Regular Superwide https://www.photoartfromscience.com/single-post/2017/06/10/convert-your-fisheye-lens-into-a-regular-superwide 6-20-2017 Keep Using Capture NX2 with Raw Format https://www.photoartfromscience.com/single-post/2017/06/20/keep-using-capture-nx2-with-raw-format 7-5-2017 Make Manual Exposure Automatic https://www.photoartfromscience.com/single-post/2017/07/05/make-manual-exposure-automatic 7-15-2017 Using MTF Mapper 0.6.3 New Features https://www.photoartfromscience.com/single-post/2017/07/15/using-mtf-mapper-063-new-features 7-27-2017 A Better Way to Test Fisheye Lens Resolution https://www.photoartfromscience.com/single-post/2017/07/27/a-better-way-to-test-fisheye-lens-resolution 8-7-2017 Yet Another MTF Explanation Article https://www.photoartfromscience.com/single-post/2017/08/07/yet-another-mtf-explanation-article 8-18-2017 Nikon D500 Focus Bug https://www.photoartfromscience.com/single-post/2017/08/18/nikon-d500-focus-bug 8-25-2017 UniWB and ETTR: the Whole Recipe https://www.photoartfromscience.com/single-post/2017/08/25/uniwb-and-ettr-the-whole-recipe 8-31-2017 How to Make a Crowd Disappear in Broad Daylight https://www.photoartfromscience.com/single-post/2017/08/31/how-to-make-a-crowd-disappear-in-broad-daylight 9-9-2017 How to Correct an LED “White” Light Source https://www.photoartfromscience.com/single-post/2017/09/09/how-to-correct-an-led-white-light-source 9-21-2017 White Balance for Infrared Photography https://www.photoartfromscience.com/single-post/2017/09/21/white-balance-for-infrared-photography 10-2-2017 Nikon D500 Focus Point Map Decoded https://www.photoartfromscience.com/single-post/2017/10/02/nikon-d500-focus-point-map-decoded 10-16-2017 MTF Contrast Plots: How Useful are They? https://www.photoartfromscience.com/single-post/2017/10/16/mtf-contrast-plots-how-useful-are-they 10-22-2017 D500 Electronic Front-Curtain Shutter Analysis https://www.photoartfromscience.com/single-post/2017/10/22/d500-electronic-front-curtain-shutter-analysis 11-5-2017 Sharper Moon Shots with AutoStakkert https://www.photoartfromscience.com/single-post/2017/11/05/sharper-moon-shots-with-autostakkert 11-16-2017 Stack Star Shots with CombineZP https://www.photoartfromscience.com/single-post/2017/11/16/stack-star-shots-with-combinezp 11-24-2017 Nikkor 300mm f/4.5 pre-AI Review: A Blast From the Past https://www.photoartfromscience.com/single-post/2017/11/24/nikkor-300mm-f45-pre-ai-review-a-blast-from-the-past 12-16-2017 Reverse that Lens for Extreme Close-ups https://www.photoartfromscience.com/single-post/2017/12/16/reverse-that-lens-for-extreme-close-ups 12-26-2017 Panoramas Using Raw Format with Lightroom and HDR Efex Pro 2 https://www.photoartfromscience.com/single-post/2017/12/26/panoramas-using-raw-format-with-lightroom-and-hdr-efex-pro-2 1-15-2018 The Brenzier Method: Thin Depth of Focus https://www.photoartfromscience.com/single-post/2018/01/15/the-brenzier-method-thin-depth-of-focus 2-3-2018 Create Your Own Planet https://www.photoartfromscience.com/single-post/2018/02/03/create-your-own-planet 2-17-2018 Nikon D500: Multiple Buttons, Multiple Focus Modes https://www.photoartfromscience.com/single-post/2018/02/17/nikon-d500-multiple-buttons-multiple-focus-modes 3-2-2018 High-speed Lens Focus Shift Explained https://www.photoartfromscience.com/single-post/2018/03/02/high-speed-lens-focus-shift-explained 3-16-2018 Coolpix B500 40X Super-Zoom Camera and Lens Review https://www.photoartfromscience.com/single-post/2018/03/16/coolpix-b500-40x-super-zoom-camera-and-lens-review 3-29-2018 Remote Camera Control Using digiCamControl https://www.photoartfromscience.com/single-post/2018/03/29/remote-camera-control-using-digicamcontrol 4-13-2018 How to Measure Lens Vignetting https://www.photoartfromscience.com/single-post/2018/04/13/how-to-measure-lens-vignetting 4-28-2018 Keeping up with MTFMapper: any MTF you Want https://www.photoartfromscience.com/single-post/2018/04/28/keeping-up-with-mtfmapper-any-mtf-you-want 5-11-2018 Portrait Retouching Using Maks https://www.photoartfromscience.com/single-post/2018/05/11/portrait-retouching-using-masks 5-29-2018 The History of MTF50 Resolution Measurment https://www.photoartfromscience.com/single-post/2018/05/29/the-history-of-mtf50-resolution-measurement 6-15-2018 Fake Focus Peak on Select Nikon Cameras https://www.photoartfromscience.com/single-post/2018/06/15/fake-focus-peak-on-select-nikon-cameras 6-29-2018 Reflex-Nikkor C 500mm f/8 Review https://www.photoartfromscience.com/single-post/2018/06/29/reflex-nikkor-c-500mm-f8-review 7-14-2018 Longer Wavelength Infrared Photography Using 850mn Filters https://www.photoartfromscience.com/single-post/2018/07/14/longer-wavelength-infrared-photography-using-850nm-filters 7-27-2018 Simulate an Expensive Big Telephoto https://www.photoartfromscience.com/single-post/2018/07/27/simulate-an-expensive-big-telephoto 8-10-2018 Camera Infrared Filter Resolution and Focus Shift Testing https://www.photoartfromscience.com/single-post/2018/08/10/camera-infrared-filter-resolution-and-focus-shift-testing 8-18-2017 Infrared Filter Comparisons: Hoya, BCI, Neewer, Zomei https://www.photoartfromscience.com/single-post/2018/08/18/infrared-filter-comparisons-hoya-bci-neewer-zomei 9-3-2018 Tamron AF 24-70 f/3.3-5.6 Aspherical Review https://www.photoartfromscience.com/single-post/2018/09/03/tamron-af-24-70mm-f33-56-aspherical-review 9-15-2018 The Darktable Photo Editor, Part 1: Overview https://www.photoartfromscience.com/single-post/2018/09/15/the-darktable-photo-editor-part-1-overview 9-28-2018 The Darktable Photo Editor, Part 2: Image Masking https://www.photoartfromscience.com/single-post/2018/09/28/the-darktable-photo-editor-part-2-image-masking 10-11-2018 The Darktable Photo Editor, Part 3: Tethered Shooting in Windows 10 https://www.photoartfromscience.com/single-post/2018/10/11/the-darktable-photo-editor-part-3-tethered-shooting-in-windows-10 10-26-2018 Lightroom Masking https://www.photoartfromscience.com/single-post/2018/10/26/lightroom-masking 11-8-2018 Test Lens Coma Yourself https://www.photoartfromscience.com/single-post/2018/11/08/test-lens-coma-yourself 11-14-2018 Nikon Z Camera Lens DesignBrilliance https://www.photoartfromscience.com/single-post/2018/11/14/nikon-z-camera-lens-design-brilliance 11-18-2018 Sigma 150-600 Firmware Update 1.02 for Nikon D500 https://www.photoartfromscience.com/single-post/2018/11/18/sigma-150-600-firmware-update-102-for-nikon-d500 11-28-2018 Fixing the D500 “Live View” AF-ON Button Failure https://www.photoartfromscience.com/single-post/2018/11/28/fixing-the-d500-live-view-dead-af-on-button 12-9-2018 Find the Maximum Shutter Speed for Vibration Reduction https://www.photoartfromscience.com/single-post/2018/12/09/find-the-maximum-shutter-speed-for-vibration-reduction 12-21-2018 Using and LCD Viewfinder on your DSLR https://www.photoartfromscience.com/single-post/2018/12/21/using-an-lcd-viewfinder-on-your-dslr 1-2-2019 Sigma 14-24mm f/2.8 DG HSM Art Review https://www.photoartfromscience.com/single-post/2019/01/02/sigma-14-24mm-f28-dg-hsm-art-review 1-18-2019 Create a 3-D Anaglyph with Zoner Photo Studio https://www.photoartfromscience.com/single-post/2019/01/18/create-a-3-d-anaglyph-with-zoner-photo-studio 2-1-2019 Monitor Calibration with the Spyder 5 Pro https://www.photoartfromscience.com/single-post/2019/02/01/monitor-calibration-with-the-spyder-5-pro 2-17-2019 Using Nik Plug-ins Stand-alone or Inside Nikon Capture NX-D https://www.photoartfromscience.com/single-post/2019/02/17/use-nik-plug-ins-stand-alone-or-inside-capture-nx-d 3-5-2019 How to Test Your Lens for Focus Shift https://www.photoartfromscience.com/single-post/2019/03/05/how-to-test-your-lens-for-focus-shift 3-19-2019 How to Align a Lens Resolution Target https://www.photoartfromscience.com/single-post/2019/03/19/how-to-align-a-lens-resolution-target 4-2-2019 Free ‘Dehaze’ for Lightroom 6.1 or Newer https://www.photoartfromscience.com/single-post/2019/04/02/free-dehaze-for-lightroom-61-or-newer 4-17-2019 DSLR Focus Calibration in Record Time https://www.photoartfromscience.com/single-post/2019/04/17/dslr-focus-calibration-in-record-time 4-30-2019 Make a Flash Diffuser for Free https://www.photoartfromscience.com/single-post/2019/04/30/make-a-flash-diffuser-for-free 5-19-2019 Sigma Lens Focus Algorithm Comparison https://www.photoartfromscience.com/single-post/2019/05/19/sigma-lens-focus-algorithm-comparison 6-4-2019 Lightroom Radial Filter: The Spotlight https://www.photoartfromscience.com/single-post/2019/06/04/lightroom-radial-filter-the-spotlight 6-18-2019 How Lens Optical Stabilization Works https://www.photoartfromscience.com/single-post/2019/06/18/how-lens-optical-stabilization-works 7-10-2019 F-stop Fun Facts https://www.photoartfromscience.com/single-post/2019/07/10/f-stop-fun-facts 7-27-2019 Nikon Custom Settings Banks versus Photo Shooting Banks https://www.photoartfromscience.com/single-post/2019/07/27/nikon-custom-settings-banks-versus-photo-shooting-banks 8-10-2019 Sigma 70-200mm f/2.8 DG OS HSM Sport Review https://www.photoartfromscience.com/single-post/2019/08/10/sigma-70-200mm-f28-dg-os-hsm-sport-review 8-24-2019 Sigma TC-1401 1.4X Teleconverter Review https://www.photoartfromscience.com/single-post/2019/08/24/sigma-tc-1401-14x-teleconverter-review 9-7-2019 Sigma Focus Algorithms: Speed versus Accuracy https://www.photoartfromscience.com/single-post/2019/09/07/sigma-focus-algorithms-speed-versus-accuracy 9-20-2019 Nikon D850 Buffer Capacity Reality Testing https://www.photoartfromscience.com/single-post/2019/09/20/nikon-d850-buffer-capacity-reality-testing 10-7-2019 Nikon D500 Un-cropped versus D850 Cropped Shot Comparison https://www.photoartfromscience.com/single-post/2019/10/07/nikon-d500-un-cropped-versus-d850-cropped-shot-comparison 10-20-2019 Flashpoint Wave Commander Remote Shutter Intervalometer Review https://www.photoartfromscience.com/single-post/2019/10/20/flashpoint-wave-commander-remote-shutter-intervalometer-review 11-3-2019 Fix that Lens Infrared Hotspot with Lightroom https://www.photoartfromscience.com/single-post/2019/11/03/fix-that-lens-infrared-hotspot-with-lightroom 11-16-2019 Should You Turn Off Vibration Reduction When Using a Tripod? https://www.photoartfromscience.com/single-post/2019/11/16/should-you-turn-off-vibration-reduction-when-using-a-tripod 11-30-2019 Lens Resolution Measurement: Avoid Sharpened Jpeg Like the Plague https://www.photoartfromscience.com/single-post/2019/11/30/lens-resolution-measurement-avoid-sharpened-jpeg-like-the-plague 12-14-2019 Measure Lens Focus Speed with Nikon D850 Video https://www.photoartfromscience.com/single-post/2019/12/14/measure-lens-focus-speed-with-nikon-d850-video 12-31-2019 Hoya Pro ND1000 Filter Review https://www.photoartfromscience.com/single-post/2019/12/31/hoya-pro-nd1000-filter-review 1-15-2020 Lens Resolution: Red Green Blue Comparison https://www.photoartfromscience.com/single-post/lens-resolution-red-green-blue-comparison 2-8-2020 Lens Field Curvature Visualization https://www.photoartfromscience.com/single-post/lens-field-curvature-visualization 2-22-2020 Nikon AF Nikkor 75-300 f/4.5-5.6 Zoom https://www.photoartfromscience.com/single-post/2020/02/22/nikon-af-nikkor-75-300-f45-56-zoom 3-7-2020 Phase Detect Versus Contrast Detect Focus Accuracy https://www.photoartfromscience.com/single-post/phase-detect-versus-contrast-detect-focus-accuracy 3-19-2020 How to Update Lightroom 6.14 with Lens Profiles After Adobe Has Ceased Support https://www.photoartfromscience.com/single-post/how-to-update-lightroom-6-14-with-lens-profiles-after-adobe-has-ceased-support 4-2-2020 Update a Fresh Lightroom 6 Install to Version 6.14 Without Adobe’s Help https://www.photoartfromscience.com/single-post/update-a-fresh-lightroom-6-install-to-version-6-14-without-adobe-s-help 4-18-2020 High-Res Camera Sensors: Worth It? https://www.photoartfromscience.com/single-post/high-res-camera-sensors-worth-it 5-2-2020 Extreme Perspective Photography Suggestions https://www.photoartfromscience.com/single-post/extreme-perspective-photography-suggestions 5-17-2020 Lens Auto-Focus Speed versus Light Level https://www.photoartfromscience.com/single-post/lens-auto-focus-speed-versus-light-level 6-1-2020 Roxant Stabilizer Pro Video Camera Support https://www.photoartfromscience.com/single-post/roxant-stabilizer-pro-video-camera-support 6-14-2020 Sigma 150-600 C with Sigma TC-1401 Teleconverter https://www.photoartfromscience.com/single-post/sigma-150-600-c-with-sigma-tc-1401-teleconverter 6-27-2020 Nikon D850: Digitize Your Negatives as Positives https://www.photoartfromscience.com/single-post/nikon-d850-digitize-your-negatives-as-positives 7-11-2020 Using the Nikon PB-4 Bellows and Micro-Nikkor 60mm f/2.8 AF-D https://www.photoartfromscience.com/single-post/using-the-nikon-pb-4-bellows-and-micro-nikkor-60mm-f-2-8-af-d 7-25-2020 Perfect White Balance Preset Creation and Verification https://www.photoartfromscience.com/single-post/perfect-white-balance-preset-creation-and-verification 8-7-2020 MTFMapper 7.29 Adds Chromatic Aberration Measurement https://www.photoartfromscience.com/single-post/mtfmapper-7-29-adds-chromatic-aberration-measurement 8-21-2020 Nikon Coolpix A Review: 7 Years Later https://www.photoartfromscience.com/single-post/nikon-coolpix-a-review-7-years-later 9-5-2020 How Lateral Chromatic Aberration Changes With Aperture https://www.photoartfromscience.com/single-post/how-lateral-chromatic-aberration-changes-with-aperture 9-19-2020 Image Resolution versus Increased ISO https://www.photoartfromscience.com/single-post/image-resolution-versus-increased-iso 10-9-2020 The Single Focus Calibration Penalty https://www.photoartfromscience.com/single-post/the-single-focus-calibration-penalty 10-24-2020 Multi-shot HDR with Nikon DSLRs, Lightroom, and HDR Efex Pro 2 https://www.photoartfromscience.com/single-post/multi-shot-hdr-with-nikon-dslrs-lightroom-and-hdr-efex-pro-2 11-6-2020 Vello Battery Grips: Good, Bad, and Ugly https://www.photoartfromscience.com/single-post/vello-battery-grips-good-bad-and-ugly 11-21-2020 Telephotos: Length Matters https://www.photoartfromscience.com/single-post/telephotos-length-matters 12-4-2020 Lens Focus Fine-Tune: Things Can Change https://www.photoartfromscience.com/single-post/lens-focus-fine-tune-things-can-change 12-18-2020 Sigma TC-1401 Teleconverter and 105mm f/2.8 Micro Nikkor https://www.photoartfromscience.com/single-post/sigma-tc-1401-teleconverter-and-105mm-f-2-8-micro-nikkor 1-1-2021 Hand-held Focus Stacking with the Nikon D850 https://www.photoartfromscience.com/single-post/hand-held-focus-stacking-with-the-nikon-d850 1-15-2021 Extreme Accuracy Focus Fine-Tune Calibration https://www.photoartfromscience.com/single-post/extreme-accuracy-focus-fine-tune-calibration 1-29-2021 Silver Efex Pro 2 and the Zone System https://www.photoartfromscience.com/single-post/silver-efex-pro-2-and-the-zone-system 2-12-2021 Movo GH-700 Gimbal Head Review and Tutorial https://www.photoartfromscience.com/single-post/movo-gh-700-gimbal-head-review-and-tutorial 2-26-2021 Neewer R-160S LED Ring Light Review https://www.photoartfromscience.com/single-post/neewer-r-160s-led-ring-light-review 3-12-2021 Optimizing Autofocus Efficiency in Nikons https://www.photoartfromscience.com/single-post/optimizing-autofocus-efficiency-in-nikons 3-26-2021 Nikon D850 Focus-Shift Shooting Step Width Calibration https://www.photoartfromscience.com/single-post/nikon-d850-focus-shift-shooting-step-width-calibration 4-9-2021 Hand-held Macro Focus Stacking that Really Works https://www.photoartfromscience.com/single-post/hand-held-macro-focus-stacking-that-really-works 4-23-2021 Focus Peaking Accuracy Analysis for the Nikon D850 https://www.photoartfromscience.com/single-post/focus-peaking-accuracy-analysis-for-the-nikon-d850 5-10-2021 Lens Resolution Changes versus Focus Distance Errors https://www.photoartfromscience.com/single-post/lens-resolution-changes-versus-focus-distance-errors 5-20-2021 Topaz Denoise AI Review and Tutorial https://www.photoartfromscience.com/single-post/topaz-denoise-ai-review-and-tutorial 6-4-2021 Nikon Auto AF Fine-Tune Calibration Analysis https://www.photoartfromscience.com/single-post/nikon-auto-af-fine-tune-calibration-analysis 6-25-2021 Macro Panoramas from Focus Stacks https://www.photoartfromscience.com/single-post/macro-panoramas-from-focus-stacks 7-9-2021 Nikon’s Color Sketch Feature https://www.photoartfromscience.com/single-post/nikon-s-color-sketch-feature 7-23-2021 Lightroom Batch Editing Tutorial https://www.photoartfromscience.com/single-post/lightroom-batch-editing-tutorial 8-20-2021 Measure Camera Mirror Blackout Time Yourself https://www.photoartfromscience.com/single-post/measure-camera-mirror-blackout-time-yourself 9-03-2021 Nikon DSLR Camera Focus Speed Comparisons https://www.photoartfromscience.com/single-post/nikon-dslr-camera-focus-speed-comparisons 9-19-2021 Nikon D850 Individual Focus Sensor Actual Coverage Area https://www.photoartfromscience.com/single-post/nikon-d850-individual-focus-sensor-actual-coverage-area 10-6-2021 Use Nik Plug-ins Inside Nikon NX Studio https://www.photoartfromscience.com/single-post/use-nik-plug-ins-inside-nikon-nx-studio 10-15-2021 Kolari Vision Infrared Camera Conversion Review https://www.photoartfromscience.com/single-post/kolari-vision-infrared-camera-conversion-review 10-29-2021 Action Shooting: Why Aperture Priority Mode is Superior https://www.photoartfromscience.com/single-post/action-shooting-why-aperture-priority-mode-is-superior 11-12-2021 Focus-Trap Shooting on the D500 and D850 https://www.photoartfromscience.com/single-post/focus-trap-shooting-on-the-d500-and-d850 11-26-2021 Kolari Vision Infrared Camera Anti-Reflection Coating Review https://www.photoartfromscience.com/single-post/kolari-vision-infrared-camera-anti-reflection-coating-review 12-10-2021 Nikon Image Overlay Feature Tutorial https://www.photoartfromscience.com/single-post/nikon-image-overlay-feature-tutorial 12-24-2021 How to Process Infrared Photos with Zoner Photo Studio https://www.photoartfromscience.com/single-post/how-to-process-infrared-photos-with-zoner-photo-studio 1-07-2022 Topaz DeNoise AI 3.4.2 with RAW File Processing https://www.photoartfromscience.com/single-post/topaz-denoise-ai-3-4-2-with-raw-file-processing 1-21-2022 Topaz DeNoise AI Lens Resolution Enhancement https://www.photoartfromscience.com/single-post/topaz-denoise-ai-lens-resolution-enhancement 2-4-2022 DSTE Battery Grip Review For Nikon and Canon https://www.photoartfromscience.com/single-post/dste-battery-grip-review-for-nikon-and-canon 2-20-2022 Topaz DeNoise AI versus Lightroom https://www.photoartfromscience.com/single-post/topaz-denoise-ai-versus-lightroom 3-4-2022 Camera Lens Anti-Reflection Coatings: Magic Explained https://www.photoartfromscience.com/single-post/camera-lens-anti-reflection-coatings-magic-explained 3-18-2022 Comparing Two ‘Identical’ Lenses: A Reality Check https://www.photoartfromscience.com/single-post/comparing-two-identical-lenses-a-reality-check 4-01-2022 How To Use Photoshop CS4 With a New Camera’s Raw-Format Files https://www.photoartfromscience.com/single-post/how-to-use-photoshop-cs4-with-a-new-camera-s-raw-format-files 4-15-2022 Nikkor 500mm f/5.6 AF-S PF ED VR Review https://www.photoartfromscience.com/single-post/nikkor-500mm-f-5-6-af-s-pf-ed-vr-review 4-29-2022 Nikkor 500mm f/5.6 PF with Sigma TC-1401 Teleconverter Review https://www.photoartfromscience.com/single-post/nikkor-500mm-f-5-6-pf-with-sigma-tc-1401-teleconverter-review 5-13-2022 Arca-Swiss Camera Mount: Everything You Need to Know https://www.photoartfromscience.com/single-post/arca-swiss-camera-mount-everything-you-need-to-know 5-29-2022 Get Wide-Angle Shots Without Using a Wide-Angle Lens https://www.photoartfromscience.com/single-post/get-wide-angle-shots-without-using-a-wide-angle-lens 6-18-2022 Lightroom Exposure Editing Tips https://www.photoartfromscience.com/home/archive/2022/06 7-1-2022 Reasons Why You Would Actually Want to Use DNG Format https://www.photoartfromscience.com/single-post/reasons-why-you-would-actually-want-to-use-dng-format 7-17-2022 Helicon Focus versus Combine ZM for Focus Stacking https://www.photoartfromscience.com/single-post/helicon-focus-versus-combine-zm-for-focus-stacking 7-28-2022 Make a 3D Focus Stack Movie https://www.photoartfromscience.com/single-post/make-a-3d-focus-stack-movie 8-12-2022 Shooting a Pre-AI Nikkor 105mm f/2.5 with the Nikon Z9 https://www.photoartfromscience.com/single-post/shooting-a-pre-ai-nikkor-105mm-f-2-5-with-the-nikon-z9 8-26-2022 The Nikon Z9 with Teleconverters: No Focus Speed Penalty? https://www.photoartfromscience.com/single-post/the-nikon-z9-with-teleconverters-no-focus-speed-penalty 9-9-2022 Nikon Z9 AutoFocus Area Mode Speed Measurements https://www.photoartfromscience.com/single-post/nikon-z9-autofocus-area-mode-speed-measurements 9-23-2022 Using the Minolta Rokkor-PF 135mm f/2.8 on a Nikon Z9 https://www.photoartfromscience.com/single-post/using-the-minolta-rokkor-pf-135mm-f-2-8-on-a-nikon-z9 10-8-2022 Minolta Rokkor-QF 50mm f/3.5 Macro on the Nikon Z9 https://www.photoartfromscience.com/single-post/minolta-rokkor-qf-50mm-f-3-5-macro-on-the-nikon-z9 10-23-2022 Nikon Z9 Pre-Release Capture Shooting Guide https://www.photoartfromscience.com/single-post/nikon-z9-pre-release-capture-shooting-guide 11-5-2022 Nikon Z9: Un-retire Your Lenses https://www.photoartfromscience.com/single-post/nikon-z9-un-retire-your-lenses 11-18-2022 Batch Processing: Lightroom and Topaz DeNoise AI https://www.photoartfromscience.com/single-post/batch-processing-lightroom-and-topaz-denoise-ai 12-2-2022 Color Infrared Techniques using Capture One Pro 22 https://www.photoartfromscience.com/single-post/color-infrared-techniques-using-capture-one-pro-22 12-16-2022 Nikon Z9: Using Screw-Drive AF or Manual Focus Lenses https://www.photoartfromscience.com/single-post/nikon-z9-using-screw-drive-af-or-manual-focus-lenses 12-30-2022 TT Artisan 50mm f/1.4 Tilt Lens Review https://www.photoartfromscience.com/single-post/tt-artisan-50mm-f-1-4-tilt-lens-review 1-14-2023 How to add External Editors to Capture One 22 https://www.photoartfromscience.com/single-post/how-to-add-external-editors-to-capture-one-22 1-27-2023 How to Perform Helicon Focus Image Retouching https://www.photoartfromscience.com/single-post/how-to-perform-helicon-focus-image-retouching 2-10-2023 Batch Processing: Capture One and Topaz DeNoise https://www.photoartfromscience.com/single-post/batch-processing-capture-one-and-topaz-denoise 2-24-2023 Build the World’s Most High Tech Pinhole Camera: the Z9 https://www.photoartfromscience.com/single-post/build-the-world-s-most-high-tech-pinhole-camera-the-z9 3-19-2023 A Full-Time Bubble Level on Your Camera https://www.photoartfromscience.com/single-post/a-full-time-bubble-level-on-your-camera 6-2-2023 Using ON1 Photo RAW 2023 for Sky Swapping https://www.photoartfromscience.com/single-post/using-on1-photo-raw-2023-for-sky-swapping 6-16-2023 ON1 Photo RAW 2023 Deblur for Motion Blur Repair https://www.photoartfromscience.com/single-post/on1-photo-raw-2023-deblur-for-motion-blur-repair 6-30-2023 Nikkor Z 24-120mm f/4 S Lens Review https://www.photoartfromscience.com/single-post/nikkor-z-24-120mm-f-4-s-lens-review 7-14-2023 Use an External Editor from Inside ON1 Photo RAW 2023 https://www.photoartfromscience.com/single-post/use-an-external-editor-from-inside-on1-photo-raw-2023 7-28-2023 ON1 Photo RAW 2023 Masking Tutorial https://www.photoartfromscience.com/single-post/on1-photo-raw-2023-masking-tutorial 8-11-2023 Using ON1 Photo RAW 2023 from Inside Lightroom https://www.photoartfromscience.com/single-post/using-on1-photo-raw-2023-from-inside-lightroom 8-27-2023 Focus Peaking Analysis for Nikon Mirrorless Cameras https://www.photoartfromscience.com/single-post/focus-peaking-analysis-for-nikon-mirrorless-cameras 9-9-2023 ON1: Edit and Convert Raw Photos into Jpeg in Batch Mode https://www.photoartfromscience.com/single-post/on1-edit-and-convert-raw-photos-into-jpeg-in-batch-mode 9-22-2023 Camera Lens Resolution Measurement using a Razor Blade https://www.photoartfromscience.com/single-post/camera-lens-resolution-measurement-using-a-razor-blade 10-6-2023 Lens Resolution: Are My Measurement Results Bogus? https://www.photoartfromscience.com/single-post/lens-resolution-are-my-measurement-results-bogus 10-20-2023 Panorama Prowess: Lightroom vs ON1 vs Capture One https://www.photoartfromscience.com/single-post/panorama-prowess-lightroom-vs-on1-vs-capture-one 11-3-2023 Nikon Z9 ‘Bird’ Subject Detection: This is Golden! https://www.photoartfromscience.com/single-post/nikon-z9-bird-subject-detection-this-is-golden 11-17-2023 The Importance of Focus Precision https://www.photoartfromscience.com/single-post/the-importance-of-focus-precision 12-1-2023 Toggle Your Nikon Z9, Z8 Shooting Settings with a Button https://www.photoartfromscience.com/single-post/toggle-your-nikon-z9-z8-shooting-settings-with-a-button 12-16-2023 Remove all Reflections Using Double-Polarized Light https://www.photoartfromscience.com/single-post/remove-all-reflections-using-double-polarized-light 12-28-2023 How to Make Panoramas with Moving Subjects https://www.photoartfromscience.com/single-post/how-to-make-panoramas-with-moving-subjects 01-13-2024 Nikon Z Cameras Fix Spherical Aberration Focus Shift https://www.photoartfromscience.com/single-post/nikon-z-cameras-fix-spherical-aberration-focus-shift 01-26-2024 Does Your Computer Monitor Need Calibration? https://www.photoartfromscience.com/single-post/does-your-computer-monitor-need-calibration 02-07-2024 Pixel Shift Shooting Analysis of the Nikon Z8 https://www.photoartfromscience.com/single-post/pixel-shift-shooting-analysis-of-the-nikon-z8 02-23-2024 Ultimate Landscapes and Moon: Nikon Z8 Pixel-shift and AutoStakert https://www.photoartfromscience.com/single-post/ultimate-landscapes-and-moon-nikon-z8-pixel-shift-and-autostakkert 03-08-2024 Focus Speed Slowdown at Different Lens Apertures https://www.photoartfromscience.com/single-post/focus-speed-slowdown-at-different-lens-apertures 03-22-2024 A Second Look at a Classic Lens on a New Camera https://www.photoartfromscience.com/single-post/a-second-look-at-a-classic-lens-on-a-new-camera 04-05-2024 TTArtisan 50mm f/0.95 for Nikon Review: DX or FX? https://www.photoartfromscience.com/single-post/ttartisan-50mm-f-0-95-for-nikon-z-review-dx-or-fx 04-19-2024 Nikon Z8 versus D850 Autofocus Wars https://www.photoartfromscience.com/single-post/nikon-z8-versus-d850-autofocus-wars 05-03-2024 Reflections as Art https://www.photoartfromscience.com/single-post/reflections-as-art 05-17-2024 Diffraction in Camera Lenses Explained https://www.photoartfromscience.com/single-post/diffraction-in-camera-lenses-explained 05-31-2024 Nikon ‘Pinpoint Focus Mode’: the Most Accurate? https://www.photoartfromscience.com/single-post/nikon-pinpoint-focus-mode-the-most-accurate 06-14-2024 Measure Lens Resolution without a Test Chart https://www.photoartfromscience.com/single-post/measure-lens-resolution-without-a-test-chart 06-28-2024 Use ON1 Photo Raw to Add the Moon to Photos https://www.photoartfromscience.com/single-post/use-on1-photo-raw-to-add-the-moon-to-photos 07-08-2024 Nikon Focus Consistency Wars: DSLR versus Mirrorless https://www.photoartfromscience.com/single-post/nikon-focus-consistency-wars-dslr-versus-mirrorless 07-10-2024 Nikon Z8,Z9 Firmware Bug: Pinpoint AF Mode Ignored https://www.photoartfromscience.com/single-post/nikon-z8-z9-firmware-bug-pinpoint-af-mode-missing 07-26-2024 How to Measure Lens Focal Length and Field of View https://www.photoartfromscience.com/single-post/how-to-measure-lens-focal-length-and-field-of-view 08-09-2024 How to Find the Correct Lens Pivot for Panoramas https://www.photoartfromscience.com/single-post/how-to-find-the-correct-lens-pivot-for-panoramas 08-22-2024 Nikon Z8 Pixel Shift Shooting to Reduce Aliasing https://www.photoartfromscience.com/single-post/nikon-z8-pixel-shift-shooting-to-reduce-aliasing 09-06-2024 Should you Turn IBIS Off When Using a Tripod? https://www.photoartfromscience.com/single-post/should-you-turn-ibis-off-when-using-a-tripod 09-20-2024 Autofocus Fine-Tune on Nikon Z Cameras: Useless or Not? https://www.photoartfromscience.com/single-post/autofocus-fine-tune-with-nikon-z-cameras-useless 10-04-2024 How to Analyze Lens Longitudinal Chromatic Aberration https://www.photoartfromscience.com/single-post/how-to-analyze-lens-longitudinal-chromatic-aberration 10-18-2024 Nikkor 55-300mm f/4.5-5.6G AF-S ED VR DX Review https://www.photoartfromscience.com/single-post/nikkor-55-300mm-f-4-5-5-6g-af-s-ed-vr-dx-review 11-01-2024 Handy Camera Hardware for Proper Panoramas and Balance https://www.photoartfromscience.com/single-post/handy-camera-hardware-for-proper-panoramas-and-balance 11-15-2024 Focus Stacking: ON1 Photo Raw vs Helicon Focus https://www.photoartfromscience.com/single-post/focus-stacking-on1-photo-raw-vs-helicon-focus 11-29-2024 How to Find out Your Lens ‘T-Stop’ Transmission https://www.photoartfromscience.com/single-post/how-to-find-out-your-lens-t-stop-transmission 12-13-2024 Infrared Camera Sensor Anti-reflection Coating Analysis https://www.photoartfromscience.com/single-post/infrared-camera-sensor-anti-reflection-coating-analysis 12-27-2024 Cross Screen Filters https://www.photoartfromscience.com/single-post/cross-screen-filters 1-10-2025 Batch Processing with the Capture One Editor https://www.photoartfromscience.com/single-post/batch-processing-with-the-capture-one-editor 1-24-2025 How Far Should You Zoom In with that Lens? https://www.photoartfromscience.com/single-post/how-far-should-you-zoom-in-with-that-lens 2-14-2025 How to Measure Nikon ‘Z’ Lens Auto-Focus Speed https://www.photoartfromscience.com/single-post/how-to-measure-nikon-z-lens-auto-focus-speed 2-28-2025 Nikon Z9,Z8 LCD Monitor Lag Measurements https://www.photoartfromscience.com/single-post/nikon-z9-z8-lcd-monitor-lag-measurements 3-14-2025 Nikkor Z 28-400mm f/4-8 VR Resolution Analysis https://www.photoartfromscience.com/single-post/nikkor-z-28-400mm-f-4-8-vr-resolution-analysis 3-28-2025 Nikkor Z 28-400mm f/4-8 VR Chromatic Aberration Analysis https://www.photoartfromscience.com/single-post/nikkor-z-28-400mm-f-4-8-vr-chromatic-aberration-analysis 4-11-2025 Nikkor Z 28-400 f/4-8 VR Lens Review https://www.photoartfromscience.com/single-post/nikkor-z-28-400-f-4-8-vr-lens-review 4-25-2025 Nikkor Z 28-400mm f4-8 VR Parfocal Analysis https://www.photoartfromscience.com/single-post/nikkor-z-28-400mm-f-4-8-vr-parfocal-analysis 5-9-2025 Comparing Photo Editors for Fixing Chromatic Aberration https://www.photoartfromscience.com/single-post/comparing-photo-editors-for-fixing-chromatic-aberration 5-23-2025 Autofocus Lens Stepping Motors Explained https://www.photoartfromscience.com/single-post/autofocus-lens-stepping-motors-explained 6-6-2025 TTArtisan 50mm f/0.95 Z Lens Love-Hate Relationship https://www.photoartfromscience.com/single-post/ttartisan-50mm-f-0-95-z-lens-love-hate-relationship 6-20-2025 Nikon Zoom Lens Internal Workings https://www.photoartfromscience.com/single-post/nikon-zoom-lens-internal-workings 7-1-2025 Nikon Z8 Manual Focus Subject Tracking https://www.photoartfromscience.com/single-post/nikon-z8-manual-focus-subject-tracking 7-18-2025 Focus Shift with Pixel Shift on the Nikon Z8 https://www.photoartfromscience.com/single-post/focus-shift-with-pixel-shift-on-the-nikon-z8 8-1-2025 Use Your Nikon Mirrorless Camera as a Telescope https://www.photoartfromscience.com/single-post/use-your-nikon-mirrorless-camera-as-a-telescope 8-15-2025 Measure Your Lens Resolution Tutorial https://www.photoartfromscience.com/single-post/measure-your-lens-resolution-tutorial 9-4-2025 Should You Use A Tele-converter or Not? https://www.photoartfromscience.com/single-post/should-you-use-a-tele-converter-or-not 9-12-2025 Nikon Z8 400% Zoom Manual Focus vs. Autofocus Accuracy https://www.photoartfromscience.com/single-post/nikon-z8-400-zoom-manual-focus-vs-autofocus-accuracy 9-26-2025 Diffraction-Limited Lenses and the Sharpest Possible Photo https://www.photoartfromscience.com/single-post/diffraction-limited-lenses-and-the-sharpest-possible-photo 10-10-2025 Starscapes using Topaz Photo Studio and Capture One https://www.photoartfromscience.com/single-post/starscapes-using-topaz-photo-studio-and-capture-one 10-24-2025 Using Topaz Photo Studio to Remove Unwanted Objects https://www.photoartfromscience.com/single-post/using-topaz-photo-studio-to-remove-unwanted-objects 11-7-2025 Measure and Compensate for Lens Spherical Aberration https://www.photoartfromscience.com/single-post/measure-and-compensate-for-lens-spherical-aberration 11-21-2025 Topaz Photo Studio Sharpening Algorithms Compared https://www.photoartfromscience.com/single-post/topaz-photo-studio-sharpening-algorithms-compared 12-5-2025 Fast Portrait Editing using the ON1 Editor https://www.photoartfromscience.com/single-post/fast-portrait-editing-using-the-on1-editor 12-19-2025 Lens Longitudinal Chromatic Aberration in Infrared https://www.photoartfromscience.com/single-post/lens-longitudinal-chromatic-aberration-in-infrared 1-2-2025 Lens Chromatic Aberration in IR vs Visible Light https://www.photoartfromscience.com/single-post/lens-chromatic-aberration-in-ir-versus-visible-light
- Lens Chromatic Aberration in IR Versus Visible Light
Information about how camera lenses perform when photographing in the infrared is quite scarce. Lens designers usually ignore light outside of the visible spectrum in their designs. I have been analyzing a lens that is well-corrected in visible light to see what happens in a couple of different wavelength regions of infrared. I already looked at what happens with longitudinal chromatic aberration, and next I’m looking at lateral chromatic aberration (CA). I had a camera converted to infrared by Kolari Vision, which includes an infrared anti-reflection coating on their sensor cover ( very helpful for controlling hotspots). This modification passes wavelengths above 590nm, which then includes red/orange plus infrared. This light range lets me create “color infrared” or pure black-and-white images. I used a separate camera (a Nikon Z8) to take photos in regular visible light using the same lens that I used on the infrared camera. Lateral CA when using visible-spectrum light As you can see above, the colors in white light that we perceive can get bent going through a lens by different amounts when CA is present. Infrared (all IR frequencies lumped together) may or may not get similarly split up by the lens. CA typically doesn’t happen in the center of the camera sensor, but it gets progressively worse toward the edge of the sensor. I frequently put an 850nm infrared filter on my lenses when shooting infrared with my IR camera, so I thought it would be prudent to include an analysis using that portion of the spectrum, too. This filter only passes long-wavelength IR, so the photographs look like black-and-white. I use the MTFMapper program to look at CA. The author Frans van den Bergh provides a couple of different files that can be printed out for analyzing CA. The standard resolution test charts can be used for also measuring CA. I printed the resolution test chart using a laser printer. If I had tried using an inkjet printer, then the printout would have been invisible when shooting infrared. The carbon black toner used in laser printers is opaque to infrared, while the ink in inkjet printers is mostly transparent to infrared. I chose my Sigma 70-200mm f/2.8 Sport zoom for the testing. This lens has a pretty low level of CA, but that ‘low level’ is only advertised for visible light. A lens with zero CA would have the red, green, and blue light get bent identically, and therefore all light from a subject focuses at the same spot. I focused the lens on the chart center. Resolution chart corner, no CA correction, 200mm f/2.8 The shot above shows a piece of a resolution chart without any correction for lateral CA. There’s a small amount of visible CA (meridional direction), which gets worse away from the lens center. This shot was done in visible light. CA range for visible light The CA measurements for the lens in visible light range from about +2 to +8 microns in red-green sensor pixel shift, and -2.5 to +1.5 microns in blue-green pixel shift. 590nm Infrared 200mm f/2.8 In the test shot above, I switched to 590nm infrared, where ‘color’ doesn’t really have a specific meaning. This camera lets in orange, red, and infrared light. The shot above has been color-balanced to make the target background white; if left alone, the shot would look like it had a deep orange filter over the lens. For measuring CA, I give the MTFMapper program the raw shot as-is and don’t do any kind of color balancing. CA range for 590nm infrared The CA for the 590nm infrared shot drops quite a bit, where now the red-green pixel shift is about 0 to -1.5 microns. The blue-green pixel shift is about 0 to +2 microns. Next, I put the 850nm infrared filter over the lens… 850nm Infrared 200mm f/2.8 I didn’t need to perform a white balance with this type of deep infrared, since it normally looks like pure black-and-white. CA range for 850nm infrared The CA for the 850nm infrared shot drops to near-zero for both red-green and blue-green shift. This is the lowest level of CA I have ever seen. Summary Lens behavior in normal light doesn’t guarantee anything when it’s used to shoot in infrared. You’ll have to do that sort of testing yourself. It's interesting that this lens looks better-corrected in infrared than it does in visible light for lateral chromatic aberration.
- Lens Longitudinal Chromatic Aberration in Infrared
There’s very little information about how camera lenses perform when photographing in the infrared. There’s even less information about what lens designers consider in their design and analysis accommodating light outside of the visible spectrum. I decided to take a lens that is well-corrected in visible light and see what happens in a couple of different wavelength regions of infrared. Most lenses have trouble focusing with infrared light; camera companies used to even put a little mark on their lenses to show you how much to compensate focus for IR. In this study, I’m going to concentrate on analyzing longitudinal chromatic aberration (LoCA). I had a camera converted to infrared by Kolari Vision, which includes an infrared anti-reflection coating on their sensor cover ( very helpful for eliminating hotspots). This modification passes wavelengths above 590nm, which then includes red/orange plus infrared. LoCA when using visible-spectrum light As you can see above, the light that we perceive can get focused at different distances along the lens axis when LoCA is present. Infrared (all IR frequencies lumped together) may or may not get similarly split up by the lens. I frequently put an 850nm infrared filter on my lenses when shooting infrared with my IR camera, so I thought it would be prudent to include an analysis using that portion of the light spectrum, too. This filter only passes long-wavelength IR, so the photographs look like black-and-white. I use the MTFMapper program to look at LoCA. The author Frans van den Bergh provides a couple of different files that can be printed out for analyzing LoCA. In his program, you configure it to look at focus shift using red or green or blue Bayer sensor information from photographs of a focus chart. The chart is rotated about the vertical axis to be 45 degrees from the camera sensor, with the shorter vertical bars nearer to the camera. The chart rotation is what allows the program to note where the peak focus is. I printed the focus chart using a laser printer. If I had tried using an inkjet printer, then the printout would have been invisible when shooting infrared. The carbon black toner used in laser printers is opaque to infrared, while the ink in inkjet printers is mostly transparent to infrared. I chose my Nikkor 24-70 f/2.8 AF-S VR zoom for the testing. This lens has a pretty low level of LoCA, but that ‘low level’ is only advertised for visible light. A lens with zero LoCA would have the red, green, and blue channels overlap perfectly and therefore all light from a subject focuses at the same distance. I focus the lens on the chart center, but that’s rarely where best focus ends up. Focus chart detail, red channel, visible light The shot above shows a piece of a focus chart after analysis. In this case, focus was close to perfect (2.6mm closer to the camera than the chart center) and the center of focus (blue line) is close to the chart center (orange arrows). The green plot shows the highest resolution (best focus) at different distances from the camera, measured in cycles per pixel of contrast. The peak focus shows 0.125 cycles/pixel of contrast here, at 2.6mm from the chart centerline. The black circles in the plot are called ‘fiducials’, which let the MTFMapper program know where things are in the plot, and how to evaluate and measure what it sees. Visible light R,G,B focus at 70mm f/2.8 The triplet of pictures above show the chart analysis in red (left), green (center), and blue (right). The red focus +2.6 millimeters from the chart center. The green focus is +15.1mm nearer to the camera than the chart centerline. The blue focus is +9.2mm nearer to the camera, or in between the red and green focus. The whole range of focus with visible light is therefore 12.5mm using this chart. The red, green, and blue measurements are all made from a single chart photograph (no lens focus change), separately analyzing the red, green, and blue sensor pixels. The chart was photographed with a regular-spectrum camera (Nikon Z9) using the same Nikkor 24-70 f/2.8 lens. The LoCA is fairly low, and probably wouldn’t be noticed in normal photography. There are two styles of focus charts that are provided with the MTFMapper program. I chose the plot style shown above, because it’s much easier to see the overlaid results against a mostly-white background. The accuracy of the results is no different, if the different charts are printed to the exact same size on the exact same paper. You’ll note that all of the little round fiducials are the same in both styles of charts. 590nm Infrared R,G,B focus at 70mm f/2.8 Switching to 590nm infrared, the results are very, very different. The red focus (left chart) is at +6.8mm, or shifted toward the camera relative to the chart centerline. The green focus (middle) is -6.2mm. The blue focus (right) is -56.6mm (away from the camera), and quite dim. The whole range of focus with 590nm infrared is therefore 63.4mm using this chart (compared to 12.5mm in the visible spectrum). This makes the lens look horrendous for longitudinal chromatic aberration, and the blue camera sensor pixels are starved for light. Next, I put the 850nm infrared filter over the lens… 850nm Infrared R,G,B focus at 70mm f/2.8 The red focus (left) is at +11.5mm, with the green focus (center) at +10.5mm, and the blue (right) focus is at +11.6mm. The whole range of focus with 850nm infrared is therefore only 1.1mm using this chart. That’s an amazingly consistent focus between the three color channels. Not all infrared is the same! Using just the very long-wavelength 850nm infrared, the lens looks nearly perfect for LoCA. Lens performance can be very misleading, depending upon the light spectrum being tested. The MTFMapper program has many features for testing your lenses. You’re unlikely to find any information at all about your particular lenses when shooting infrared from the manufacturer. This program enables you to find out those optical characteristics yourself.
- Fast Portrait Editing using the ON1 Editor
Portrait photographers are always looking for ways to get editing done quicker, and most of them follow a standard recipe of what edits need to be done. Almost nobody wants to see their portrait that hasn’t been touched up to make themselves look a little bit better. The ON1 editor has a special panel that’s dedicated to portraits. Using artificial intelligence, ON1 automatically recognizes the parts of face. The most tedious part of portrait editing is typically drawing the masks on the different parts of the face to make local adjustments, and this task is now automated. ON1 lets you quickly move through the steps of almost everything that needs to be done to edit a portrait. In this article, I’ll show you how a typical editing session is carried out. I’m presently using the 2023 version of ON1 . The ‘Portrait AI’ panel with default settings As you can see in the panel above, there are several editing options for the different parts of the face. But that’s not all… Additional skin retouching options When you expand the ‘Details’ option, there are controls to further refine how the face skin gets altered. Portrait before editing (cropped) Skin ‘Retouching’ set to 50 (left), 90 (right) Most of the controls let you go beyond what you should set. The skin Retouching control seems about right at a setting of 50, but the setting of 90 starts looking artificial. Face ‘Brightness’ 38 (left), 100 (right) ‘Slim Face’ 0 (left), 70 (right) Slimming a face also alters the neck and above the shoulders, so that it's really hard to tell the portrait was altered. Eye ‘Brightness’ 0 (left), 100 (right) Eye ‘Whitening’ 0 (left), 60 (right) The ‘Whitening’ control will let you reduce redness of the eyes. Eye ‘Detail’ 0 (left), 40 (right) Use this ‘Detail’ control to sharpen eye lashes and the iris. This feature doesn’t work as well as my Topaz Photo Studio or DeNoise , but you can’t beat how easy it is to use. Eye ‘Dark Circles’ 0 (left), 100 (right) Eye ‘Brow Enhance’ 0 (left), 60 (right) Those brows start to look scary if they’re enhanced very much. Teeth Whitening 0 (left), 60 (right) Moderate teeth whitening is almost always a good thing. It’s usually unrealistic to totally remove all yellowing. In extreme cases, you might need to switch to the “Develop” panel and use the masking brush for the teeth to alter their color temperature toward blue. Lip Vibrance 0 (left), 100 (right) Additional Edits You still might find a few things that need to be done outside of the Portrait panel, such as using the ‘Retouch Brush’ to rid strands of hair (inside the ‘Develop’ panel). Finished portrait Final settings in Portrait panel Save the settings as a new ‘Style’ The ‘Style’ drop-down menu lets you save (or update) the settings as a new, named style. In this way, you can automatically apply these settings to other portraits. In the future, you could edit other portraits at lightning speed by simply selecting a saved portrait style. Summary If you’re looking for an editor that will let you retouch portraits with maximum convenience, the ON1 editor is hard to beat. Please keep in mind that a properly edited portrait shouldn’t look like it has been edited!
- Topaz Photo Studio Sharpening Algorithms Compared
Unsharpened eye detail from image crop, 85mm f/1.4 The Topaz Photo Studio program can work quite well for sharpening photos, but it’s easy to go overboard with it. The shot shown above sorely needs help with sharpening. For portraits, sharpening often fails miserably when considering the skin. For that reason, the Photo Studio masking feature is basically mandatory. This program (and Topaz Photo AI ) also offers “Super Focus” for sharpening. This feature, in either program, crashes my computer every single time. Every version that Topaz offers still manages to crash my computer. My Windows computer has 64GB RAM and 10GB memory for the GPU, which should be overkill. I’m presently using Photo Studio version 1.0.2 and Photo AI version 4.0.4. In this article, I’m going to concentrate on what works (and doesn’t) for portraits. Mainly, you want to have sharp eyes. Sharpened skin is a bad idea. In my examples, I used a high-speed lens that has poor resolution when shot wide-open. I want to show how Photo Studio can help make the lens performance appear somewhat better. Note that the lens has longitudinal chromatic aberration (LoCA), and it makes a slight red border on some of the eye lashes. The shots are all at f/1.4. When viewed at normal magnifications, the red coloration around the lashes is basically invisible. The photograph used was shot in raw format, so any sharpening is purely due to Photo Studio . The eye is cropped from a shot where the face fills the frame, and at 100% magnification. Start by selecting a Custom mask Select the ‘Custom’ option to create a mask for the eyes. Draw a mask over the eyes and lashes Adjust the brush to have a diameter suitable for just selecting eye detail, and then paint over the eyes and lashes. Include the eye brows, too, if you wish. I typically don’t sharpen anything else in portraits, but sometimes I’ll include the mouth. Select a sharpening style, and then adjust its strength I find that Photo Studio default settings generally sharpen too aggressively. The strength is determined by its internal artificial intelligence. There’s a slider to adjust the strength. The photos below are all using the default strength setting, as determined by the program’s ‘artificial intelligence’, unless otherwise noted. “Natural” sharpening option, with mask used “Lens Blur” sharpening option, no masking “Lens Blur v2” sharpening option, no masking “Motion Blur” sharpening option, no masking “Refocus” sharpening option, no masking “Standard” sharpening option, no masking ‘Wildlife’ sharpening, no masking “Strong” sharpening option, no masking The slight red cast on the lashes, due to the lens LoCA, is difficult to see at normal magnification. It’s due to the lens, and not the fault of the program. Adding the ‘Recover Faces’ filter ‘Strong’ sharpening, no masking (without 'Recover Faces') ‘Strong’ sharpening, no masking, Recover Faces v1 ‘Strong’ sharpening, no masking, Recover Faces v2 A subtle, but sometimes useful step is to add a ‘Recover Faces’ filter after sharpening. It’s quick and requires no masking. The skin gets softened slightly, but it also slightly affects the eye detail. Summary The Sharpen algorithms that leave white edges along the black lashes seem unsuitable for portrait shooting. When using an under-performing lens like this one, something like the ‘Strong’ sharpening works pretty well. Differences among many of the sharpening filters are very subtle, but it depends upon the subject being sharpened. In all cases, sharpening of the skin is undesirable. Masking can be a bit tedious, but using it to avoid skin sharpening is nearly always preferable. It’s worth trying the ‘Recover Faces’ filter first, since it’s quick to add, but I don’t think it works as well as masking does. Topaz Photo Studio should be used before doing other editing, and it can be invoked from inside most other photo editors. If you edit a raw photo before sending it to Photo Studio , those edits are ignored. If you send it raw-format photos (you should), then it will return raw output, in the DNG format. Topaz Photo Studio doesn’t have the tools to perform all of the edit steps necessary for something like portraits. I prefer to call this program from within editors like Capture One or ON1 , giving it the raw photo. After the sharpened, DNG-format photo gets returned to my editor, I finish the rest of the editing. Using this program is a cheap way (compared to buying high-end optics) to make a low-performing lens look much better than it actually is. Since skin usually looks pretty bad at high resolution, a cheaper lens can in some ways be an advantage when shooting portraits.
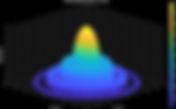
- Measure and Compensate for Lens Spherical Aberration
The majority of large-aperture camera lenses suffer from an optical defect known as ‘spherical aberration’. This phenomenon causes the lens to shift its focus merely by changing the aperture. If you’re unaware that your lens has this problem, it can be very mysterious and frustrating. If you have a mirrorless camera, you may be able to easily compensate for it. If you are using a DSLR camera, you’re basically out of luck. A large-aperture lens with spherical aberration Spherical aberration causing focus shift As shown above, lenses with spherical aberration cause focus shift by cutting off light rays when you stop down the aperture. The majority of light rays focus nearer to the lens front at a wide aperture (the ‘circle of least confusion’). When you stop down the aperture and block the outer-perimeter light rays, the majority of the remaining light rays are focused farther from the lens rear. Going from f/1.4 to f/2.0, the area of light rays decreases by 50 percent. If you stop down to f/5.6, the area of light remaining is just 6.25 percent. The circle of least confusion is therefore much smaller at f/5.6, and also much sharper. To know how much spherical aberration a lens has, I use the free MTFMapper program , written by Frans van den Bergh. He provides a “Focus distance” chart file that can then be printed and mounted. This chart can be used for both focus distance tests and also for evaluating longitudinal chromatic aberration. The test chart is photographed while rotated by 45 degrees about the vertical. The left side of the chart is farther away from the camera. The chart needs to fill the frame for best results. If you’re using a DSLR camera, it is going to auto-focus with the lens aperture wide open. The aperture closes down just before taking the shot, but focus doesn’t get adjusted at this point. If your lens has spherical aberration and you stop down the lens, the best focus gets ‘automatically’ missed. Fully-manual lenses aren’t a problem, because they remain at whatever aperture you set while you manually focus. Any spherical aberration is always being compensated for. Nikkor 85mm f/1.4 (left) and f/2.0 (right) In the shots above, I show a close-up of the chart at f/1.4 on the left, and f/2.0 on the right. I focused the camera using f/1.4, and then stopped down the lens for the shot at f/2.0 without re-focusing the f/2.0 shot. The f/2.0 photo shows a distance shift of 5.1 mm away from the chart center where it is in the sharpest focus. That’s the effect of spherical aberration. I chose my Nikkor 85mm f/1.4 AF-S G lens for this demonstration, but all of my fast lenses exhibit this optical defect. Some fast lenses handle the problem better than others. The chart center is indicated in orange above. The green curve shows the area of best focus, with its peak at optimal focus (also shown via a vertical blue line). Peak focus is also indicated with a “cycles per pixel”, or “c/p” MTF50 value. This number can be converted into other units, such as lines per millimeter, if you know the camera sensor pixel dimensions. By the way, I chose to have the MTFMapper program use the green pixels on the sensor for these measurements. I could have chosen red or blue pixels instead. The differences between measurements of red, green, and blue are the essence of measuring “longitudinal chromatic aberration”, also known as LoCA. If the camera is always focusing while using the f/1.4 aperture, then a shot at f/2.0 would miss the sharpest focus by 5.1 millimeters at this particular distance (1.3 meters away). Nikkor 85mm f/2.8 (left) and f/4.0 (right) In the shots above, I show the chart at f/2.8 on the left, and f/4.0 on the right. I focused the camera using f/1.4, and then stopped down the lens for the shots at f/2.8 and f/4.0 without re-focusing the f/2.8 or f/4.0 shots. The f/2.8 photo shows a distance shift of 12.2 mm away from the chart center, where it is in the sharpest focus. The f/4.0 shot shows a distance shift of 16.1 mm from the chart center at this apertures’ best focus. If the camera is always focusing while using the f/1.4 aperture, then a shot at f/2.8 would miss the sharpest focus by 12.2 millimeters at this particular distance (1.3 meters away), and the f/4.0 shot would have missed by 16.1 millimeters. Nikkor 85mm f/5.6 Similarly, the f/5.6 shot has its best focus at 18.8 millimeters away from the chart center. If the camera focused using the f/1.4 aperture, it just missed best focus by 18.8 millimeters. By f/5.6, the focus shift is largely masked by the depth of focus. The MTFMapper software is very sensitive, though, and can still note that the center of focus is shifted. Different lens, same focus-shift problem Shown above, I marked where the focus plane moved for a Rokinon AF f/1.4 lens. I tried to focus on the chart center, but this lens focused a bit far at f/1.4. I took more shots (without re-focusing) at different apertures, and the arrows indicate where the sharpest focus landed. This lens has less severe spherical aberration than my Nikkor 85mm f/1.4 lens. How to avoid this ‘missed focus’ problem If you’re using a Nikon or a Sony mirrorless camera, then you have a remedy for this focus-shift problem. These cameras allow you to auto-focus at the shooting aperture , instead of having to focus at the widest aperture. This slows down the focusing speed a tiny fraction, but you gain sharper photos by doing so when you have a lens that has spherical aberration. On Nikons, the camera won’t stop down any further than f/5.6 while auto-focusing; it stops the aperture down the rest of the way just before taking the shot. Camera focus starts to get much more sluggish at apertures narrower than f/5.6. If you’re using a Canon mirrorless camera, then you’re presently out of luck. They don’t allow you the option of auto-focusing at the selected aperture, but instead always use the maximum aperture to focus. Maybe a future firmware update will allow this option. As previously mentioned for all DSLR cameras, they focus at the maximum aperture. They are pretty much forced to do this because they need as much light as they can get in order to focus quickly. The only way to avoid the focus-shift problem would be to focus-calibrate the camera at the selected aperture. When you change apertures, you’d need to re-calibrate focus. If you never use high-speed lenses, then this discussion is basically a “don’t care”. Spherical aberration focus-shift was always a source of major frustration when I only had DSLRs for my fast lenses. Thank goodness for mirrorless cameras.
- Using Topaz Photo Studio to Remove Unwanted Objects
I have found the Topaz Photo Studio editor to be amazing at intelligent object removal. Artificially intelligent, that is. Neighbors and No Neighbors It’s possible to use Topaz Photo Studio alone (drag photos to its desktop icon), but I find it preferable to send the photo to Photo Studio from within my photo editor (normally Capture One ). I always use raw format for the best quality. Launch Photo Studio from the photo editor In Capture One, you just right-mouse-click in the photo to bring up the ‘Edit With’ menu. Launch Photo Studio from within the editor, and then convert the shot into DNG format. It’s still a raw format, which will retain image quality. Don't do any photo edits before doing this step, since those edits will be discarded. Wait until after processing in Photo Studio to do any more photo editing. Convert the photo into DNG format To remove objects in Photo Studio , select a new filter Note that Topaz has already applied the “RAW denoise” filter. It will always do this step automatically when you send it a DNG (raw) photo. Pick the ‘Remove’ filter Goal: remove the car and the sign in the photo above Draw a mask over an object Use the ‘removal’ brush to draw over an object. If you have several objects to remove, it’s best to do them one-at-a-time. Click the ‘Remove’ button after drawing over an object. There’s a “Size” slider to alter the brush size. If you make a mistake drawing the mask, you can click the “Add/remove” ‘+’ or ‘-‘ buttons to add or erase the mask. You can move the zoomed image view around the screen if you hold down the ‘space’ bar. If you prefer, you can change the image magnification to “Fit” the screen using the drop-down list that shows “100%” by default, at the bottom of the window. After clicking ‘Remove’, the car is gone! Note in the shot above just how intelligently the car was removed. The AI figured out how to re-create the ends of the stairs, for instance. Add some more masks to rid small distracting objects After clicking ‘Remove’ again, the distracting sign is gone When all of the unwanted objects are removed, click the “Done” button. You are then free to select more filters, such as another “Sharpen” filter. The vertical slider shows the ‘Remove’ filter effect The vertical white slider can be used to review the ‘before’ and ‘after’ of the filter effects. Just slide it left/right across the photo. When you’re finished with Photo Studio , just click the “Export to Capture One” (or whatever photo editor you are using). The DNG-format photo will be automatically added to your photo editor catalog, and you’ll be returned to your photo editor to do more editing. This sophisticated level of object removal is only possible using artificial intelligence. Your photo editor ‘healing brush’ and ‘clone brush’ are no match for this. For full disclosure, I have had issues with both Topaz Photo AI and Photo Studio occasionally crashing my computer. I tolerate that irritation, because these programs are so good as sharpening, noise removal, and object removal. My computer exceeds all of the Topaz specifications for CPU memory, GPU memory, disk space, etcetera, but I still have problems. I have tried every version through 4.0.4, but they all cause problems. I have found that Topaz Photo AI and Photo Studio essentially interchangeable programs.
- Starscapes using Topaz Photo Studio and Capture One
I have found that a single photo editor is rarely sufficient for getting the best results. For starscapes, I use a combination of Topaz Photo Studio and Capture One23. Yosemite Valley night sky To properly capture the light of the Milky Way, you need a long exposure, but not too long. Let me explain. In the shot above, I wanted the longest exposure I could make that didn’t show star trails. For this shot, I used my Sigma 14-24mm f/2.8 Art lens at 14mm, f/2.8 and 25 seconds at ISO 3200. I always shoot in raw format. For this 14mm field of view, exposures longer than 25 seconds start to show the star trails, due to the Earth’s rotation. The Topaz Photo Studio (and Topaz Photo AI 4.0.4 ) has a sharpening feature to rid subject motion. I thought that this feature was the ticket to taking really long starscape exposures, but I thought wrong. Stars in the night sky move in an arc, and not a straight line. The Topaz programmers that train their AI models give it examples of subjects moving in a straight trajectory. When their program is given photos of a subject moving in an arc, it doesn’t recognize that as being ‘motion’, so no motion blur correction is applied. That sucks. I hope that at some future date the Topaz people will train their AI motion blur correction with star trails. The following discussion shows you how to process star shots such that motion blur correction would be used, if their AI model gets smarter. As an aside, I also tried the ON1 Photo RAW editor, including its “Tack Sharp AI” to rid motion blur, but it didn’t rid star motion blur, either. 14mm f/2.8 at 25 seconds, ISO 3200 with no editing The shot above shows what the stars and landscape look like before editing. I used my Nikon Z9 in ‘manual’ exposure mode. I use a wired remote release and a sturdy tripod. Launch Topaz Photo Studio from Capture One Before I do any editing in Capture One , I send the picture to Topaz Photo Studio . Inside the Capture One editor, I right-mouse-click the star shot to get the “Edit With” dialog and select the “Process with Topaz Photo (Studio)”. My Topaz Photo AI works just as well. Any edits to the raw-format photo will be ignored when you send the picture to Topaz Photo Studio , so don’t bother doing any editing yet. Wait until the photo gets processed in Topaz for more editing back in the Capture One editor later. The raw (NEF) shot will get converted into another raw format (DNG). Always stick with raw-format for editing, to maintain maximum quality. Topaz Photo Studio When Topaz Photo Studio gets launched, it will automatically select the RAW denoise filter when it is given a raw-format photo. For the ISO 3200 shots, the ‘RAW Strong’ denoise strength is preferred. Topaz claims that the RAW denoise filter also automatially removes 'hot' pixels. It’s possible to add another denoise filter, but usually the ‘RAW denoise’ filter will be sufficient. Click the ‘100%’ to alter the view magnification Change the default 100% magnified view, because the selection mask is virtually guaranteed to be WRONG. Select “Fit” to see the whole shot Click “Select a filter” To add another filter, click the “Select a filter”. Pick the ‘Sharpen’ filter next Pick the “Motion blur” filter and the “Sky” mask As I previously mentioned, the above “motion blur” sharpening filter selection is largely wishful thinking. In the future, I hope the Topaz programmers will get some better functionality behind this. It still does sharpen the stars, however. The AI-generated sky selection mask: pathetic I’m guessing that the “sky” selection mask is so terrible because it’s a dark nighttime shot. The AI-generated ‘daytime’ selection masks are generally pretty good. Click on the “Edit selection” to modify the Sky mask Clean up the Sky mask As shown above, adjust the mask-selection brush diameter to both add/erase the red ‘sky’ selection mask. When painting the mask is done, click the “Done” button. In theory, the software would then eliminate the star motion trails and leave sharp points of light. The landscape is left untouched by this motion blur mask. Add another filter (for the landscape) Add a ‘Sharpen’ filter for the Landscape Add a sharpening filter for the landscape. With low illumination levels, you probably won’t see too much effect on the landscape. Just like the sky, the landscape AI selection mask will probably be really poor. Adjust the mask-selection brush Brush over the entire landscape, then click ‘Done’ It’s possible to remove airplane/satellite tracks… There is a ‘Remove’ filter option to rid unwanted satellite and airplane light tracks from the sky, but I personally don’t like the results. I save these edits for the Capture One editor, where I use the healing brush to do this operation. Click “Export to Capture One” Click the “Export to Capture One” to return to the Capture One editor, where this DNG-format sharpened/noiseless photo will get automatically added to the Capture One catalog. Now, you’re going to edit the DNG version of the starscape. Edit the DNG version in Capture One You can see the edits that I performed in the Capture One editor above, as shown by the red arrows. I used the healing brush to get rid of the unwanted satellite track. I left the landscape quite dark, with just a hint of details. You can, of course, lighten the landscape to your liking (mostly increasing the ‘Shadow’ slider). The sky color temperature (Kelvin) should be adjusted to taste; most people prefer a cooler color temperature. Star trails close-up with a 60-second exposure What’s shown above is a star shot after motion-blur removal with Topaz Photo Studio . The trails were unfortunately virtually unaffected by the motion-blur filter. This is why I keep my exposures shorter, and I don’t depend upon software to fix star trails after the fact. Starscape with editor adjustments to lighten shadows more I really like how Topaz Photo Studio and Topaz Photo AI rid image noise and also sharpen details. They just don’t work for fixing star trails (yet).
- Diffraction-Limited Lenses and the Sharpest Possible Photo
There are actually physical limits on how sharp your photos can be. Physics itself demands these limits, no matter how much you’re willing to spend on a premium lens. Your camera sensor places additional limits on just how sharp a photograph can be. Lens Limits Something called the “Airy Disc”, named after George Airy (1801-1892), places absolute limits on a lens’ sharpness. A lens can only focus a point of light within certain bounds, related to the color of the light being focused. Airy disc in 3 dimensions, courtesy Google AI Light is actually a 3-D thing. A point of light focused onto a camera sensor looks more like a splash of water. Light waves of different colors have different lengths, where blue light is shorter than red light. Green light is somewhere in the middle. When a lens aperture is stopped down, the size of this Airy disc starts growing in diameter. The Airy disc diameter is only a function of the aperture f-number and the color (frequency) of light. When apertures are idealized as being a perfect circle, the Airy disc diameter, measured in microns, can be estimated to be 1.34 times the aperture f-number for green light (549nm or 0.549um). For blue light, for instance, the Airy disc diameter is smaller. Green light can be between 500nm and 600nm, but 549 was chosen here. The Airy disc formula is: Airy_disc_dia = (2.44 X frequency_um X F_stop) For the above, frequency_um = 0.549 Airy disc sizes with green light In the table above, I’ve shown how big the Airy disc gets at different lens apertures. I also mention a camera sensor with pixels that are 4.35 microns across, such as my Nikon Z9 and Z8. This shows that a lens that has absolutely perfect optics can only focus a point of light within limits, depending upon the lens aperture and the light color (frequency). Camera Sensor Limits For you to notice the image getting fuzzy, the size of this Airy disc has to grow until it covers more than a single pixel on your camera sensor. A rule of thumb is to start getting concerned about diffraction when the Airy disc grows to be two pixels across or more. For making prints, this rule can be loosened up considerably. For camera sensors that have anti-alias filters (to help rid any Moire effects) the images are even fuzzier. The sharpness limits for the camera sensor are summarized by what’s called the Nyquist Limit and the Kell Factor . According to Edmund Optics , the absolute limiting resolution of a sensor is the Nyquist Limit which is half of the sampling frequency (pixels/mm). For the Nikon Z9/Z8, the sensor is 8280 X 5520 pixels. The dimensions are 35.9mm X 23.9mm. The Nyquist limit is (8280/35.9)/2 pixels per millimeter (231/2 pix/mm) horizontal or (5520/23.9)/2 pixels/mm vertical, or again (231/2) pix/mm. The Nyquist limit of (231/2) lp/mm is then 115.5 lp/mm. The typical actual frequency response includes what’s called the “Kell Factor” named after Raymond Kell, which is conservatively set to 0.7. This value helps compensate for the physical space between the light-sensitive portions of the pixels, and to avoid patterns similar to the moire effect. This means the practical actual sensor frequency response limit is now (115.5 X 0.7) or 80.85 lp/mm. Given this information, any measured lens resolution above 80.85 lp/mm for this camera sensor is unreliable. My Best Lens For me personally, my best lens is the Nikkor 500mm f/5.6 PF. I tested it on my Nikon Z8 camera, where I found that I needed to do minor focus fine-tuning to optimize its focus. Several focus test results for my 500mm f/5.6 PF lens The resolution results from the data plotted above got an average MTF50 resolution of 77.1. The peak reading was 84.1, with a standard deviation of 5.3. Using the MTF50 average of 77.1 lp/mm, this lens is quite near the calculated sensor limit of 80.85 lp/mm. As an aside, these measurements are better than I have been able to obtain using my Nikon Z9, although I haven’t been able to figure out why that is (even with focus fine-tune). If Nikon had made this lens any sharper, you’d never be able to detect it without buying a camera with smaller pixels in the sensor. The absolute sharpest possible lenses would also have the widest aperture, and not suprisingly they'd be super heavy with all of that glass.
- Nikon Z8 400% Zoom Manual Focus vs. Autofocus Accuracy
Nikon’s Z8 version 3.0 firmware adds the capability to zoom the viewfinder to 400%. I wanted to see if this level of zooming during manual focus could allow even more accurate focus than autofocus. The most accurate focus that I have tried on my Z8 so far is the “Pinpoint” AF, which is only available in AF-S mode. It’s only a hair better than using 3D focus in AF-C mode, so I rarely bother with Pinpoint focus. For routine day-to-day focus, I much prefer AF-C with 3D focus and the practicality of AF-C over AF-S. What follows is a study comparing those 3 kinds of focus modes. Manual focus practicality and ease of use heavily depends upon the focus ring range of rotation. Lenses with 180 degrees and less of total focus ring rotation range are quite difficult to get critical focus, especially while hand-held. I used my Sigma 70-200 f/2.8 Sport lens in these tests, zoomed to 120mm at f/2.8. Its focus ring rotation range is about 135 degrees, which is fairly typical of AF lenses. The 400% viewfinder zoom was quite challenging to focus; I kept overshooting the best focus slightly. This is a good problem to have, however; the viewfinder made it easy to see how focus changed with even the slightest focus ring rotation. To get the best analysis of focus accuracy, I will use the MTFMapper program. It is far more picky than human vision to discern what’s in focus, via its resolution measurements of a test chart. The Fn2 button assigned 400% zoom Full LCD display 400% display zoom is pretty extreme I set up the camera on a tripod and used a wired remote for all of the photographs to rid vibrations. I took 10 shots each with AF-S/Pinpoint, AF-C/3D, and manual focus with 400% zoom. I de-focused between each test shot to guarantee a full re-focus each time. I assigned the viewfinder zoom feature in the Custom Controls menu to the Fn2 button. The new addition to the version 3.0 firmware is to go beyond 200% all the way to 400% zoom. While using autofocus, the zoom is automatically centered on the current focus point position. One of the AF-S, Pinpoint shots of my resolution chart got messed up when I accidentally tugged on the wired remote. Since the resulting resolution measurement on that shot was terrible, I omitted that shot from the data that follows. Sample resolution measurement using AF-S, Pinpoint AF-S, Pinpoint test chart with overlaid measurements Sample resolution measurement using AF-C, 3D AF-C, 3D test chart with overlaid measurements Resolution measurement using manual focus, 400% zoom Manual focus, 400% zoom chart with overlaid measurements Each resolution measurement Resolution data plot If you don’t notice much resolution change from one type of focus method to another, neither do I. That’s a good thing. It means that manually focusing can get just as good of results as autofocus, as long as you use the viewfinder zoom to analyze critical focus. I decided long ago that focus-peaking wasn’t quite accurate enough for critical manual focus; you could only get approximate focus. By combining focus peaking and the zoom feature, you can be confident that your manual-focus shots will be sharp. Focus peaking is still an excellent way to rapidly get ‘close’ to correct focus. With the Fn2 button assigned to the viewfinder zoom, it’s simple and fast to press it and toggle between the ‘normal’ and ‘zoomed’ view. Sometimes, 400% seemed a bit extreme when compared to 200% zoom. Since it’s programmable, it’s great to be able to change your mind whenever you want.
- Should You Use A Tele-converter or Not?
Nikkor 500mm f/5.6 PF and Sigma TC-1401 tele-converter I never did much questioning about using a tele-converter when I needed more optical reach. Since I tend to live by “trust but verify”, it seemed prudent to actually compare using a tele-converter to simple image cropping. Besides magnifying the image, a 1.4X tele-converter will also slow the lens by one stop. This one-stop light loss also introduces extra image diffraction, which complicates matters a bit. If you choose to crop an image instead of using a tele-converter, you don’t get the chance to alter the depth of focus for the same subject distance. For example, 500mm f/5.6 at 10 meters depth of focus is 0.13m. On the other hand, 700mm f/8.0 at 10 meters depth of focus is 0.09m. Most people would rather have the smaller depth of focus that the tele-converter would provide. I have the Sigma TC-1401 1.4X tele-converter. It works just fine on my Nikkor lenses, even though Sigma and Nikon both tell me not to do it. There are of course lenses that aren’t compatible with any tele-converter, and I’m not discussing those lenses. I tested a few lenses to see how much the tele-converter messes up the resolution, and found that the tele-converter was well worth the slight drop in resolution. I particularly like this tele-converter mounted on my Sigma 70-200 f/2.8 Sport lens. My mirrorless Nikons have no trouble with the loss of one f-stop of light, either. Before I got mirrorless Nikons, I never used this combination of the 500mm f/5.6 PF Nikkor and the Sigma TC-1401. The f/8 aperture resulted in unreliable focus with my DSLRs. Even my Nikon D850 and D500 cameras would often fail to focus in deep shade. My mirrorless cameras focus just fine with the tele-converter on this lens, in just about any light. I use the free MTFMapper program to test lens resolution and other lens optical characteristics. This program gives me very comprehensive information on how a lens performs optically. When I tested my 500mm lens with the 1.4X tele-converter on my Nikon Z9, I got a surprise. The following was what I found. 500mm f/5.6 PF Nikkor MTF50 resolution The resolution plots shown above give me the overall lens resolution throughout the frame, in both the meridional and sagittal directions. The peak lens MTF50 resolution at f/5.6 was found to be 61.5 lp/mm, which is the same as 2940 lines per picture height on my Nikon Z9 camera. MTF Contrast plot at 500mm f/5.6 The most common plot of lens performance, as shown above, is an MTF contrast plot. I have included measurements at 50 lp/mm, which most manufacturers omit. Test chart edge measurement details at 500mm f/5.6 Overall, this lens is really good, even wide-open. The resolution is consistently high across the whole field of view, at least in the sagittal (wheel spoke) direction. I mounted the 1.4X tele-converter on the lens and then repeated the resolution testing. This is the equivalent of a 700mm f/8 lens. Nikkor 500mm with TC-1401: 700mm f/8 MTF50 resolution The EXIF data when using the Sigma 1.4X teleconverter doesn’t notice that the teleconverter is attached, so it still indicates 500mm f/5.6. In reality, this is 700mm f/8. The peak lens MTF50 resolution at f/8 was found to be 43.9 lp/mm, which is the same as 2098 lines per picture height on my Nikon Z9 camera. MTF Contrast plot at 700mm f/8 Test chart edge measurement details at 700mm f/8 The lens resolution at 500mm is 2940 lines/ph, compared to 2098 at 700mm, or 61.5 lp/mm versus 43.9 lp/mm. So, how do we know if using the tele-converter is “worth it”? Cropping changes the “picture height” portion of the equation, because there are effectively fewer millimeters of image height. The 1.4X tele-converter retains 71.43% of the image width and height, or 1/1.4. Cropped resolution = (original_resolution) * (1/TC_magnification) TC_magnification = 1.4X Cropped resolution = 2940 * (1/1.4) = 2100 lines/ph Lens MTF50 resolution with tele-converter = 2098 lines/ph This resolution is the combination of the tele-converter effects and also the 1-stop-dimmer diffraction effects. Here, it’s better to NOT use a teleconverter! You don’t gain any resolution at the effective 700mm. If the cropped resolution is equal to or greater than the tele-converter mounted onto the lens, then you s houldn’t use a tele-converter. Especially when you consider that you’re losing at least a stop of light, it just isn’t worth it. If the reduced depth of focus is important to you, however, you might opt for using the tele-converter anyway. If you notice the autofocus getting too slow, then you may opt for cropping the 500mm setup instead. I tried these same tests on my Nikon Z8 camera, and the 500mm with the 1.4X tele-converter performed better than on my Z9. In that case, using the tele-converter is worth it. Not every lens responds the same way to a tele-converter. Take nothing for granted.