Topaz DeNoise AI Review and Tutorial
- Ed Dozier
- May 20, 2021
- 10 min read
Updated: May 21, 2021
I used to handle most of my photo noise reduction and un-sharp masking in my Lightroom program. Sometimes I use Photoshop, Capture NX-D, Sharpener Pro 3, Zoner Pro, and a few other conventional editors for these tasks (with similar results from all of them). I got curious about what recent developments in artificial intelligence technology might be able to do in handling these same tasks. My curiosity got the better of me, and I bought Topaz DeNoise AI.
You might think from the program’s name that DeNoise AI is only used to rid noise from your photos, but it’s just as useful for sharpening them, too. The main reason I like DeNoise AI is its ability to simply make your lens seem better than it is. Details are enhanced without any “haloes” on the edges. Completely noise-free photos can still benefit from this program.

ISO 3200 using Topaz DeNoise AI “AI Clear”, no luminance fix
The ISO 3200 shot above didn’t have very much color noise, but DeNoise got rid of what was there. The luminance noise seems nearly untouched, but the sharpness is worlds better. There’s not a hint of haloes to be found. You can see the DeNolise AI settings used in the right-hand side of the picture. I really zoomed into the shot to be able to show the individual hare hairs at high magnification. Sorry; I couldn’t resist.

ISO 3200 enhanced with Topaz DeNoise AI “AI Clear”, separate luminance fix
The shot above had luminance noise removed in Lightroom before calling the DeNoise plug-in. The Lightroom luminanace setting was 54, with a Detail value of 50. Fine details are now mostly lost; look under the bunny’s chin to see how the details have turned into mush. I’d much rather have a slightly ‘sandy’ background and retain the fine details. Luminance noise removal works best if you use masking and only apply it to those open, featureless areas of the shot prior to calling up the DeNoise AI plug-in.
I’ll discuss in the article below how DeNoise is a bit finicky about the settings range that more effectively works on luminance noise.

ISO 3200 “DeNoise AI” effect on luminance noise
Without changing any DeNoise AI algorithm settings, here’s an ISO 3200 shot that the same algorithm decided to have a larger impact on luminance noise. It did so in an intelligent way, enhancing details while still decreasing luminance noise. I’d swear that the artificial intelligence knows when luminance noise is more distracting and gets more aggressive with it. AI algorithms always have an air of mystery about them; nobody knows exactly how they make their decisions.
What does Artifical Intelligence here even mean? This program “knows” what to do by being shown many, many samples of noisy and fuzzy input shots and then sharp, clean output shots. The AI algorithm figures out what needs to be done to the pixels to produce a clean output, thus relieving the photographer from having to spend a bunch of time and effort to try to achieve the same level of quality.
The first thing I found using this program was that you better have a really high-performance computer and GPU. I tried out DeNoise AI on what I considered to be a decent-performing laptop (Windows 10) that had an Intel Core-I7 CPU and an Nvidia Quadro FX 880M GPU (48 cores). It basically brought my laptop to its knees when I tried to process my first photograph with the default setting of “auto update”.
By the way, do not buy this program if your computer doesn’t have a GPU. You have been warned.
Next, I installed DeNoise AI onto an HP Omen desktop gaming computer with an AMD 3.09 GHz Ryzen 9 3900, 12-Core Processor with 32 GB of RAM. This computer sports an Nvidia GeForce RTX 3070 GPU (5888 cores), and uses an M.2 drive for storage. Now we’re talkin. This computer coasts though the most intense tasks you can throw at it, including DeNoise AI.
I only mention computer hardware here because AI technology needs vastly more computing resources than conventional programs. So, is it worth it? For me, the answer is yes. I’ll let you decide if it’s right for you.
Not wanting to abandon using my laptop, I found a way to be able to use DeNoise AI that makes it workable, if not entirely pleasant. I’ll share those procedures in what follows.
So, what’s so important about noise reduction and sharpening, anyway? For me, it’s about being able to use high ISO. A large proportion of my shooting is done using long focal lengths (600mm) in lighting conditions that are not ideal. I have never been thrilled at the “smeary” results when using ISO 3200, even with my Nikon D850. I shoot only 14-bit raw format, but nevertheless the high-ISO shots always leave something to be desired. And if you’ve tried shooting wide-angle star-scapes, you know what a challenge color noise removal can be.
For low-ISO images, this program still earns its keep by doing such an excellent job with sharpening. Using manual techniques in various editors, I haven’t been able to outdo what the “AI Clear” algorithm achieves.
Running Topaz DeNoise AI
After you install the program, there are a couple of ways that you can use it. If you want to, it can be executed as a stand-alone application (just double-click its desktop icon). Using Lightroom, it can be executed from either the Library or Develop tabs via the menu Photo | Edit In | Topaz DeNoise AI. You can also right-click the “film strip” photo or edited photo and select “Edit In | Topaz DeNoise AI” to get there. For some editors, you can tell them to install a plug-in like other Photoshop plug-ins that expect the folder that will have the “tltopazdenoiseaips.8bf” in it. Did you know the “8bf” suffix stands for “eight-bit filter”?
An example Zoner editor plug-in installation procedure would look like:
Settings | Preferences | Plug-ins | Add…| (browse to tltopazdenoiseaips.8bf folder) Apply
You can use raw-format input files, but Topaz will save the finished results only in neutral image formats, such as 16-bit LZW Tiff, png, DNG, or jpeg.
My setup, when executed from Lightroom, saves the DeNoise results in a file that adds “-Edit” to the file name, and saves it in 16-bit LZW tiff format. In the Zoner Editor, it returns the plug-in changes into your un-saved raw file to save as Tif or jpeg. In the Capture NX-D editor, you use “File |Open With| Topaz DeNoise AI…” and Topaz will save the results into the folder configured in Capture NX-D via the “File|Open With|Register” dialog. Every program seems to be a little different in how it captures the DeNoise results.
It’s generally recommended to process your photos in DeNoise AI after your other editing is done, but you can compare your own results to see if processing order is important to you. Also, you probably want to avoid any cropping until DeNoise has processed your photo; it seems to do a better job with the larger set of information in the un-cropped shot.
Topaz DeNoise AI Configuration

Suggested Preferences
The default settings of DeNoise AI are not what the vast majority of its audience will want. The first thing that should be done after starting the program is to change the default settings via the File | Preferences menu. Most people will want to turn OFF the “Auto-Update Preview” option. If you don’t do this, then it will attempt to re-calculate and re-draw the display every time you scroll or zoom.
Next, you will want to set the Performance | Ai Processor | Default GPU. You don’t want the processing burden to fall on your computer CPU; that’s what GPU’s live for.
Three Different Ways to Use Topaz DeNoise AI
There are three fundamentally different kinds of algorithms for removing noise and sharpening in Denoise AI. They are called DeNoise AI, AI Clear, and Low Light.
As noted below, Topaz just released a newer version 3.1.1 that expands your options to 4 algorithms.

Compare all algorithms together
For different conditions, different algorithms might be superior. Topaz will let you easily compare them to see which you like best. You usually have to look up really close to see differences, so there’s a little viewing rectangle that you can size and move to scrutinize small sections of the picture. The settings are all maintained separately for each algorithm, even after you close and re-open the program.
“DeNoise AI” (or "Standard") is intended to enhance details in low-noise images. “AI Clear” (or "Clear") is targeted at high-noise, high ISO images. “Low Light” is designed for high-noise images with low detail retention. The new "Severe Low Light" is for super-high ISO's. I nearly always choose “AI Clear” (or just "Clear" now).

5-19-2021 Update: Version 3.1.1 just arrived
Topaz just came out with a new version as I’m writing this article called 3.1.1. The number of algorithms has expanded to 4. The “ Comparison view” window now needs you to select which 3 algorithms to compare against the “original” view. The 4 algorithms are called “Standard”, which corresponds to “DeNoise AI”, “Clear” corresponds to “AI Clear”, “Low Light” for difficult low-light conditions, and “Severe Noise” for extreme ISO shots.
You can zoom your view using the mouse wheel, which will make the white viewing rectangle change size automatically. You can left-mouse- button-drag the image to move to see the area of interest.
If you have a high-performance computer, you’ll probably want to select the “Comparison View”, which splits a view of the photo into 4 separate images. When the view gets updated (click on the “Update Preview” button), all of the algorithms will get executed with their individual settings. Remember to select the desired final algorithm before clicking the “Save Image” at the bottom of the screen to finish.
If you have a ‘regular’ computer, you’ll probably want to select the “Side-by-side View”, which compares the original with your selected algorithm results, such as “AI Clear” in a split screen.
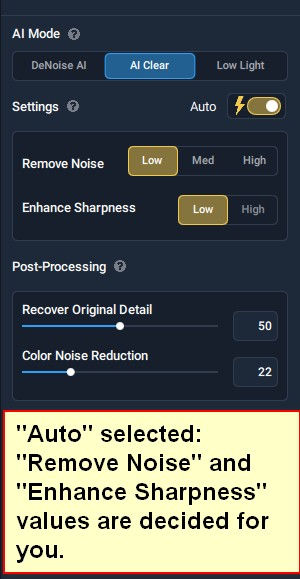
Let Topaz figure out what to do

You decide what to do
For all of the algorithms, you have the choice of running in “Auto” mode or not. The program can decide what it should do to optimize the image in Auto, or it will let you make the decisions if this is turned off. In either case, you still get to decide what the “Post-Processing” values should be. I usually disagree with the sharpening values that the “Auto” mode decides to use, so I keep this option turned off.

Stars: it seems to know color noise versus stars
In really, really dark shots, color noise can be awful. DeNoise really shines for ridding this. For star shots, it can be a bit difficult to tell since the sky is so dark. DeNoise has a tool to help this, so read on.
The “Brighten” option
The “Brighten” option can lighten dark backgrounds without adding color noise in doing so. It seems far superior at picking out details and colors than your own eyes can in nighttime scenes. I could barely make out the pine tree when I took the shot; the “Brighten” feature can even discern the green pine needles from the dark branches. You may or may not like this effect, but having choices are always better than having none.
Algorithm Settings
When I first started using DeNoiseAI, it seemed as if luminance noise wasn’t even touched. It took quite a while to dial in settings that handle this noise to my satisfaction, especially with the “AI Clear” algorithm.

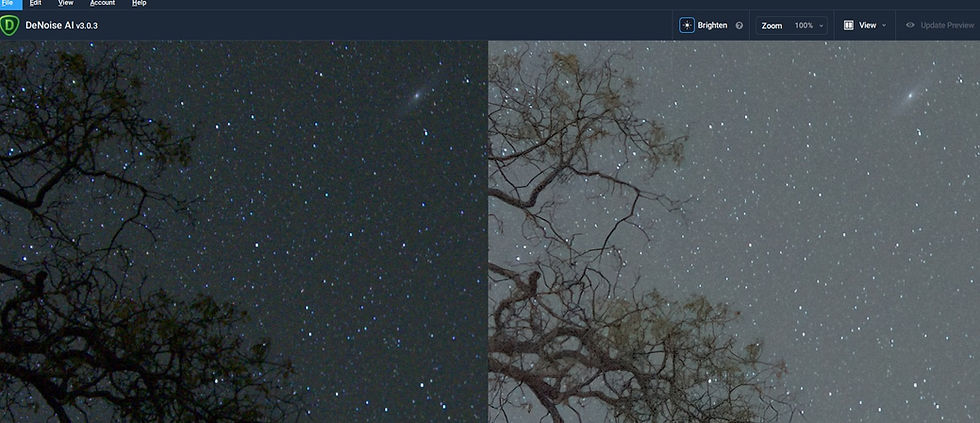
ISO 2500 using ‘AI Clear’
You’d think the shot on the right-hand side above was nearly filling the frame, but it’s just a tiny part of the photo. The AI Clear algorithm (now called just "Clear") just did a spectacular job in cleaning up details and noise. This software found details that I didn’t know were there.

ISO 2500 algorithm comparison
In the shot above, the “Denoise AI” did the best job in my opinion. It eliminated luminance noise, while the “AI Clear” didn’t touch luminance noise. In another test with different settings, I gave the edge to “AI Clear” instead for the sharpest rendering with good luminance noise suppression. You can almost drive yourself crazy with the number of knobs and algorithms to select from. My favorite recipe for this shot ended up being “AI Clear”, “Remove Noise”=high, “Enhance Sharpness”=low, “Recover Original Detail”=23, “Color Noise Reduction”=6.
Until the right algorithm settings are found, you might be fooled into thinking that a particular algorithm is just not suited to your image. I encourage you to take the time to fully explore what effects the various settings have on your images with each algorithm. Once you find a good recipe, I’d suggest you record it.

Nothing can help ISO 12800
In case you were wondering, extreme ISO’s are still hopeless. You can rid noise, but there’s no detail or dynamic range to work with. You might want this for surveillance work, but not much else.
Masking
But wait, there’s more.

Use DeNoise on parts of the photo
You can also apply sharpening/noise adjustments to pieces of your photo. You start by clicking the “Mask” button at the bottom of the program. To apply that particular mask, click the “Apply Mask” button. When all effects are done, you still click the “Apply” button at the bottom-right to save the file (and return to the calling application).
A realistic example of this using this feature would be to selectively sharpen only the eyes and lashes of a model. This is very common among portrait photographers who never want to apply sharpening to the skin of the model (they usually apply gaussian blur instead).
Batch Mode
DeNoise AI can work on many images in one sitting, if you wish. Each image can have a different algorithm applied to it. The bottom of the screen lets you make image selections and lets you know which algorithm it will use. When done making algorithm selections on each image, the button at the bottom-right will display “Save * Images”, where the * indicates how many images to be processed and saved.
What DeNoise AI Won’t Do
A totally un-handled image defect is motion blur. This program doesn’t do anything about motion. Topaz sells another product called Sharpen AI, which adds a “Stabilize” feature to rid image motion blur. I try to always use a high-enough shutter speed (or vibration reduction) to avoid this problem. Sharpen AI does some noise reduction as well, but I think DeNoise AI does a bit better job in this regard. I just want you to be aware that this feature exists.
Conclusion
I couldn’t be more pleased at the sophistication of Topaz DeNoise AI for sharpening fine details without adding edge haloes. If you have color noise, this program completely eliminates it. Luminance noise is handled at least as well as a professional editor would do, but only if you find the ‘sweet spot’ in the algorithm settings.
The latest DeNoise AI version that actually came out the day of this article writing is 3.1.1. I’ll update this article if I notice any significant changes. It appears the main change is an addition of an algorithm to handle extreme ISO called “Severe Noise”. Those programmers at Topaz are obviously kept pretty busy.
Even this program can’t perform magic. Personally, I’m still not willing to sacrifice the loss of details and dynamic range beyond ISO 3200. But this program makes ISO 3200 look pretty good.
Although it adds an extra process step to editing, I am more than willing to tolerate the extra complication to get these premium results on my “keeper” shots.


Brilliant review of Topaz DeNoise AI—your visual comparisons and clear breakdown really highlight its value for photo editors! Just as this tool simplifies image clarity, free AI tools for project management are transforming the way teams manage tasks, automate reports, and streamline workflows. For growing businesses or creative professionals juggling multiple projects, these free AI tools are a smart starting point. It’s amazing to see how AI is redefining both visual and operational precision. Your tutorial bridges tech and creativity perfectly. Thanks for this insightful piece—it’s incredibly helpful. Looking forward to more content that blends AI innovation with practical use cases!