Nikkor Z 24-120mm f/4 S Lens Review
Updated: Sep 23, 2023

Nikkor Z 24-120mm f/4 S, mounted on Nikon Z9
I have heard so many good things about this lens for so long that I finally got one. Since I already have the very professional AF-S Nikkor 24-70 f/2.8 ED VR, it would seem a mostly redundant acquisition. Yes and no.
I have a dedicated infrared F-mount camera, and that 24-70 is nearly always parked on it. Since the Z 24-120 has a different mount, that IR camera won’t ever see this lens; pity.
Before I digress too far, let’s get back to the subject at hand: the 24-120 f/4 Z lens. This is a true walk-about lens which goes wide, telephoto, AND macro. I’ll show some shots later that prove the point.
By definition, 5X zooms produce images that are crap. Right? Not this one. It beats my 24-70 f/2.8 F-mount lens at every f-stop and focal length for resolution. It is even slightly sharper than my Micro-Nikkor 105mm f/2.8 AF-S VR, at least in the central part of the image.
I got this Z lens for HALF the price of what the 24-70 f/2.8 AF-S lens goes for these days (which I actually paid $2,400 for). So what’s missing here?

24mm setting
Note that you can see the entire range of zoom settings above (about a quarter turn). I included the lens hood; you should, too.

120mm setting
Notice the two telescoping pieces that make up the zooming portion of the lens. Nikon claims that the lens is still entirely weather/dust sealed nonetheless.

Shown: lens controls
Shown above left-to-right:
Focus ring
Zoom ring
Lens function button (L-Fn)
Lens control ring
A/M switch
What’s NOT included with this lens?
This Z lens has no VR, but my Z9 and Z8 bodies both have IBIS; for me this is a “don’t care”. For you, it may be important.
This lens has no focus scale. It messes up my ability to measure focus speed by filming a slo-mo video of the lens focus scale in motion, but otherwise it’s a “don’t care”.
No quality lens case. It comes with a nearly useless flimsy pouch without even a drawstring. I have several really good lens cases, so again I don’t care.
Lens Specifications
· Weight: 1.39 lbs., 630g. (24-70 f/2.8 F-mount is a huge 1067g for comparison)
· Dual stepping motors for internal autofocus (almost perfectly silent and super fast)
· 77mm filter threads
· ARNEO/Nano crystal/fluorine coating: repels dirt; very little flare.
· 9 rounded blades, electronic aperture (circular out-of-focus lights)
· 3 ED glass, 3 aspherics, 1 ED/aspherical combination lens element. Sharp!
· Total lens elements: 16, 13 groups.
· Constant-aperture f/4 (all focal lengths). Minimum aperture f/22.
· 1 programmable lens function button, e.g. “AF-ON”.
· A/M focus switch. “M” will stop autofocus behavior.
· 1 programmable lens control ring, e.g. a real aperture control!
· Metal lens mount, mostly high-quality plastic exterior.
· Moisture/Dust sealed. No Nikon refunds for H2O damage…
· Minimum focus: 35cm/1.15 ft. (0.42X at 120mm, measured) near-macro!
· Length: 118mm, 84mm diameter
· HB-102 plastic petal bayonet lens hood
General Impressions
The zoom ring on this lens is stiffer than any lens I have ever used. Getting to the nearest millimeter is a challenge. It takes about a quarter turn to go through the whole zoom range, so you can zoom very quickly. A sort of giveth and taketh away.
The dual-telescoping zoom action has NO wiggle. This lack of wiggle is necessary to obtain the very high resolution at all focal lengths. This is probably why the zoom action is stiff.
The astonishing close focus distance and 0.42X magnification at 120mm has enabled me to mostly abandon using my 105mm macro lens. I rarely need to get all the way down to 1.0X magnification, and the super high resolution allows for significant cropping. The intensely fast auto-focus lets me get macro action shots that I’d miss with my slower-focusing 105mm Micro Nikkor.
With my usual editors (Lightroom, Capture One 23, ON1 Photo Raw 2023) the photos don’t show any vignetting or image distortion. The information embedded in the Raw images (I’m using either the “High Efficiency Raw” or DNG format) has distortion-correction information and vignetting-correction information. The editors auto-correct the images without asking. For my old version of Lightroom, I use the latest Adobe DNG converter to use my Nikon Z8 raw files as DNG and still get automatic distortion correction.
Focus Speed
Due to the lack of a focus scale and internal focusing, I haven’t figured out an accurate way of providing actual focus speed numbers. Suffice it to say that those dual stepping motors make focus really fast. A crude test I performed involved focusing at minimum distance on a close subject at a focal length of 120mm, start video recording at 120 fps, and then press the AF button while panning to focus on a distant scene. When I reviewed this video, it took roughly 57 frames, which is 0.48 seconds (in sunlight).
Keep in mind that this lens focuses closer than most, so minimum-to-maximum focus range is much further than most lenses. For normal photography, you'll find the focus to be blazingly fast.
Sample Shots

120mm f/4 1/800s bokeh example
Bokeh circles can show slight edge brightness, and the frame edge highlights become non-round. Even the $8000 Nikkor 58mm f/0.95 Noct has non-round highlights at the frame edges, so don’t use that as a pass/fail test. After you stop down the aperture, the non-round edge highlights become circular, although of course they’re smaller.

120mm f/4 1/800s pixel-level crop from the shot above
Note how sharp those feathers and eye reflections are in this 100% crop. This lens is sharp. I haven’t seen any “onion skin” in the highlights, which is something which really bugs me when it’s present in photos.

Nikon Z8, 120mm f/5.6 crop from a close-up
To my eye, this is as sharp as a good macro lens. I cropped some, but the resolution really holds up well.

24mm f/9 1/400s

24mm f/9 1/1600s

120mm f/7.1 1/1000s. Packard hood ornament
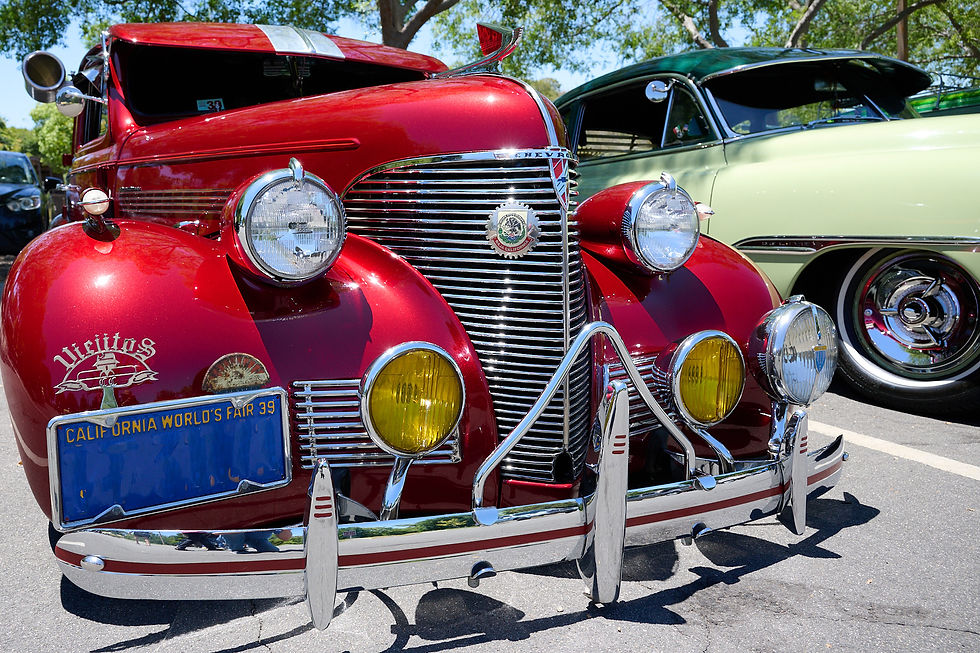
24mm f/7.1 1/500s (license plate altered)

80mm f/8 1/400s converted to black and white
Infrared Performance
For those of you that are interested in infrared photography, I tried out this lens with an 850nm infrared filter. This is very deep infrared. The lens passed with flying colors (except that ‘color’ is undefined in this part of the spectrum). No dreaded hotspots seen.

850nm deep infrared, 120mm f/5.6 180 seconds
I had to use an infrared filter over the lens, since this Z lens won’t mount onto my F-mount infrared camera. Super long exposure, because the image sensor cover of the Z9 used in this test really screens out infrared.
Lens Optical Characteristics

24mm f/4.0 “hidden” barrel distortion and vignetting
I was able to “uncover” the actual optical distortion of this lens by converting the raw file into the Adobe DNG format, and then using my image-analysis software MTFMapper. As shown above, there’s hefty barrel distortion at 24mm. As you’ll see later, there’s pincushion distortion that’s pretty evident at 120mm. Again, you’ll probably never see this distortion in your photos, since most photo editors will automatically remove it.
Relying on photo editors to remove optical distortion is getting more common all the time, and isn’t necessarily bad. Lenses would always be bigger, heavier, more expensive, and more complicated to totally rid this distortion purely through the glass. Lens designers are going to just embed the mathematics of the geometry corrections into the photo file (correction profile), so that editors can straighten curves, and even adjust transmission loss (vignetting). It only gets ugly when you’re using an image editor that doesn’t understand this embedded information.
Resolution, Contrast, and Lateral Chromatic Aberration
I use the MTFMapper program to perform resolution tests, which you can get here: https://sourceforge.net/projects/mtfmapper/
This image analysis program was used to measure the Z-cam lenses on board the Mars rover Perseverance.
My resolution chart size is 40” X 56” to get a better working distance. My tests were done using unsharpened raw-format shots using a 45.7 MP Nikon Z8.
The contrast plots are real contrast plots, and not the theoretical ones that lens manufacturers put out. They include the camera sensor effects, since you’re going to be using the lens with a real sensor.
The MTF50 resolution plots, measured in line pairs per millimeter, are shown in both the sagittal and meridional direction across the whole field of view. Resolution is a 2-dimensional thing, and not a simple single number. I stop measuring after f/16, because diffraction destroys the resolution.

MTF50 lp/mm resolution, 24mm f/4.0
Peak resolution, central = 76.4 lp/mm (3652 lines per pic. height)
Peak resolution, worst edge = 57.9 (2768 l/ph)
Peak resolution, worst corner = 43.2 (2065 l/ph)

MTF Contrast plot, 24mm f/4.0
There’s definite astigmatism here, since the sagittal/meridional lines don’t overlap very closely as you get further from the lens center. The meridional (tangent) direction has less contrast and resolution than the sagittal (wheel spokes) for this lens at most apertures and focal lengths until the lens is stopped down typically beyond f/11.

Lateral chromatic aberration, f/4
The worst (blue vs green) chromatic aberration is about -5.7 microns. The sensor has 4.35 micron pixels, so it’s 1.3 pixels worst case.

MTF50 lp/mm resolution, 24mm f/5.6

MTF50 lp/mm resolution, 24mm f/8.0

MTF50 lp/mm resolution, 24mm f/11.0

MTF50 lp/mm resolution, 24mm f/16.0

MTF50 lp/mm resolution, 34.5mm f/4.0
Peak resolution, central = 72.7 lp/mm (3475 l/ph)
Peak resolution, worst edge = 39.1 (1869 l/ph)
Peak resolution, worst corner = 32.4 (1549 l/ph)
(Like I said, zooming to an exact millimeter is very difficult on this lens.)

MTF50 lp/mm resolution, 34.5mm f/5.6

MTF50 lp/mm resolution, 34.5mm f/8.0

MTF50 lp/mm resolution, 34.5mm f/11.0

MTF50 lp/mm resolution, 34.5mm f/16.0

MTF50 lp/mm resolution, 50mm f/4.0
Peak resolution, central = 77.4 lp/mm (3700 l/ph)
Peak resolution, worst edge = 50.5 (2414 l/ph)
Peak resolution, worst corner = 43.2 (2065 l/ph)

MTF50 lp/mm resolution, 50mm f/5.6

MTF50 lp/mm resolution, 50mm f/8

MTF50 lp/mm resolution, 50mm f/11

MTF50 lp/mm resolution, 50mm f/16

MTF50 lp/mm resolution, 70mm f/4
Peak resolution, central = 65.2 lp/mm (3117 l/ph)
Peak resolution, worst edge = 41 (1960 l/ph)
Peak resolution, worst corner = 38.3 (1831 l/ph)

MTF50 lp/mm resolution, 70mm f/5.6

MTF50 lp/mm resolution, 70mm f/8

MTF50 lp/mm resolution, 70mm f/11

MTF50 lp/mm resolution, 70mm f/16

MTF50 lp/mm resolution, 120mm f/4
Peak resolution, central = 66.5 lp/mm (3179 l/ph)
Peak resolution, worst edge = 42.7 (2041 l/ph)
Peak resolution, worst corner = 41.2 (1969 l/ph)

120mm f/4.0 “hidden” pincushion distortion and vignetting

MTF Contrast plot, 120mm f/4.0

Lateral chromatic aberration, f/4

MTF50 lp/mm resolution, 120mm f/5.6

MTF50 lp/mm resolution, 120mm f/8

MTF Contrast plot, 120mm f/8

MTF50 lp/mm resolution, 120mm f/11

MTF50 lp/mm resolution, 120mm f/16
Summary
It never occurred to me that I would use this lens for macro photography. The 0.42X magnification, good working distance, and fast focus has made it my go-to for most macro work. Most close-up photography doesn't really need to go all the way down to 1.0X.
This lens really does compete with many prime lenses. It’s in the same ballpark for sharpness, and the bokeh isn’t that bad. And you just can’t beat being able to zoom over such a large and useful range. I didn’t fully appreciate how much better it is, compared to my 24-70 f/2.8 zoom, for sharpness, focus speed, focal range, and close focus. It would of course be nice to have the same f/2.8 aperture, but you can't have everything.
Telephoto zooms are famous for being much worse at their maximum focal length. Not this guy.
For those times that you can take only a single lens on a trip, this is it. It will handle everything except the really big glass required for wildlife. And it’s maybe a little long for architectural interior shots.
The Z lenses, especially the ‘S’ line, have a reputation for being overpriced, but here’s a case where what you get is a real bargain. I got it along with my Z8, so I got an even better bargain.
Sample Shots

95mm f/8 1/100s

96mm f/5.6 1/400s

120mm f/8 1/2000s


Trong lần khảo sát https://qq888inc.com/, mình tập trung vào quá trình chuyển đổi giữa những danh mục có nội dung liên quan. Khi người dùng muốn tìm hiểu nhiều chủ đề, khả năng di chuyển thuận tiện sẽ giúp họ tiết kiệm thời gian và duy trì mạch theo dõi. Mình bắt đầu từ một danh mục, mở nội dung chi tiết rồi tìm cách chuyển sang phần kế tiếp. Những đường dẫn được đặt đúng vị trí và có tên gọi dễ hiểu thường giúp người xem xác định bước tiếp theo nhanh hơn. Mình cũng quan sát xem sau khi chuyển trang, cấu trúc menu có còn quen thuộc hay xuất hiện những thay đổi khiến người dùng…
trangchuhitclub.in giúp mình chú ý đến cách các khu vực khác nhau cùng tạo nên một hành trình tìm kiếm linh hoạt. Mình thường bắt đầu từ Xổ số, chuyển sang Thể thao rồi tiếp tục đến Game bài, Casino Online và Bắn cá tùy theo nội dung muốn xem. Khi đã đi qua nhiều phần, mình thử quay lại một danh mục cũ bằng menu để xem những điểm tham chiếu ban đầu còn hữu ích hay không. Mình cũng quan sát cách các liên kết câu hỏi thường gặp, khuyến mãi và hướng dẫn tài khoản được bố trí bên cạnh những khu vực chính. Điều mình quan tâm là khả năng chuyển đổi giữa các mục mà không…
Khi kiểm tra ko 66, mình chú ý nhiều hơn đến phản hồi của giao diện sau từng thao tác. Mình mở một danh mục, chuyển sang phần nội dung tiếp theo rồi quay lại vị trí trước đó. Trong quá trình này, mình quan sát thời gian hiển thị, trạng thái các nút và cách nội dung được giữ nguyên. Mình tiếp tục lặp lại quy trình với một số danh mục khác để có cơ sở đối chiếu. Cách kiểm tra này giúp mình nhận biết những điểm khác nhau giữa các khu vực và đánh giá trải nghiệm điều hướng dựa trên nhiều thao tác thay vì chỉ một lần truy cập.
dn88 làm tôi quan tâm đến cách các danh mục trò chơi được giới thiệu cho người dùng. Tôi quan sát casino live, game bài và bắn cá để đánh giá sự khác biệt giữa hình ảnh đại diện, tên nhóm và phần mô tả đi kèm. Nếu các thành phần này được kết hợp hợp lý, người dùng có thể hình dung nội dung trước khi chuyển sang trang chi tiết. Tôi cũng chú ý đến cách bố trí nút quay lại và khả năng tiếp tục khám phá những lựa chọn khác mà không mất phương hướng. Theo tôi, giao diện không nên chỉ dựa vào hình ảnh bắt mắt mà cần hỗ trợ việc nhận diện thông tin…
tn88 giúp tôi quan sát cách những thành phần hình ảnh hỗ trợ việc nhận diện danh mục. Tôi chú ý đến sự kết hợp giữa biểu tượng, tiêu đề và phần mô tả trong từng khu vực. Khi tìm hiểu đá gà, tôi xem liệu cách trình bày có giúp phân biệt nội dung chính với những thông tin đi kèm hay không. Tôi cũng quan sát sự thống nhất về phong cách giữa trang giới thiệu và các trang chi tiết. Theo tôi, hình ảnh có thể tạo dấu hiệu nhận biết nhanh, nhưng vẫn cần đi cùng tiêu đề dễ hiểu để tránh phụ thuộc hoàn toàn vào yếu tố thị giác. Sự cân bằng giữa hình ảnh…