Search Results
280 results found with an empty search
- Reasons Why You Would Actually Want To Use DNG Format
I’m a hardcore RAW format shooter. For Nikon, raw is spelled “NEF”. I never take jpeg photos in-camera, since it immediately puts you into a straitjacket and limits the possible future of your pictures. Why in the world might I consider using DNG format instead of sticking with the Nikon NEF format? Let me try to explain this act of seeming lunacy. First of all, what exactly is DNG? This is an Adobe invention, and it stands for “digital negative”. This was their attempt at defining a “generic” raw format they someday everybody would standardize on. That day never came; hardly anybody uses DNG. What follows are some reasons that you might want to consider using DNG. The DNG format doesn’t lose any quality; it holds the same image information that Canon, Nikon, Sony, et al. raw-format photographs hold. My Nikon testing shows that the DNG format files are actually smaller than even my lossless-compressed NEF files. The difference isn’t huge, but often in the range of 8 to 10 percent. I don’t ever recommend deleting your original raw photos in favor of their DNG versions, but you might consider archiving the original raw photos to offline storage and just use the smaller DNG photos for editing. You can use new cameras with old software. Since every camera model’s raw format is unique, it’s very common to have software that cannot recognize your new camera raw files. Most photo editors, however, do understand the DNG file format. Also, most photo editors let you update their DNG version to newer DNG versions as they become available. If your photo editor cannot use newer-version DNG files, then the DNG converter program actually lets you convert into an older version of DNG that you can use with your editor. The DNG converter 14.4 is supposed to even support the new Nikon Z9 HE* raw format. This would then let you use the very small file size in your editors that at least understand newer DNG formats. I don’t (yet) have a Z9, so I can’t verify this claim. I have heard that Apple/Mac may still have trouble with this new version, but Windows 10 is fine. Adobe Digital Negative Converter Program The DNG format continues to be supported by Adobe. They still offer their “DNG Converter” program, and it’s free. Here’s a link to their Windows/MacOs converter program: https://helpx.adobe.com/camera-raw/using/adobe-dng-converter.html The Adobe DNG converter program is very fast, and it lets you batch-convert the files as well. In this way, it takes very little labor or time to convert your shots. For programs that only support specific older DNG formats, the DNG Converter program lets you convert your camera raw photos into a specific version. An example of this is Adobe Photoshop CS4, which can only use DNG files up to version 5.7. Convert into a specific version of DNG for older programs After installing the Adobe DNG converter, you can execute it in Windows by running it from the Programs list. The most common way to use the DNG converter is to just click on the “Select Folder…” button that lets you tell it where your raw (e.g. .NEF, .CR2, etc.) files are. This button is located in the “Select the images to convert” section. Next, click the “Select Folder…” in the “Select location to save converted images” section. This assumes you also select the “Save in New Location”; you can also combine the new DNG files in the same folder as your raw shots, if you wish. If you need the DNG version number to be compatible with older programs, then click the “Change Preferences” button to pick another version. Finally, just click the “Convert” button to start converting your camera’s raw files into the DNG format files. Your original raw files won’t get modified, to they’re safe. Summary Knowledge is power, and it’s better to know about what the DNG format can do for you than to remain ignorant about it. Adobe had a good idea, even if it never gained much traction. If you, like me, want to keep using older photo editors such as the stand-alone versions of Photoshop or Lightroom, then DNG may be the only option in the future to keep using raw-format camera files. Long live Raw.
- Lightroom Exposure Editing Tips
Lightroom has some very confusing terminology, which keeps users from making effective edit adjustments. I’d like to concentrate on adjustments that control the light levels in the finished photo in this article. You’ll find that Lightroom’s use of the word “exposure” isn’t what you think it is. Many photographers are familiar with Ansel Adams’ Zone System. Ansel divided the photographic light range into eleven zones, using Roman numerals 0 through X. Zone 0 is for pure black, with middle-gray being Zone V, and pure white falling on Zone X. Each zone ‘size’ is the same. The division of light into eleven zones was based upon the dynamic range capability of the best films of the day, combined with clever film processing tricks. This work was carried out in 1939 by both Ansel Adams and Fred Archer. The developers of Lightroom decided to use a modified zone system, which is based on only 5 zones of light. They also came up with names, instead of numbers, to identify the zones. These zones, starting with the darkest tones, are called Blacks, Shadows, Exposure, Highlights, and Whites. The Blacks zone range In the shot above, you can see the Blacks light range depicted in lighter gray. It covers roughly the lowest 10% of the total light range, representing the lowest tones of the image. Despite its name, adjusting this range will affect the full color spectrum, and not just ‘colorless’ shadows. The Shadows zone range The Shadows light range shown above extends over approximately 20% of the total light range. Again, you can see the width of this light range depicted as a lighter shade of gray in the screen capture. The Exposure zone range The Exposure light range extends over about 35% of the whole range, making up the widest adjustment range of any of the sliders that control light intensity. These are all of the image mid-tones. The Highlights zone range The Highlights light range covers the lighter tones, with a width of about 25% of the overall light range. The Whites zone range The Whites light range covers the lightest tones, making up a narrow band of about 10% of the whole light range. The whole light spectrum gets adjusted in this zone, and not just ‘colorless’ white values. This range is critical to control the brightest zones of your photo, so that you don’t end up with disturbing blank-white areas without any texture in them. I think it’s unfortunate that the Lightroom developers came up with a set of names that sound like they’re designed for different purposes, and they’re not even set up to cover the same width of a light zone. The Exposure zone is much wider than the other zones. The five light adjustment sliders These five sliders that control light levels have a little bit of overlap in their ranges, so that you don’t end up with an awkward “stair-step” adjustment between zones. The Clarity adjustment alters the contrast in the Exposure light range (the mid-tones) only. This makes it more selective than the Contrast slider, which alters the contrast range in all five of the light zones (from “Blacks” through “Whites”). Summary Without a good understanding of what the light-adjustment sliders in Lightroom do, you’re not going to achieve optimal results. These controls will reward you with better results if you can shoot at lower ISO values, since that will allow your camera to capture a wider dynamic range of light. Be aware that these adjustment sliders don’t relieve you of the responsibility of getting a good in-camera exposure; always avoid the garbage-in-garbage-out scenario.
- Get Wide-Angle Shots Without Using a Wide-Angle Lens
You see a fantastic wide-angle shot present itself, and it dawns on you that you don’t have the right lens with you. Or it’s really rainy or windy and the last thing you want to be doing is changing lenses. Assuming it’s not a moving target, the answer to your problem is the panorama. Super wide angle shot (using Zoner Photo Studio) With tools like Lightroom or Zoner Photo Studio, you can get fantastic panoramas, even if you don’t have a tripod. The modern editors are so smart that they can combine hand-held shots even when there are uneven overlaps or shots with slight rotations. You will often find that panoramas can be much sharper than using a wide angle lens. The central portion of almost any lens is sharper than its edges, and making a panorama will use primarily the middle portion of each individual shot. It nearly always works out better to take your overlapped photos in portrait mode, so that the panorama will be taller. I always use a battery grip on my cameras, which makes for much more comfortable vertical-format shooting when not using a tripod (I typically don’t use a tripod to shoot panoramas). It’s even possible to combine multiple rows of shots, when vertical-format photos still don’t give you the coverage you want. I usually try to get about a 30% overlap in my shots; digital is cheap. You can get any height-to-width ratio that suits you with this technique. Not all photo editors can accomplish multi-row panoramas, but Lightroom can. In this article, I’ll concentrate on showing you how to make panoramas with both Lightroom and Zoner Photo Studio. Lightroom Panoramas: Here are the basic steps to make a panorama in Lightroom. Library Module OR Develop Module Select shots to combine Photo | Photo Merge | Panorama Pick Spherical/Cylindrical/Perspective Auto Crop checked Merge In the following example, I had two rows of shots and let Lightroom figure out how to combine them. It creates a DNG output photo that you can edit further or export it to another file format. Lightroom Photo Merge to Panorama I selected 8 photos to merge into a panorama, divided into two rows of four shots each. These shots were made handheld, to show how good Lightroom can be at combining shots. It figures out how the shots are combined, even without being told if there are multiple rows. I chose a demonstration subject that has lots of straight lines in it, so that the manipulations to the final panorama are clearer. Each of the vertical-format shots were made at 70mm. Projection choice: cylindrical The panorama preview above shows “cylindrical projection”. It’s most accurate showing distance from the camera, but the straight horizontal lines look very curved. Projection choice: perspective Switching to “perspective projection”, the curved horizontal lines are nicely straightened. Since the shots were made hand-held, there’s a large amount of horizontal distortion remaining after crude manual alignment. Merged panorama The shot above shows the merged shots. There’s still un-corrected horizontal perspective distortion. But don’t give up on this shot just yet… Horizontal perspective repair effort Using the horizontal perspective slider, I did a quick fix to get the lower wall parallel to the edge of the frame. Remember to check the “Constrain Crop” box before you’re done. Voila, the walls don’t have that awful tilt to them. Final “wide-angle” shot from 70mm lens The final Lighroom shot gives no clues that it was made from multiple shots, and even from multiple rows. Since it’s made from the central portion of the individual shots, it’s sharper edge-to-edge than most wide-angle lenses could produce. Zoner Photo Studio Panoramas: Go to the “Manager” Navigate to where your photo files are located Select the range of photos to combine (Ctrl-click) Select Create | Panorama Verify the selected shots in the Panorama dialog Click “Next>” Verify the order of the photos is correct Click “Next>” Click “Join” Accept the defaults to crop into a best-fit rectangle You can edit further, and then save it as Tif format. The Zoner program is a bit more complicated and a bit less capable than Lightroom for making panoramas. One of the more major Zoner limitations, at least in my version 15, is the inability to make panoramas out of multiple rows of photos. Using the same 8 shots (2 rows) in Zoner Photo Studio Note the disaster above when Zoner tries to join the two rows of shots together. Just stick with a single row of shots instead, and it makes perfectly fine panoramas. The infrared panorama at the top of this article was made using Zoner. It was comprised of 7 portrait-mode shots in a single row. Summary Yes, it’s more effort to get wide-angle shots using panorama techniques, but it’s better to “get the shot” than not. As an added benefit, your final shot is usually sharper and has more pixels to work with than a wide angle lens can provide.
- Arca-Swiss Camera Mount: Everything You Need to Know
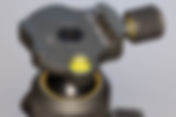
Since the 90’s, the premium way to attach a camera or a lens to tripods, monopods, and gimbals is with an Arca-Swiss mount. There are many reasons why this kind of mount has become an informal standard today. The Swiss camera equipment maker Arca-Swiss Phototechnik AG developed a quick-release mechanism for their tripod heads. To say that it caught on is an understatement. There are almost zero professionals that don’t use Arca-Swiss mounts for their cameras and large lenses. A typical Arca-Swiss mount on a tripod The shot above shows a typical Arca-Swiss mount on a tripod ball-head. The little knob on the right is used to tighten the mating plate to firmly hold a camera or lens in position. Most Arca-Swiss hardware is made from stainless steel, anodized aluminum, or magnesium alloys. Plastic would be a bad idea. A large lens attached with an Arca-Swiss tripod foot The illustration above shows you a 500mm lens mounted via its tripod foot onto an Arca-Swiss attachment. The lens/camera combination is connected to the tripod exactly over its balance position, which provides maximum stability. For most zoom lenses, the balance point shifts with focal length, and the foot needs to shift to compensate for this. Your shots will be sharper when you are photographing while using a properly balanced system, at least at slower shutter speeds. There’s also much less stress on the tripod connection when it’s supporting a balanced load. The Arca-Swiss “standard” involves a 38mm wide mounting plate that has a 45-degree dovetail rail on two sides. This plate is held in place via friction by a “grabber plate” that is tightened typically by a screw with a knurled knob. Sometimes, manufacturers will make grabber plates that use a lever instead of a tightening screw, to allow for even faster attachment to the mounting plate. Arca-Swiss mounting plate attached to a lens tripod foot Many manufacturers continue to remain ignorant of the Arca-Swiss system, including Nikon. For this situation, there are separate mounting plates you can purchase and attach to their screw-mount tripod feet. The shot above shows a little “lip” on the right-hand top of the plate that keeps the plate from twisting during use. It also shows a little silver screw on the bottom-left, which will limit how far the plate can slide along the Arca-Swiss grabber plate. Some people prefer to keep a little screw on both ends of the mounting plate bottom, so that the plate can’t accidentally slide off of the grabber plate in either direction. The downside to this is that your grabber plate has to be opened really wide to let you lift the mounting plate vertically off of the grabber. Arca-Swiss mounting plate bottom view In the view above, you can see the stainless steel screw that is used to attach the mounting plate onto the lens tripod foot. The screw is in a groove that lets you slide the screw to align with the foot’s tripod screw hole. Sliding the mounting plate until its lip (on the upper-right side) is held against the lens tripod foot keeps it from rotating during use. Once aligned, the screw is of course tightened. The balance point will change if your camera has a battery grip attached or not, so you usually want to purchase a mounting plate that is long enough to accommodate both conditions. You might also have a heavy and a light camera, so you need the range in the mounting plate to handle both scenarios. I prefer a longer mounting plate, compared to the lens tripod foot, to create a “T” mount instead of an “L” mount. I get more balancing and carrying options this way. Use the tripod foot/Arca-Swiss mounting plate as a handle The “T” shape of the mounting plate on the lens tripod foot makes for a very convenient and secure carrying handle. This is a much safer way to carry the lens/camera combination than just holding onto the foot of an “L” shape alone, which could slip from your fingers. Look for Arca-Swiss mounting plates that don’t have sharp edges or corners on them, if you intend to use them for carrying purposes. Hold your camera/lens upside-down to find the exact balance point. You can try sliding your finger along the tripod foot until the lens/camera combination is level. Be sure to have your other hand underneath everything while doing this, so that you don’t accidentally drop anything. Gimbal with an Arca-Swiss attachment Gimbals use Arca-Swiss attachments, because the lenses attached to them need to be carefully balanced by sliding them along the grabber plate. Nikon lenses cannot be used on a gimbal unless separate mounting plates are attached to their tripod feet. Grabber plate with a tripod-mount screw hole. If you happen to own a tripod head that only has a screw to attach to cameras or lenses, you can buy an Arca-Swiss grabber plate that can be attached to your tripod head via the tripod’s screw. The grabber plate shown includes some built-in bubble levels (on the back side edges and the tightening knob). Arca-Swiss mounting plate for camera If you want to mount the camera itself onto an Arca-Swiss grabber plate, then you’ll need a separate screw-on plate that goes onto the bottom of your camera. The one shown above is quite minimal, but gets the job done. Camera “L” bracket There are also more elaborate “L” shaped mounting brackets for cameras with the dovetail grooves on both the bottom surface and one side of the camera (for portrait orientation). These are more sturdy, but it can get tricky to find one that doesn’t get in the way of something (such as the camera battery door). Summary Once you start using the Arca-Swiss system for your cameras and lenses, you won’t want to return to using tripod screws. The system is more solid, adjustable, and faster than using tedious tripod screws. Most of the items shown can be found for very reasonable prices, too (except that lens).
- Nikkor 500mm f/5.6 AF-S PF ED VR Review
500mm and Nikon D850, mounted on Arca-Swiss foot The first thing that strikes you looking at the Nikkor 500 PF is its size, or lack thereof. It seems like Nikon is defying physics in being able to make this long of a lens this small. This lens is smaller than my Sigma 70-200 f/2.8 Sport, and weighs considerably less. How did Nikon manage this? The answer lies in the “PF” designation, for its phase-fresnel optics. It’s not exactly new science, since lighthouses have used PF optics for more than a hundred years. This technology lets lenses be really thin, and glass weighs a lot. The 500 PF weighs 1460 grams (3.2 pounds) and is only 237mm (9.3 inches) long. Lots of gadget bags and backpacks could easily hold a lens of this size, in contrast to its’ 500mm f/4 lens cousins. The barrel is magnesium-alloy, yet the lens is still light. For such a small size, Nikon crammed in 19 elements in 11 groups. The aperture has 9 blades. It uses 95mm front-mounted filters (no drop-in filters). Speaking of 500mm f/4 lenses, the Nikkor 500mm f/4 costs about US $10,300 while this costs $3,600. That extra f-stop will cost you dearly, which also includes your spine. The f/4 weighs 3090 grams (or 6 pounds, 13 ounces), which is more than double the weight of this f/5.6 lens. Camera sensors used to be poor enough that low ISO meant the difference between quality and garbage. Nowadays, though, higher ISO is usually not a problem. This means that f/4 lenses are much less of a necessity than they used to be. Camera auto-focus systems are also much better than they used to be, so slower lenses can now be used in conditions that used to only be f/4 territory. Both Nikon and Canon have realized this fact, and they’re starting to produce lenses that reflect this new reality. Beware that this is an “E” lens, so many lower-end and old Nikons won’t be able to control the lens aperture. The electronic aperture is supposed to be a little more accurate and also capable of shooting at higher frames per second. The D2 and D200 or older cameras won’t work with E lenses, for instance. This lens appears to be well-built and is weather-sealed, but those are quite murky terms. Nikon won’t refund your money if the lens gets water damage, and I haven’t disassembled the lens to see how well built its innards are, either. This same caution goes for the other lens manufacturers, and not just Nikon. The front lens element does have a fluorine-based coating, which I know from experience with my Sigma lenses is really good at minimizing dirt, fingerprints, and smudges. Lens Controls Lens control switches The 500 PF comes with just about all of the bells and whistles of Nikon’s “exotics”. The A/M switch lets you manually override focus, and is a bit less sensitive than the M/A autofocus override mode. The M position will stop all autofocus behavior. The FULL switch maintains the full 3-meters-to-infinity focus range, while the other position limits the near focus to 8 meters. The focus on this lens is so fast that focus-limiting isn’t really needed in many situations. The VR switch offers both Normal and Sport modes. The Sport mode is ‘smoother’, in that it doesn’t re-center the optics after a VR stop/start, so the subject doesn’t do a jump in the viewfinder. Sport mode offers about 4 stops of stabilization (1/30s), which I would get about 1/3 of the time. For moving subjects, this is the mode you’ll want. The Normal mode will cause an image jump with a VR stop/start, but it’s much more efficient at stabilizing. I could get over half of my shots sharp at 1/15s, and when leaning against a wall I could occasionally even get shots down to 1/4s, which is about 7 stops! This mode is what you want for stationary subjects. The Memory Recall switch works along with the MEMORY SET button on the opposite side of the lens barrel, near the lens mount. It will save the present focus position and you can then have any of the 4 focus buttons near the front of the lens focus to that distance whenever they’re pressed. You’ll also get a beep, if the bottom-most switch is in its forward “note” position. If you slide the switch to the AF-L position, it will activate the focus-lock when any of the 4 focus buttons near the lens front get pressed. If you use the AF-ON switch position, the 4 front buttons will focus just like the camera AF-ON button. Accessories Plastic HB-84 bayonet lens hood included Lens case is quite nice, easy open, and padded The lens case includes a shoulder strap and a belt loop as well. Visual Comparison Size comparison: Sigma 150-600mm versus Nikkor 500mm The Sigma 150-600 C lens was zoomed to 500mm, to compare it to the Nikkor 500mm. The Nikkor only weighs 75% as much as this Sigma lens. General Impressions A minor gripe I have with all my Nikon lenses is NO Arca-Swiss mount on the tripod foot. The shot at the top of this article shows the lens with a separate Arca-Swiss plate that I mounted to the foot. Just about nobody mounts lenses like this on a tripod, monopod, or gimbal with just a tripod screw. Nikon still hasn’t caught on to this. Vignetting is pretty much a don’t-care at any aperture; it’s easy to rid in a photo editor, if desired. I didn’t notice any distortion, nor did I expect any. There wasn’t any coma that I saw in any of my shots. I also didn’t notice any focus noise. And speaking of focus, it focuses accurately at all distances and apertures after I calibrated it on a target that was about 50 feet away. I have rarely noticed a bit of extra flare when point it at a subject backlit by bright lights, but I tend to avoid this type of scene in my photography anyway. Phase fresnel is more sensitive to this kind of lighting than regular optics. Problems of this sort are overblown; it’s rarely an issue, and typically a very minor effect. I did all of my testing using the Nikon D850. Lesser cameras may show worse resolution and focus speed measurements. I did use an IR-converted Nikon D7000 when testing infrared performance. I did throw in a shot using my D500, too. Focus Speed I measured the focus speed by setting the lens at f/5.6 and minimum focus distance (about 3m, or 10 feet). I then timed how long it took to focus on infinity (using phase-detect of course) under sunny conditions. I measured 0.308 seconds. I used “slow-mo” video at 120 fps to review the focusing action (looking at the focus scale). It would, of course, be crazy to be typically switching focus from 3 meters to infinity. In normal shooting, focus is extremely fast. It’s my understanding that the lens elements responsible for focus are lightweight, and can be shifted very fast. I found the focus accuracy and repeatability to be excellent in good light. I wouldn’t recommend using this lens for sports or birds in flight when light levels get low. Although it’s not really intended for use in poor light, this lens focuses well down to about EV 5. Subject contrast makes a big difference in how well it will focus without needing to ‘hunt’, and I found that it would start focus-hunting at about EV 4. Teleconverter I tried using Sigma’s TC-1401 1.4X teleconverter (700mm and f/8.0). I did this, because both Nikon and Sigma tell you to not do this. I wanted to mention that you have to put the teleconverter onto the lens before you mount it on the camera, or else autofocus won’t work. I also need to mention that only the “f8” focus points will work, which is fairly limiting. Stick with the center point to avoid surprises. I actually think this combination works pretty well. Autofocus and VR both work, as well as metering. Focus speed is decent in good light, but I don’t recommend this combination in poor light for moving targets. My D850 and D500 are supposed to have the same autofocus capabilities, but I’d swear that the D500 is better at focusing this combination in poor light. I’ll be working on a separate article on this topic, but suffice it to say that the lens resolution is better than you might think. Focus calibration is required, of course. I have read that the Nikkor 1.4X teleconverter causes the same low-light issues that I have observed with the Sigma. Note that the EXIF data in the photos doesn’t register the actual f-stop and new focal length, because it can’t ‘see’ the Sigma teleconverter. Also, you can’t save a separate entry for focus calibration with the teleconverter. I always save a little note taped onto the inside of the lens cap that has the focus fine-tune values for both with and without the teleconverter. This may be a “don’t care” on mirrorless cameras. 500mm and Sigma 1.4X TC on D500 f/8 Infrared I used my Nikon D7000, which was converted to 590nm infrared by Kolari Vision. The camera sensor also has their infrared anti-reflection coating on it. The results are very, very good. I don’t see any problems using the lens at this infrared wavelength. Nikkor 500mm PF at f/5.6 with 590nm infrared Lens Resolution This lens resolution “signature” looks very unique, probably due to the phase-fresnel lens design. It’s the only lens that I have measured that looks best wide-open. With a lens that doesn’t go any wider than f/5.6, that’s extremely good news; there’s no reason to stop it down, unless you want deeper depth of focus. Incredibly, the resolution is nearly as good on the frame edges as it is in the central portion of the frame. As always, I am only reviewing a single lens copy. Note that shots focused on infinity are limited by air turbulence. Don’t think that the lens isn’t sharp at long distance. Horizon shots are the worst. I use the MTFMapper program to perform resolution and focus tests, which you can get here: https://sourceforge.net/projects/mtfmapper/ My resolution chart size is 40” X 56”. Big charts provide a more realistic working distance; the actual target distance is included in each plot below (nearly 17 meters). All of my resolution tests are done using unsharpened, raw-format from my Nikon D850 (45.7 MP). I use live view and contrast-detect focus, to eliminate any concerns about focus calibration. I’m showing the best results from about 10 shots at each focal length and aperture tested. I halted each resolution test after stopping down to f/16, because the diffraction effects ruin the resolution beyond this aperture. Even f/16 starts the resolution plunge, but sometimes you need the depth of field. The lens stops down to f/32, if you really need it. The contrast plots are real contrast plots, and not the theoretical ones that lens manufacturers put out. They include the camera sensor effects, since you’re going to be using the lens with a real sensor. MTF50 lp/mm resolution, f/5.6 Peak resolution, central = 58.5 lp/mm Peak resolution, edge = 52.5 lp/mm Peak resolution, corner = 49.6 lp/mm MTF Contrast plot, f/5.6 Now that shows how little astigmatism these optics have. Lateral chromatic aberration, f/5.6 MTF50 lp/mm resolution, f/8.0 Peak resolution, central = 54.3 lp/mm Peak resolution, edge = 47.7 lp/mm Peak resolution, corner = 47.8 lp/mm MTF Contrast plot, f/8.0 MTF50 lp/mm resolution, f/11.0 Peak resolution, central = 47.1 lp/mm Peak resolution, edge = 45.9 lp/mm Peak resolution, corner = 42.7 lp/mm MTF Contrast plot, f/11.0 MTF50 lp/mm resolution, f/16.0 Peak resolution, central = 40.3 lp/mm Peak resolution, edge = 38.9 lp/mm Peak resolution, corner = 37.3 lp/mm MTF Contrast plot, f/16.0 Summary This is rapidly turning into my favorite lens. I rarely bother with a monopod/gimbal or tripod, since it weighs so little. The VR-Normal works so well at slow shutter speeds, that hand-holding is realistic even in very low light. This lens has enough resolution that you can do significant cropping, if needed. Ironically, more cropping is done on long-lens shots than any other type. Sample Pictures 500mm 1/1000s f/5.6 ISO 640, cropped “distance” shot The crater detail is amazing. I shot it high in the sky to minimize turbulence. Looks like a telescope shot Minimum focus distance, 1/2000 f/5.6 Pixel-level detail from the shot above. Enough said. Bokeh sample, 1/2000 f/5.6 ISO 500 He just wanted his picture taken; I didn’t argue. 1/640 f/5.6 I had to throw in a bird-in-flight shot 1/2500s f/5.6 ISO 800
- Nikkor 500mm f/5.6 PF with Sigma TC-1401 Teleconverter Review
This is a combination that both Nikon and Sigma tell you not to do. So of course I had to try it out. The reality is that it works pretty well. The official name for this lens is the Nikkor AF-S 500mm f/5.6E PF ED VR. The Sigma TC-1401 is a 1.4X teleconverter, so you end up with a 700mm f/8 lens. Does this result in some limitations? Of course. Is it still worth it? Of course. Sigma TC-1401 and Nikkor 500mm PF on Nikon D850 First things first: if your camera doesn’t have f/8 focus points, then don’t use this combination. I use the combo on my Nikon D850 and D500 (for a 1050mm lens). This caution and most other cautions that follow would be the same for the Nikon teleconverter, too. Before I forget, I need to mention that 3D tracking focus mode doesn’t really work, since it’s pretty much limited to f/5.6 or faster lenses The Sigma TC-1401 only extends the lens by 20mm, and weighs 1460 grams (6.7 ounces), so you barely notice when it’s attached. Nobody would notice the TC in the shot above if I didn’t point it out. Focus accuracy isn’t entirely repeatable when using the TC, even in sunlight. Be sure to take a few extra shots of your subject, and you’ll be glad you did. The camera isn’t aware that there is a teleconverter attached, which means that the EXIF data will still register f/5.6 and 500mm instead of f/8 and 700mm. Also, the camera focus fine-tune data cannot be separately stored for the lens with and without the teleconverter attached. You’ll definitely need to calibrate focus differently when the TC is attached, too. VR seems to work just fine with this combination; you'll be happiest with "Sport" VR mode for moving subjects. Please note that you need to attach the TC to the lens before you attach the combination to the camera, or else autofocus won't work. Focus Speed I tested focus speed by using 120fps video to observe the focus scale; I set the lens on minimum focus and then focused on infinity in bright light. Minimum focus is 3 meters, or about 10 feet. I measured 0.400 seconds to focus, which compares to 0.308 seconds when not using the TC. I used my D500 camera, which focuses essentially identically to the D850. I got the time measurement by counting 48 video frames to finish focus, at 0.0083 seconds per frame. Watching the video of the focus action, I noticed that the lens would over-shoot infinity slightly, back up, and then stop at infinity. This focus-stutter happens much quicker than you can perceive with the naked eye, and can only be observed using high-speed video. Focus still works in shade, but it’s of course a bit slower and a bit less reliable than bright light. You’ll be a bit disappointed trying to follow action with this combination in the shade, although it’s not out of the question. The same caution applies to Nikon’s teleconverters, according to what I have read. Resolution tests I performed the resolution tests with the lens/teleconverter combination at 20 meters (about 65 feet). Shots look pretty sharp if the resolution stays above about 30 lp/mm. As you’ll see, that’s no problem with this combination, even wide open. Again, the EXIF data is incorrect for this combination, so the 700mm focal length is reported as 500mm, and shots at f/8 will show up as f/5.6 instead. I perform resolution tests using “live view” with contrast-detect focus, to eliminate focus calibration from being an issue. I set my camera up to use electronic front-curtain exposure to rid vibrations. I also use a wired remote release. Even contrast-detect focus gives variable results, so I pick my sharpest result (from 10 shots) to report. I always use unsharpened Raw-format shots for testing. Overall, the following tests show a resolution drop of between 18% to 27%, depending on the aperture (compared to not using a teleconverter). Considering that the focal length is 40% longer, this is much better than merely cropping a 500mm shot. MTF50 resolution, 700mm f/8 Peak center resolution at f/8 is 42.8 lp/mm, compared to 58.5 without the TC, or a 27% drop. Peak edge resolution is 44.3 lp/mm. Peak corner resolution is 36.4 lp/mm. This is shooting with the aperture wide open (f/5.6 marked, f/8 actual). MTF Contrast Plot, 700mm f/8 Lateral chromatic aberration, 700mm f/8 MTF50 resolution, 700mm f/11 Peak center resolution at f/11 is 44.4 lp/mm, compared to 54.3 without the TC, or a 18% drop. Peak edge resolution is 43.7 lp/mm. Peak corner resolution is 42.8 lp/mm. This is the best aperture for the combination (1 stop down from maximum). MTF Contrast Plot, 700mm f/11 MTF50 resolution, 700mm f/16 Peak center resolution at f/16 is 35.1 lp/mm, compared to 47.1 without the TC, or a 25% drop. Peak edge resolution is 35.4 lp/mm. Peak corner resolution is 34.0 lp/mm. MTF Contrast Plot, 700mm f/16 Samples 700mm 1/2000 f/8 ISO 4500. Cloudy conditions. D850 Pixel view 700mm 1/2000 f/8 ISO 7200 Deep shade. D850 700mm 1/2500 f/8 ISO 800 Sunny. D850 Pixel view 700mm 1/3200 f/8 ISO 800 700mm 1/3200 f/8 ISO 800 Conclusion Honestly, you don’t really even need to stop the lens down for great resolution shots. Don’t worry about the sharpness loss, but you’ll have to decide if difficulties with autofocus keep you from using this combination. Only using the camera f/8 focus sensors is a bit irritating. It’s a pain to have to remember changing the focus fine-tune calibration when adding/removing the TC, but such is life. Mirrorless cameras could rid this concern. Although the focus systems are supposed to have equal capabilities, my D500 seems to work better with this combination than my D850 in low light. Overall, not bad for a verboten combination.
- How to Use Photoshop CS4 With a New Camera’s Raw-Format Files
I had a brief period of grief when Adobe abandoned standalone versions of Photoshop. I’m a huge fan of using raw-format images, and every new camera model’s raw format is different. I was convinced that any of my new camera’s raw photos wouldn’t be supported in my Photoshop CS4. Some people (like me) naively believed Adobe when they bought a “lifetime” license for Photoshop. I guess Adobe didn’t specify how long a lifetime was. It turns out that there is a way to keep Photoshop CS4 updated, however. It’s a bit complicated, but it works. What I’m about to describe is a pure Windows discussion; I don’t know how to do the same thing using a Mac. The key to using raw-format photos (e.g. Nikon’s NEF or Canon CR2, CR3) in Photoshop is to first convert them into the Adobe “generic” DNG format. DNG stands for “digital negative”, and it’s still a raw format, just a different raw format. Many other photo editors understand this DNG format, as well. Fortunately, you don’t lose any quality by converting your raw photos into the DNG format. To be clear, though, you’ll be using the DNG file and not your camera’s original raw-format file to make use of Photoshop. There’s another problem to solve, however: how to set up the Adobe Camera Raw plug-in to be able to use DNG photos in Photoshop CS4. Convert Raw Shots into DNG Format The DNG format continues to be supported by Adobe. They still offer their “DNG Converter” program, and it’s free. Here’s a link to their Windows/MacOs converter program: https://helpx.adobe.com/camera-raw/using/adobe-dng-converter.html The Adobe DNG converter program is very fast, and it lets you batch-convert your raw files as well. In this way, it takes very little labor or time to convert your shots. Some programs only support older DNG formats, so the DNG Converter program lets you convert your camera raw photos into a specific DNG version. Adobe Photoshop CS4 can only use DNG files up to version 5.7. Convert into a specific version of DNG for older programs After installing the Adobe DNG converter, you can execute it in Windows by running it from the Programs list. The most common way to use the DNG converter is to just click on the “Select Folder…” button that lets you tell it where your raw (e.g. .NEF, .CR2, etc.) files are. This button is located in the “Select the images to convert” section. Next, click the “Select Folder…” in the “Select location to save converted images” section. This assumes you also select the “Save in New Location” option; you can also save the new DNG files in the same folder as your raw shots, if you wish. If you need the DNG version number to be compatible with older programs, then click the “Change Preferences” button to pick another version. For Photoshop CS4, the latest DNG format that can be selected in the converter is version 5.4, as shown above. Finally, just click the “Convert” button to start converting your camera’s raw files into the DNG format files. Your original raw files won’t get modified, so they’re safe. Install the Last Supported Camera Raw Plug-in Version 5.7 Adobe stopped supporting the Camera Raw plug-in for CS4 after version 5.7, so that’s what you need to get for Photoshop CS4. There are actually two different plug-ins for Windows; the 32-bit and 64-bit versions. Each of these plug-ins is called “CameraRaw.8bi”, and the 64-bit version will be found in a directory called “win64”. It’s confusing to have these two versions called the same name, so be careful to keep them in separate locations. Here’s the link to get the Camera Raw V5.7 plug-in : http://download.adobe.com/pub/adobe/photoshop/cameraraw/win/5.x/Camera_Raw_5_7.zip The discussion about getting this file (NOT the "updater" version) is found here: https://community.adobe.com/t5/camera-raw-discussions/how-to-upgrade-to-camera-raw-5-7/td-p/12060996 If you already have an older version of Camera Raw, then you should be able to update it using the “Help | Updates” option. If that won’t work for you, then you can get plug-in installed manually. I’m going to describe how to manually install the plug-in in Windows. First, you need to un-zip the “Camera_Raw_5_7.zip”. Make sure you exit Photoshop. Execute the CameraProfiles.exe in the un-zipped, newly-created folder “Camera_Raw_5_7”. Follow the program’s instructions. Using Windows File Explorer, navigate to the 64-bit folder called: C:\Program Files\Common Files\Adobe\Plug-Ins\CS4\File Formats If the folder shown above doesn’t exist on your computer, then create it manually. Windows will probably ask you for permission to do this operation. If there is a file in this directory called “Camera Raw.8bi”, then you should move it to some other folder for safekeeping. This is an older version of the 64-bit Camera Raw plug-in. Copy the newly-created file in your un-zipped folder “Camera_Raw_5_7\win64\Camera Raw.8bi” into the 64-bit folder “File Formats” shown in the path above. This is the new 64-bit plug-in. For the 32-bit plug-in, you’ll need to navigate to (or create it): C:\Program Files (x86)\Common Files\Adobe\Plug-Ins\CS4\File Formats If there is a file in this directory called “Camera Raw.8bi”, then you should move it to some other folder for safekeeping. This is an older version of the 32-bit Camera Raw plug-in. Copy the newly-created file in your un-zipped folder “Camera_Raw_5_7\ Camera Raw.8bi” into the 32-bit folder “File Formats” shown in the path above. This is the new 32-bit plug-in. Summary Now, you should be able to use your camera’s raw files (converted into the DNG-version-5.4) in Photoshop CS4 via the Camera Raw plug-in. If you open the DNG file in Photoshop, it will automatically execute the Camera Raw plug-in to open the photo. You now have a technique that should allow you to use your new-model cameras’ raw shots, once you convert them into DNG, in your standalone Photoshop CS4! Make your investment in Photoshop pay off for a little bit longer with this trick. Using Camera Raw from Photoshop CS4
- Comparing Two ‘Identical’ Lenses: A Reality Check
You assume that it doesn’t matter which copy of a new lens you buy. When a reputable lens manufacturer makes a particular lens model, you’d think that they’re all about the same, right? Think again. I have read that you should only worry about lens quality variation when you buy the cheap consumer models. My own experiences say, to borrow from the French, “au contraire, mon frere”. I used to have two copies of the FX Nikkor 85mm f/1.4 AF-S. This is not a cheap lens, and is considered premium “pro” gear. One lens copy was about 25% lower resolution than the other; I ended up selling the soft lens copy (at a 50% loss!). 18-140 Nikkor at 140mm I presently have two copies of the Nikkor 18-140mm AF-S DX f/3.5-5.6 G ED VR lens. It’s not a professional lens by any means, but it has pretty good sharpness, decent focus speed, small, light, and is very versatile with its large zoom range. I thought it would be an interesting exercise to compare several properties of this lens model. When a lens manufacturer puts together a complicated lens like this, it’s impossible to assemble the parts identically from one lens to the next. Tiny parts tolerances along with small assembly variations can have a bigger impact on the final optical characteristics than you might imagine. I used the free MTFMapper program and a 4-foot-by-five-foot mounted test chart to get the measurements that follow. This is the same program that NASA used to evaluate the lenses on the Mars Perseverance Rover. Nikkor 18-140mm: 17 elements in 12 groups. Courtesy Nikon Resolution Pretty much everybody understands that lens copies may differ slightly in resolution, so I’m going to start the lens comparison with that parameter. A proper lens resolution analysis needs to show you the whole lens results, and not just a measurement from the lens center or from an edge. To better understand optical characteristics, you also need resolution information in both the sagittal (think wheel spokes) and meridional (circle tangent) directions. I used a 24MP DX camera for all of the measurements that follow. Vibration reduction was turned off, and the camera was mounted on a sturdy tripod. The mirror was flipped up, to minimize any vibrations. The resolution measurements were made using the same resolution chart at the same distance with the same aperture, and the same lighting for both lenses. If measurements are taken at a different camera-to-subject distance or aperture, the resolution will change. I used a linear translation stage to carefully shift the camera/lens between each resolution test shot by 1 millimeter, and then picked the sharpest one. Even contrast-detect focus isn’t quite accurate enough to nail the focus, and slightly missed focus really impacts resolution. Lens ‘A’ MTF50 resolution: 18mm f/3.5 Lens ‘B’ MTF50 resolution: 18mm f/3.5 Notice that lens ‘A’ above has a slightly lower peak resolution (63.1 lp/mm) versus than lens ‘B’ (65.3 lp/mm). This sort of difference cannot be seen in photos, and it takes a computer analysis to note this small of a difference. The peak resolution for lens ‘A’ is pretty much in the optical center. For lens ‘B’, you’ll notice that peak resolution is below the center. The lens B was probably assembled slightly off-center. Also note that the general shape of the meridional-direction resolution is nearly a perfect circle. The sagittal-direction shape is very different, yet quite similar between the two lens copies. The drastic drop-off in resolution away from the center is the price you pay for a super-zoom lens. A landscape photographer wouldn’t be very pleased with the quality of the photos along the edges, at least not with the lens aperture wide-open. The lens edge resolution is improved by stopping down, but it never approaches fixed-focal length lenses or pro lenses. Lens ‘A’ MTF50 resolution: 140mm f/5.6 Lens ‘B’ MTF50 resolution: 140mm f/5.6 At the longest zoom setting of 140mm, lens ‘A’ is clearly better, having a peak MTF50 resolution of 50.2 lp/mm, while lens ‘B’ only reaches 40.7 lp/mm. Notice how similar the meridional and sagittal plot shapes are between the two lenses. They may not be identical twins, but they’re clearly siblings. On most lenses, the meridional resolution is worse than the sagittal. This is expected from the design of the lens. If I had to choose which lens to keep, it would be lens ‘A’, at least based upon resolution. The lens ‘B’ is about 19% lower in peak resolution. MTF50 Contrast The contrast plots are what most photographers are familiar with. In case you didn’t know, though, nearly all lens manufacturers only publish ‘theoretical’ values, and not actual measured values. Also note that theoretical plots don’t even consider the camera sensor; my MTF50 contrast plots include the camera sensor effects. My contrast plots additionally include measurements at 50 lp/mm, and not just 10 and 30. 18mm f/3.5 and 140mm f/5.6 MTF 10,30 : Courtesy Nikon Note that in Nikon’s theoretical MTF contrast plots above, they expect the meridional-direction (M) results to be quite a bit worse than the sagittal-direction (S) results. Lens ‘A’ 18mm f/3.5 MTF 10,30,50 Contrast Plot Lens ‘B’ 18mm f/3.5 MTF 10,30,50 Contrast Plot Lens ‘A’ 140mm f/5.6 MTF 10,30,50 Contrast Plot Lens ‘B’ 140mm f/5.6 MTF 10,30,50 Contrast Plot The contrast plots show that lens ‘A’ is clearly superior. The ‘B’ lens has a wider spread in measured readings, indicating that its lens elements aren’t as carefully aligned as they are in lens ‘A’. Lateral Chromatic Aberration Nearly every photo editor can correct for lateral chromatic aberration, so this lens defect isn’t as important as resolution and contrast. 18mm f/3.5 lens ‘A’ lateral chromatic aberration 18mm f/3.5 lens ‘B’ lateral chromatic aberration 140mm f/5.6 lens ‘A’ lateral chromatic aberration 140mm f/5.6 lens ‘B’ lateral chromatic aberration You can’t tell much of a difference between these lenses in regards to lateral chromatic aberration. The values are a bit larger than most lenses, but that’s another price you pay for a super-zoom lens. Fortunately, photo editors can mostly eliminate it. Summary Identical lenses are a fantasy. If manufacturers could make lenses that were imperceptibly different from one to the next, they would probably have to cost tens of thousands of dollars. Generally speaking, about the best you can do is to focus-calibrate your lens to your camera, assuming that your camera supports that feature. Mirrorless cameras are of course better at getting accurate focus, but lens manufacturing variations are still going to bite you. It would be interesting to know what “meets factory specifications” actually means. I think that the manufacturer is just hoping that you don’t look too closely at what you’re buying. Don’t get me wrong. I still use these lenses quite a bit. It’s a lot better to get the shot than get nothing, and lenses as portable and versatile as these encourage you to bring along your ‘real’ camera and not just depend on your cell phone camera.
- Camera Lens Anti-Reflection Coatings: Magic Explained
There’s more science and history that goes into camera lens coatings than you could imagine. Without the invention of anti-reflection lens coatings, modern lenses couldn’t exist. With nothing added to the surface of a glass lens, about 4% of the light hitting it gets reflected back and is lost. A camera lens with only a single element has two air-glass surfaces, so the reflection losses double. Modern lenses often have upwards of 20 elements in them, so un-coated surfaces would result in huge light losses. Much of the light that gets reflected off of lens surfaces will bounce around inside the lens and end up fogging your image with horrible flare. In 1935, the Ukranian physicist Alexander Smakula of the Zeiss company invented the world’s first anti-reflection coating. This invention was so important that it became a German military secret. The Allies only discovered this secret in early World War II, and so lens anti-reflection coating knowledge quickly spread worldwide. You may have heard of Zeiss T* optics. The “T” is short for “transparency”, and alludes to the anti-reflection coatings used in their lenses to yield superior optical transparency. Light reflecting off of a coated lens Notice above that there are a pair of reflections shown. A bush in the upper reflection looks green, while the same bush reflection looks yellow as the light bounces off of a different lens surface with a different coating on it. Somehow, the lens is reflecting different colors of light off of different lens element surfaces. Read further to get some insight into how a lens maker can cause this to happen. Typical camera lens design with several glass elements A typical camera lens with six elements is shown above. Each air-glass surface gives more opportunity for light to reflect back, instead of being transmitted through the whole lens. Picture courtesy of Wikipedia. Light wave reflecting off of a coated lens There’s a lot to explain in the picture shown above, so here goes. The Greek symbol “lambda” is λ. This symbol is commonly used to represent the wavelength of light. For camera lenses, the most important light wavelength to worry about is green (the same reason that there are twice as many green pixels in camera sensors as there are red or blue pixels). Green light wavelength is about 500 billionths of a meter. The letter η shown above represents the “index of refraction”. The index of refraction indicates how much power a substance has to bend light. The η₀ above represents the index of refraction of air, while η₁ is the index of refraction of the lens coating, and ηₛ is the index of refraction of the lens glass itself. Light actually slows down when traveling through a substance with a high index of refraction (it only moves “at the speed of light” while in a vacuum, whose index of refraction value is 1.0). The R₁ above is the light wave that gets reflected off of the lens coating. The R₂ above is the light wave that is reflected off of the lens glass element surface. These reflected light waves are drawn in orange. The coating material is shown in darker blue, while the lens element glass is shown in light blue. The “T” above is the transmitted light wave that has survived the journey through the lens coating and the surface of the lens glass. The drawing above is slightly inaccurate, because the transmitted light wave is actually "bent" and exits the lens in a different direction than when it entered the lens. Notice that the lens coating thickness shown above is a quarter of the light wavelength (¼λ). This is no accident. The distance traveled by the reflected light wave R₂ is a half-wavelength farther than the light wave R₁ that reflects off of the lens coating. The extra half wavelength of travel happens because it goes a quarter wavelength through the coating, and then reflects back another quarter wavelength to exit the coating. When the pair of reflected light waves R₁ and R₂ combine, their wave crests and troughs now align. This alignment difference causes the waves to cancel each other and “disappear”, which is called “destructive interference” by physicists. Since the reflected light waves (the green ones, at least) cancel each other out, all of the incoming light energy gets transmitted through the glass lens element instead of having some (about 4%) being lost due to reflection! Incredibly, by forcing an extra reflection off of the lens, you end up not losing any light, and it all gets transmitted through the lens! This is the opposite of what your “common sense” would tell you would happen when forcing extra reflections. Now you can start to appreciate the genius of Alexander Smakula (he went on to teach and do research at MIT in the United States). The discussion above is only “theoretical”, however. The lens coating index of refraction η₁ should ideally be half of the value in between that of air η₀ and the lens glass ηₛ. The index of refraction of typical lens glass is about 1.5, while the index of refraction of air is 1.0003. The ideal lens coating index of refraction would then be about 1.25. Reality rears its ugly head, though. The substance “magnesium fluoride” has an index of refraction of 1.38. It is transparent and can be applied after heating in an oven (to form a vapor) and deposit a thin coating onto lenses. This coating thickness can be carefully controlled, so they can put down a quarter-wavelength- thick layer. Magnesium fluoride is tough enough to withstand the rigors of daily use and lens cleaning. This type of lens coating isn't the only substance used by lens manufacturers, but it's probably the most common. Imagine if you had to accurately apply 125 billionths of a meter of something onto glass. And people expect this to get done for cheap. Good luck. They haven’t yet found a substance that is closer to the ideal index of refraction of 1.25 that has the mechanical and optical properties needed for a lens coating. At least nobody is confessing to knowledge of this desirable substance. The net result is that they can make single-coated lenses that reduce reflections down to about 1%, versus the theoretical 0%. Light waves arrive with different colors (therefore different wavelengths). This means that the coating thickness optimized for green light isn’t very efficient in reducing these other reflections. Light waves also strike the lens at different angles, and therefore they don’t travel precisely one-half-wavelength farther to cause the perfect reflection-canceling behavior. So guess what? Lenses now get “multi-coating”. These multiple coating layers on lens surfaces cause yet more reflections. The outer coating layers (with slightly lower index of refraction values) can further reduce (via reflection destructive interference) light losses. If each layer of a coating on a lens surface is a different thickness, then it becomes possible to stop the losses of different colors of light. Just like the Germans before the War did, lens makers aren’t divulging their secrets of just exactly how they’re making lens multi-coatings that enable near-perfect light transmission. Thanks, Alexander.
- Topaz DeNoise AI versus Lightroom
I decided to do some detailed comparisons between Lightroom and Topaz DeNoise AI. The Lightroom product does a pretty good job at sharpening and getting rid of noise, but DeNoise AI is just a little better. I use DeNoise AI for a couple of reasons. Sure, I use it to tame noisy photos, but I mainly rely on it to sharpen details. The artifical intelligence built into the Topaz products is just superior to the conventional pixel-based image processing logic that is used by Lightroom. In the sample shots that follow, I always begin with raw-format files. This way, I’m not depending on the camera to “clean up” the image data in any way. I’m not a fan of using high ISO, because it destroys resolution and loses too much dynamic range. There are times, however, when you have to crank up ISO or else lose the shot. Topaz Severe Noise algorithm at work on ISO 25,600 shot The shot above shows the before-and-after results of processing a shot taken at ISO 25,600. I never willingly go this high in ISO unless I’m desperate. The resolution is largely destroyed, and the dynamic range takes a huge hit. If I want to totally rid luminance noise at super-high ISOs, then this is the algorithm that I use. I used the Nikon D850 to take this shot of oranges. Its sensor is still near state-of-the-art, but even this camera can’t make ISO 25,600 look acceptable to my eye. Lightroom at work I processed the same ISO 25,600 shot in Lightroom. The results are actually pretty similar to what Topaz did. The noise is gone, but fine details have been sacrificed to rid that noise. So far, I’d have to say that there isn’t a compelling reason to use the Topaz product instead of the Lightroom product. Topaz Clear algorithm at work If I process the same shot using the Topaz Clear algorithm, the fine details look better. A tiny amount of luminance noise is left behind, but the overall shot is sharper. I personally prefer this compromise over total elimination of the luminance grain. Much of my photography involves long focal lengths around 600mm and motion-stopping shutter speeds in the range of 1/2000 through 1/4000. This generally forces me to use ISOs up to 6400. My cameras are able to retain an acceptable amount of resolution and dynamic range at these ISOs, but only with careful post-processing. Before I discovered Topaz DeNoise AI, my upper ISO limit was 3200. I feel that its AI algorithms have allowed me to get about one more stop, or ISO 6400, before the shot quality drops too low for my taste. D500 with 600mm at f/8 1/4000s ISO 2,500 The shot above was shot with a Nikon D500, using an ISO of 2,500. This is much more typical of what kind of ISO is needed with long focal lengths. I’m showing a pixel-level view of a photo processed using Lightroom. The shot is a very distant pine tree that hasn’t been affected too much by atmospheric turbulence. At this viewing scale, the shot looks quite sharp, and you can still make out the pine needles, even though the tree was several hundred meters away. Same photo processed with Topaz Clear algorithm At the same pixel-level view, the Topaz-processed shot shown above looks about the same as the photo processed using Lightroom. Edge haloes seen in Lightroom processing If you look more carefully, however, there are edge haloes that can be seen in the Lightroom-processed shot. I drew arrows to show edges that demonstrate these haloes more clearly. The haloes aren’t gross, but they are definitely there. If you don’t sharpen as much in Lightroom, the haloes will decrease, but then the details start to turn into mush. There’s always a balance between sharpening enough without having the edge haloes become obvious. No edge haloes in Topaz processing If you look in the same locations as the shot processed in Topaz, the edge haloes are gone. Also, you see a few more pine needles that don’t seem to even exist in the Lightroom version. Somehow, the Topaz algorithms sharpen but don’t generate any edge haloes in the process. This seems to be the primary difference between Topaz and other photo editors that rely on conventional pixel-based enhancement logic. Summary Granted, the Topaz results aren’t a huge difference from Lightroom, but the subtle quality differences are definitely there. I have to mention that it will definitely add more time and effort to use Topaz in your editing workflow, but I think it’s worth it. Someday, all image editors will be forced to adopt artificial intelligence in their sharpening and noise elimination algorithms. Start saving up to buy the new computers that have the necessary processing power (e.g. GPU) to keep up.
- DSTE Battery Grip Review For Nikon and Canon
I got a DSTE battery grip for my Nikon D7000, after my 8-year-old Vello BG-N4 grip finally died. Vello doesn’t make a grip for the D7000 anymore, although they still do for models as old as the D7100. I gambled and bought the DSTE MB-D11H grip. The Nikon battery grips are fairly expensive, and you can typically buy between 4 and 6 generic battery grips for the price of a single Nikon grip. I own Vello grips for several models of Nikons, and this is the second time that I have had a Vello grip fail. Considering the price, I’m way ahead of the game compared to buying Nikon grips. The Vello grips have the same functionality as the Nikon ones, and all of the controls are in the same place as they are on the Nikon grips, too. I have had this DSTE grip for a several months now, and its still working perfectly. I wanted to wait and give it a good workout before I was willing to comment on it. So far, I have no regrets. This gamble has paid off. I honestly cannot tell the difference between the Vello/DSTE grips in terms of look, feel, or function. The only design difference is that the DSTE grip includes an infrared remote control, which lets you shoot from up to 27 feet (8.2m) away, in ideal conditions. The buttons and dials feel fine on both company’s grips; they don’t seem like a non-Nikon part at all. There are DSTE battery grips offered for other cameras, such as Canon, as well. I don’t know all of the camera models that are supported, but it appears at the time of this writing that DSTE has grips for the Nikon D7100, D7200, D850, D3100-D3300, D600-D610, D750 and D5300. There are probably many, many more supported cameras than this list. DSTE battery grip mounted on Nikon D7000 In the shot above, you can see the grip with its sub-command dial and lockable shutter release on the left. The little red window on the grip is its infrared sensor for the remote release. The DSTE grip has the same styling and feel as the camera materials. It includes two different battery drawers (just like the Vello) to hold either an EN-EL15-series battery or 6 AA batteries. You can also hook up the EP-5B AC power adapter to it, if you wish. If you don’t have an extra battery, the grip controls all work just fine without a battery installed in it. You can also operate the camera with no battery installed in the camera, and just inside the grip instead. There is, of course, a ¼-20 tripod socket on the base of the grip for tripod use. It's located at the correct location for proper left-right balance, as well. The specifications state that it weighs 234 grams, or about 8 ounces. Many people are really hung up on weight. To me, this extra weight is pretty trivial. I sometimes wonder if some people only wear shorts because slacks are too heavy. To each his own, as they say. DSTE battery grip rear view In the shot above, you can see the multi-selector, the AE-L button (mine is reassigned to be an AF-ON button), and the Main command dial. DSTE and Vello grips comparison You can compare the DSTE and Vello grips above. Except for the DSTE infrared receiver window, you can’t tell them apart. If the Nikon grip was included in the shot, I’ll bet you couldn’t tell it apart from the other grips, either. Infrared remote control Infrapro infrared remote control As I mentioned above, this little remote control worked for shooting up to 27 feet from the camera. It operates basically the same as the official Nikon ML-L3 remote, except that the “Infrapro Remote” only controls the battery grip. The DSTE grip only has an infrared receiver on its front, so you can’t operate it from the rear of the camera. I should mention that you need to set the camera release mode to “Mup” to use the remote. In this mode, you press the remote button once to flip the camera mirror up, and then press the remote a second time to release the shutter. This is optimal for ridding any vibrations when shooting, so it makes sense to operate in this mode. I don’t know if other DSTE grips for other camera models operate in this same way for remote photography, but I suspect they do. The remote is pretty small, and will easily slip into a pocket when you're not using it. It's only a little bigger than the Nikon ML-L3 remote. I have used it for several months with its original battery, so it seems to be pretty efficient with power usage. Weather sealing Forget about it. Keep in mind that Nikon offers zero warranty protection against water damage, in case you have any illusions about their gear. Just buy another grip if you drown your first grip; you’ll still be money ahead. Summary I don’t know about long-term durability of the DSTE grip, just like I didn’t know about my Vello grips’ longevity, either. So far, I’m very happy with it and have no regrets. I’m a huge fan of battery grips, mainly because of their better ergonomics, the superior balance with bigger lenses, and not worrying about running out of battery power. It's also simpler and quicker to remove the battery from the grip than the camera body for charging. If you haven’t tried a battery grip before, you might just find that you never want to be without one again. Relative to the price of just about any other piece of camera gear, adding a grip like this is about as dirt-cheap as it gets.
- Topaz DeNoise AI Lens Resolution Enhancement
I thought it would be interesting to see how much sharper Topaz DeNoise AI could make photos appear. I didn’t want to do any hand-waving on this subject, but instead show real measurements to evaluate it. Since DeNoise AI is able to process raw-format photos directly, I came up with the idea of having DeNoise AI save its sharpening results into another raw-format file. I’m using DeNoise AI version 3.4.2. My (unsharpened) input raw file is from a Nikon D500 (.NEF), and my output raw file is in DNG format. Both of these file formats can be used by the MTFMapper program, which I use to measure lens resolution from special resolution test charts. An added benefit to this scheme is that it provides a means to actually measure how sharpness changes as the Topaz AI sharpening algorithm input configurations change. This is then an ideal way to know when the input parameters to an AI algorithm are optimized. Lens resolution is evaluated by measuring how quickly a straight black edge changes into the pure white of its background. Photo sharpening is achieved by reducing the distance it takes to transition subject edges from light-to-dark or dark-to-light, as well. Normally, web sites that report on lens resolution measurements are using un-sharpened raw-format photos of test charts. Some sites take measurements directly from the lens itself, and bypass the camera sensor. In any case, lens resolution measurements should never be based upon sharpened chart photographs (e.g. jpeg). I’ll show you why this is true in a bit. I normally use the Topaz DeNoise AI algorithm called “Clear” for my shots with an ISO of 6400 or less. This algorithm works for all of the input camera file formats. I run this artificial intelligence algorithm in “Manual” mode, with input parameters of “Remove Noise”=Medium, “Enhance Sharpness”=Low, “Recover Original Detail”=26, and “Color Noise Reduction”=7. I used to let the algorithm run in “Auto” mode, but I was never pleased with the results. Topaz DeNoise AI sharpening, “Clear” algorithm The shot above shows how to convert an un-sharpened raw photo into another raw format (DNG) after applying sharpening and noise removal. The Topaz program has five different AI algorithms to select from, and also provides the option to manually configure the sharpening/noise algorithms. Topaz DeNoise AI sharpening, “RAW” algorithm Topaz now has a new algorithm called “RAW” that you can use if you give it a raw-format input file. It’s super-slow to run, but Topaz claims it produces superior results. This is my chance to check the validity of that claim. I am running it in “Auto”, where it chose to use “Remove Noise”=16, “Enhance Sharpness”=46, “Recover Original Detail”=0, and “Color Noise Reduction”=0. I decided to have a contest between my favorite AI recipe “Clear” and the new “RAW” algorithm. I could then compare these output result files (DNG format) to the resolution of the original raw-format NEF file. I selected a shot of a resolution test chart using my Sigma 150-600 lens at 300mm f/6.3. Again, this shot was made using my Nikon D500. The ISO was 400, so this is primarily a sharpening contest, versus a noise removal contest. Despite its name, Topaz DeNoise AI is as much a sharpening program as it is a noise-removal program. Un-sharpened D500 raw (NEF) resolution test The peak MTF50 resolution in the plot of the un-sharpened test chart shot above is around 57 lp/mm. This is a fairly decent resolution, but can it be improved? Let’s see… DNG raw file output from Topaz “Clear” algorithm Wow. The MTF50 resolution measurements more than doubled, up to around 130 lp/mm! Strictly speaking, Topaz Denoise AI can’t manufacture extra resolution out of thin air, but visually it means that photos certainly look much, much sharper. This is why I like my “Clear” algorithm so much, in addition to its ability to get rid of most of the noise from my shots. DNG raw file output from Topaz “RAW” algorithm Now we’re talking. The “RAW” algorithm really did a nice job. Again, I used it with the default “Auto” mode, where it decides how to sharpen and rid the noise on its own. The downside, however, is that the algorithm takes nearly 20 times longer to execute than the “Clear” algorithm. Getting MTF50 resolution numbers of approximately 150 lp/mm is just outrageous, though. Unsharpened raw (NEF) chart center detail The shot above shows some of the resolution chart (center) target edge measurements, which are near 57 lp/mm in some spots. This is typical of a “decent”, but not outstanding lens. Raw (DNG) chart center detail, “Clear” algorithm results The chart center resolution MTF50 numbers from the “Clear” algorithm shown above are pretty crazy. It doesn’t seem like anything could out-do results like these. Raw (DNG) chart center detail, “RAW” algorithm results Lo and behold, the “RAW” algorithm really does get details sharpened up to unbelievably high levels. I have never seen MTF50 numbers like these before. It may be “false detail”, but it looks really, really good. Just as the Topaz people said, the RAW algorithm gives superior results. Unsharpened raw (NEF) chart corner detail The unprocessed NEF file gives pretty ho-hum corner results. To be fair, though, MTF50 resolution above 30 lp/mm looks pretty darn good. Raw (DNG) chart corner detail, “Clear” algorithm results The “Clear” algorithm corners have jumped to values that go beyond what most lenses look like in their centers. Impressive. Raw (DNG) chart corner detail, “RAW” algorithm results Interestingly, the corner results from the “RAW” algorithm aren’t as good as the “Clear” algorithm. They’re still really good, but the “Clear” algorithm beats the “RAW” algorithm here. AI algorithms work in mysterious ways. Just when you think they have a clear pattern of operation, they’ll surprise you. The same goes for AI-controlled autos; sometimes they have crashed for unknown reasons. Raw unsharpened NEF file MTF contrast plot DNG MTF contrast plot from RAW algorithm The MTF contrast plots show a couple of interesting things. DeNoise AI certainly makes them look better, but the spread of results seems to get larger, too. Those AI algorithms don’t seem to treat every detail or edge in the same way. Some details are improved more than others are, although all details seem to get at least some improvement. Original NEF without sharpening “Clear” algorithm “RAW” algorithm I processed a very distant plane raw-format photo with both the “Clear” and the “RAW” algorithms. In the original un-sharpened photo, you can’t even perceive many fine details. Both of the processed shots bring out an amazing amount of these “invisible” details. To be honest, I can’t readily tell the difference between the “Clear” and the “RAW” algorithm results; they’re both simply excellent. It’s amazing to think that the same lens was involved in the three shots shown above. AI sharpening gets shot quality to a whole new level. Summary I think you can now see why web site reviewers should never use sharpened test chart photos to evaluate lens resolution. The resolution measurements can be wildly manipulated to make a crummy lens look good. I do think that resolution-measurement software can be especially useful to evaluate and fine-tune programs like Topaz DeNoise AI. Using a program like MTFMapper, you have the ability to know which AI algorithms work the best, and by how much. You can also fine-tune algorithm input parameters to optimize your results, assuming you’re patient enough to spend the time and energy to do so. Given the very large difference in processing time between the different AI algorithms, you’ll have to decide if squeezing out a tiny bit of extra sharpness is worth it to you. You should also compare these results to invoking DeNoise AI as a plug-in from your photo editor, which means you won’t have access to the “RAW” algorithm at all. I have avoided a discussion of photo noise reduction here, since I haven’t yet figured out a good way to “measure” it. It’s easy to note if a photo is less “sandy” looking or has fewer color speckles in it, but it’s a lot trickier to be able to say by “how much”. Also, too much noise reduction inevitably destroys resolution.