Search Results
287 results found with an empty search
- Topaz DeNoise AI Review and Tutorial
I used to handle most of my photo noise reduction and un-sharp masking in my Lightroom program. Sometimes I use Photoshop, Capture NX-D, Sharpener Pro 3, Zoner Pro, and a few other conventional editors for these tasks (with similar results from all of them). I got curious about what recent developments in artificial intelligence technology might be able to do in handling these same tasks. My curiosity got the better of me, and I bought Topaz DeNoise AI. You might think from the program’s name that DeNoise AI is only used to rid noise from your photos, but it’s just as useful for sharpening them, too. The main reason I like DeNoise AI is its ability to simply make your lens seem better than it is. Details are enhanced without any “haloes” on the edges. Completely noise-free photos can still benefit from this program. ISO 3200 using Topaz DeNoise AI “AI Clear”, no luminance fix The ISO 3200 shot above didn’t have very much color noise, but DeNoise got rid of what was there. The luminance noise seems nearly untouched, but the sharpness is worlds better. There’s not a hint of haloes to be found. You can see the DeNolise AI settings used in the right-hand side of the picture. I really zoomed into the shot to be able to show the individual hare hairs at high magnification. Sorry; I couldn’t resist. ISO 3200 enhanced with Topaz DeNoise AI “AI Clear”, separate luminance fix The shot above had luminance noise removed in Lightroom before calling the DeNoise plug-in. The Lightroom luminanace setting was 54, with a Detail value of 50. Fine details are now mostly lost; look under the bunny’s chin to see how the details have turned into mush. I’d much rather have a slightly ‘sandy’ background and retain the fine details. Luminance noise removal works best if you use masking and only apply it to those open, featureless areas of the shot prior to calling up the DeNoise AI plug-in. I’ll discuss in the article below how DeNoise is a bit finicky about the settings range that more effectively works on luminance noise. ISO 3200 “DeNoise AI” effect on luminance noise Without changing any DeNoise AI algorithm settings, here’s an ISO 3200 shot that the same algorithm decided to have a larger impact on luminance noise. It did so in an intelligent way, enhancing details while still decreasing luminance noise. I’d swear that the artificial intelligence knows when luminance noise is more distracting and gets more aggressive with it. AI algorithms always have an air of mystery about them; nobody knows exactly how they make their decisions. What does Artifical Intelligence here even mean? This program “knows” what to do by being shown many, many samples of noisy and fuzzy input shots and then sharp, clean output shots. The AI algorithm figures out what needs to be done to the pixels to produce a clean output, thus relieving the photographer from having to spend a bunch of time and effort to try to achieve the same level of quality. The first thing I found using this program was that you better have a really high-performance computer and GPU. I tried out DeNoise AI on what I considered to be a decent-performing laptop (Windows 10) that had an Intel Core-I7 CPU and an Nvidia Quadro FX 880M GPU (48 cores). It basically brought my laptop to its knees when I tried to process my first photograph with the default setting of “auto update”. By the way, do not buy this program if your computer doesn’t have a GPU. You have been warned. Next, I installed DeNoise AI onto an HP Omen desktop gaming computer with an AMD 3.09 GHz Ryzen 9 3900, 12-Core Processor with 32 GB of RAM. This computer sports an Nvidia GeForce RTX 3070 GPU (5888 cores), and uses an M.2 drive for storage. Now we’re talkin. This computer coasts though the most intense tasks you can throw at it, including DeNoise AI. I only mention computer hardware here because AI technology needs vastly more computing resources than conventional programs. So, is it worth it? For me, the answer is yes. I’ll let you decide if it’s right for you. Not wanting to abandon using my laptop, I found a way to be able to use DeNoise AI that makes it workable, if not entirely pleasant. I’ll share those procedures in what follows. So, what’s so important about noise reduction and sharpening, anyway? For me, it’s about being able to use high ISO. A large proportion of my shooting is done using long focal lengths (600mm) in lighting conditions that are not ideal. I have never been thrilled at the “smeary” results when using ISO 3200, even with my Nikon D850. I shoot only 14-bit raw format, but nevertheless the high-ISO shots always leave something to be desired. And if you’ve tried shooting wide-angle star-scapes, you know what a challenge color noise removal can be. For low-ISO images, this program still earns its keep by doing such an excellent job with sharpening. Using manual techniques in various editors, I haven’t been able to outdo what the “AI Clear” algorithm achieves. Running Topaz DeNoise AI After you install the program, there are a couple of ways that you can use it. If you want to, it can be executed as a stand-alone application (just double-click its desktop icon). Using Lightroom, it can be executed from either the Library or Develop tabs via the menu Photo | Edit In | Topaz DeNoise AI. You can also right-click the “film strip” photo or edited photo and select “Edit In | Topaz DeNoise AI” to get there. For some editors, you can tell them to install a plug-in like other Photoshop plug-ins that expect the folder that will have the “tltopazdenoiseaips.8bf” in it. Did you know the “8bf” suffix stands for “eight-bit filter”? An example Zoner editor plug-in installation procedure would look like: Settings | Preferences | Plug-ins | Add…| (browse to tltopazdenoiseaips.8bf folder) Apply You can use raw-format input files, but Topaz will save the finished results only in neutral image formats, such as 16-bit LZW Tiff, png, DNG, or jpeg. My setup, when executed from Lightroom, saves the DeNoise results in a file that adds “-Edit” to the file name, and saves it in 16-bit LZW tiff format. In the Zoner Editor, it returns the plug-in changes into your un-saved raw file to save as Tif or jpeg. In the Capture NX-D editor, you use “File |Open With| Topaz DeNoise AI…” and Topaz will save the results into the folder configured in Capture NX-D via the “File|Open With|Register” dialog. Every program seems to be a little different in how it captures the DeNoise results. It’s generally recommended to process your photos in DeNoise AI after your other editing is done, but you can compare your own results to see if processing order is important to you. Also, you probably want to avoid any cropping until DeNoise has processed your photo; it seems to do a better job with the larger set of information in the un-cropped shot. Topaz DeNoise AI Configuration Suggested Preferences The default settings of DeNoise AI are not what the vast majority of its audience will want. The first thing that should be done after starting the program is to change the default settings via the File | Preferences menu. Most people will want to turn OFF the “Auto-Update Preview” option. If you don’t do this, then it will attempt to re-calculate and re-draw the display every time you scroll or zoom. Next, you will want to set the Performance | Ai Processor | Default GPU. You don’t want the processing burden to fall on your computer CPU; that’s what GPU’s live for. Three Different Ways to Use Topaz DeNoise AI There are three fundamentally different kinds of algorithms for removing noise and sharpening in Denoise AI. They are called DeNoise AI, AI Clear, and Low Light. As noted below, Topaz just released a newer version 3.1.1 that expands your options to 4 algorithms. Compare all algorithms together For different conditions, different algorithms might be superior. Topaz will let you easily compare them to see which you like best. You usually have to look up really close to see differences, so there’s a little viewing rectangle that you can size and move to scrutinize small sections of the picture. The settings are all maintained separately for each algorithm, even after you close and re-open the program. “DeNoise AI” (or "Standard") is intended to enhance details in low-noise images. “AI Clear” (or "Clear") is targeted at high-noise, high ISO images. “Low Light” is designed for high-noise images with low detail retention. The new "Severe Low Light" is for super-high ISO's. I nearly always choose “AI Clear” (or just "Clear" now). 5-19-2021 Update: Version 3.1.1 just arrived Topaz just came out with a new version as I’m writing this article called 3.1.1. The number of algorithms has expanded to 4. The “ Comparison view” window now needs you to select which 3 algorithms to compare against the “original” view. The 4 algorithms are called “Standard”, which corresponds to “DeNoise AI”, “Clear” corresponds to “AI Clear”, “Low Light” for difficult low-light conditions, and “Severe Noise” for extreme ISO shots. You can zoom your view using the mouse wheel, which will make the white viewing rectangle change size automatically. You can left-mouse- button-drag the image to move to see the area of interest. If you have a high-performance computer, you’ll probably want to select the “Comparison View”, which splits a view of the photo into 4 separate images. When the view gets updated (click on the “Update Preview” button), all of the algorithms will get executed with their individual settings. Remember to select the desired final algorithm before clicking the “Save Image” at the bottom of the screen to finish. If you have a ‘regular’ computer, you’ll probably want to select the “Side-by-side View”, which compares the original with your selected algorithm results, such as “AI Clear” in a split screen. Let Topaz figure out what to do You decide what to do For all of the algorithms, you have the choice of running in “Auto” mode or not. The program can decide what it should do to optimize the image in Auto, or it will let you make the decisions if this is turned off. In either case, you still get to decide what the “Post-Processing” values should be. I usually disagree with the sharpening values that the “Auto” mode decides to use, so I keep this option turned off. Stars: it seems to know color noise versus stars In really, really dark shots, color noise can be awful. DeNoise really shines for ridding this. For star shots, it can be a bit difficult to tell since the sky is so dark. DeNoise has a tool to help this, so read on. The “Brighten” option The “Brighten” option can lighten dark backgrounds without adding color noise in doing so. It seems far superior at picking out details and colors than your own eyes can in nighttime scenes. I could barely make out the pine tree when I took the shot; the “Brighten” feature can even discern the green pine needles from the dark branches. You may or may not like this effect, but having choices are always better than having none. Algorithm Settings When I first started using DeNoiseAI, it seemed as if luminance noise wasn’t even touched. It took quite a while to dial in settings that handle this noise to my satisfaction, especially with the “AI Clear” algorithm. ISO 2500 using ‘AI Clear’ You’d think the shot on the right-hand side above was nearly filling the frame, but it’s just a tiny part of the photo. The AI Clear algorithm (now called just "Clear") just did a spectacular job in cleaning up details and noise. This software found details that I didn’t know were there. ISO 2500 algorithm comparison In the shot above, the “Denoise AI” did the best job in my opinion. It eliminated luminance noise, while the “AI Clear” didn’t touch luminance noise. In another test with different settings, I gave the edge to “AI Clear” instead for the sharpest rendering with good luminance noise suppression. You can almost drive yourself crazy with the number of knobs and algorithms to select from. My favorite recipe for this shot ended up being “AI Clear”, “Remove Noise”=high, “Enhance Sharpness”=low, “Recover Original Detail”=23, “Color Noise Reduction”=6. Until the right algorithm settings are found, you might be fooled into thinking that a particular algorithm is just not suited to your image. I encourage you to take the time to fully explore what effects the various settings have on your images with each algorithm. Once you find a good recipe, I’d suggest you record it. Nothing can help ISO 12800 In case you were wondering, extreme ISO’s are still hopeless. You can rid noise, but there’s no detail or dynamic range to work with. You might want this for surveillance work, but not much else. Masking But wait, there’s more. Use DeNoise on parts of the photo You can also apply sharpening/noise adjustments to pieces of your photo. You start by clicking the “Mask” button at the bottom of the program. To apply that particular mask, click the “Apply Mask” button. When all effects are done, you still click the “Apply” button at the bottom-right to save the file (and return to the calling application). A realistic example of this using this feature would be to selectively sharpen only the eyes and lashes of a model. This is very common among portrait photographers who never want to apply sharpening to the skin of the model (they usually apply gaussian blur instead). Batch Mode DeNoise AI can work on many images in one sitting, if you wish. Each image can have a different algorithm applied to it. The bottom of the screen lets you make image selections and lets you know which algorithm it will use. When done making algorithm selections on each image, the button at the bottom-right will display “Save * Images”, where the * indicates how many images to be processed and saved. What DeNoise AI Won’t Do A totally un-handled image defect is motion blur. This program doesn’t do anything about motion. Topaz sells another product called Sharpen AI, which adds a “Stabilize” feature to rid image motion blur. I try to always use a high-enough shutter speed (or vibration reduction) to avoid this problem. Sharpen AI does some noise reduction as well, but I think DeNoise AI does a bit better job in this regard. I just want you to be aware that this feature exists. Conclusion I couldn’t be more pleased at the sophistication of Topaz DeNoise AI for sharpening fine details without adding edge haloes. If you have color noise, this program completely eliminates it. Luminance noise is handled at least as well as a professional editor would do, but only if you find the ‘sweet spot’ in the algorithm settings. The latest DeNoise AI version that actually came out the day of this article writing is 3.1.1. I’ll update this article if I notice any significant changes. It appears the main change is an addition of an algorithm to handle extreme ISO called “Severe Noise”. Those programmers at Topaz are obviously kept pretty busy. Even this program can’t perform magic. Personally, I’m still not willing to sacrifice the loss of details and dynamic range beyond ISO 3200. But this program makes ISO 3200 look pretty good. Although it adds an extra process step to editing, I am more than willing to tolerate the extra complication to get these premium results on my “keeper” shots.
- Lens Resolution Changes versus Focus Distance Errors
What happens when you slightly miss focus? Most web sites who quote lens resolutions avoid using autofocus to take their measurements. Instead, they take a series of resolution test chart shots at slightly different distances and report the best result. How far off can a lens be from optimal focus distance and still achieve the peak resolution? Not very far, it seems. The following discussion explores how lens resolution changes as you approach, enter, and then leave the zone of optimal focus. I have chosen my Nikon D850 and Micro-Nikkor 105mm f/2.8 lens for this testing. I’m not using vibration reduction, and the camera is mounted on a sturdy tripod. I have the camera set to use electronic front-curtain shutter and it’s in “mirror up” mode to totally eliminate any vibrations. I trip the shutter using a wired remote release. I left the aperture wide open for all testing, since this test is all about managing shallow focus depth. Any vibrations would look to the measurement software like an unsharp or defocused lens. Test setup: camera mounted on a sliding stage I mounted the camera onto a precision linear translation stage (made by Melles Griot) typically used for microscope work. The stage has an attached micrometer head (made by Mitutoyo) that lets me shift the stage (and the camera) to within an accuracy of 0.01mm. I took a series of photos of a resolution target while shifting the camera by 1.00 mm between shots. The camera is mounted such that its balance point is nearer the center column of the tripod. This arrangement is more stable, and helps minimize vibrations. The camera was placed 1.26 meters (1260 mm) from the resolution target, and I used phase-detect autofocus for the initial focus setting while the camera was near the middle stage position (at the 12.0 mm micrometer setting). This distance exactly fills the frame with the resolution target. Next, I moved the camera on the stage back by 5mm farther away from the target. For each photo of the chart, I shifted the camera exactly 1 millimeter closer without touching the lens focus. The whole point here is to adjust focus purely by shifting the camera and not by re-focusing the lens. The theme of this exercise is to start beyond the correct focus position and then progressively move closer to the target in each test shot. At some point, optimal focus should be achieved, and then the target will gradually go out of focus again as I go past the point of best focus. I processed each raw-format shot using the MTFMapper program to get the MTF50 resolution measurements. I'm using the peak resolution value, rounded to the nearest MTF50 lp/mm value. As the typical resolution chart displayed below shows, "resolution" of a lens is actually a vague value spread out over the whole sensor, and it's different in the saggital (wheel spoke) and meridional (tangent) directions. A typical MTF50 resolution test chart result Resolution versus distance change results The plot of the resolution measurement results above show how rapidly the resolution changes with distance. Optimal focus only extends over a bit more than 1 millimeter! Given the chart distance, it means that for this lens and aperture, a focus precision within 1/1260 or .08 percent is required for the best resolution. Most people wouldn’t think that optimal focus could possibly be this demanding. The initial focus, obtained via autofocus while the stage was at 12mm, turned out to be incorrect (the MTF50 was 41 lp/mm). Best focus was 2 or 3 millimeters closer to the target (at 9 or 10mm on the stage, with the MTF50 of about 43). The autofocus error was small, but it had a fairly significant impact on the resolution. For this lens, a focus fine-tune change from -4 to -1 fixed the focus error. When I say “fixed”, I mean that the typical autofocus position was shifted forward to where it should be. Some shots focus too far and some shots focus too near the target. Autofocus isn’t perfect, but it can get pretty close. It’s easy to see why web sites that report lens resolution generally have to abandon using autofocus to perform their testing. Even well-calibrated cameras aren’t really capable of this level of repeatable autofocus performance. The results also show how important focus calibration is; even slight adjustment errors can make a lens look bad.
- Focus Peaking Accuracy Analysis for the Nikon D850
I have read that manual focus using magnified Live View mode, with “focus peaking”, is the most accurate way to focus. I intend to either verify or debunk this claim. My software of choice for analyzing image sharpness is MTFMapper. Did you know that the mars rover Perseverance main lenses (on the stereo-panorama Mastcam-Z) were measured and qualified using Frans van den Bergh’s MTFMapper? This software is more than capable of determining just how good focus peaking really is. The lower the focus peaking level value, the narrower the depth of focus that shows peaking information. For the tests that follow, I tried setting the peaking level to 1, but it generally provided no useful feedback for many subjects. The peaking level 2 gave the best combination of useful feedback and focus discrimination. Peaking level 3 wasn’t nearly picky enough, and so wasn’t a useful test. At high LCD screen magnifications, peaking doesn’t provide any feedback at all, so I used the highest magnification that still provided peaking feedback. As you’ll see, it turns out that focus peaking feedback really depends on the level of subject detail and which focus peaking level you select. If the subject detail is either too fine or too coarse, then there’s often no peaking feedback at all at peaking level 1! To be able to physically measure the quality of the peaking information, I used one of the focus target designs that are available at the MTFMapper website. I would manually focus on this target using focus peaking, and then evaluate the resulting (raw-format) photograph. I chose this particular target, because it has details at 3 different levels to evaluate small, medium, and large details. Since I use the MTFMapper program to help me calibrate my phase-detect focus, I will also compare the accuracy of my phase-detect autofocus against the manual focus-peaking results. Focus Peaking Level Selection from “i” button To invoke focus peaking, the D850 focus mode selector switch has to be set to “M” and then click the “i” button while in Live View to set some peaking level other than “off”. Thereafter, anytime you’re in Live View in manual-focus mode, focus peaking will be active with the level you last used. The shooting/display option d8 from the ‘pencil' menu will let you select a peaking color other than the default red. Peaking highlight color selection d8 Peaking hightlight colors Depending upon your subject, you can choose between red, yellow, blue, or white peaking highlight colors. Focus Peak level #1 LCD screen If you don’t look carefully, you won’t even see any of the red “peaking” highlights at peaking level #1 in the shot above. I am using a chart that is slanted at 45 degrees, and then used manual focus to get the little black dot inside the red square into focus. Without using my LCD viewfinder magnifying loupe, it was very, very difficult to see the red level #1 peaking highlights. Detail of LCD screen showing peaking level 1 highlights For this and the other test shots, I used an 85mm lens at f/1.4 and I set my D850 to “DX” mode. The focus distance was 1.5 meters. This combination of hardware yields an extremely narrow depth of focus, to make it easier to evaluate focus peaking accuracy. The black target dot being focused is 10mm in diameter. The horizontal band of little rectangles just above the black dot are at a spacing of 2mm. The other focus target markings, either coarser or finer, generally don’t get registered by the focus peaking at all. Since the black target dot itself didn’t get any red focus peaking highlights, I had to use the scale above the dot to manually focus. LCD screen magnified view I used the “+” magnifying glass button to zoom in on the LCD screen. If I magnified the view any more than what’s shown above, then there was no displayed focus peaking marker to be found. I could see the “peaking level 1” highlights only slightly better at this level of screen magnification. Even at the maximum accuracy level of the focus peaking, the little highlights already extend to about 3 subject dot diameters, or about 21mm of actual focus depth. I used the middle of the focus-peaking red band to determine the best manual focus. If I didn’t have the continuous band of little rectangles at just the right frequency to help me focus, then the focus peaking level #1 would have been useless for this particular subject. I don’t think the feedback provided by focus peaking level #1 is generally useful enough to select this setting for general photography. You’ll end up questioning if focus peaking is active or not in many shooting situations. Focus peaking level #2 with un-magnified view Next, I switched to focus peaking level #2. Now, I’m getting better feedback to determine focus. The little 2mm-spaced rectangles above the target dot indicate that roughly 4 dot-diameters (around 25mm of focus depth) is now “in focus”. LCD screen detail, peaking level 2 All of the target markers in the band of sharp focus now have some focus-peaking highlights on them. I’d consider this peaking level to be generally useful for most subjects. The question is, however, if all of those red focus-peaking pixels are really indicating sharp focus. Focus peak level #3 The focus-peaking highlights at level #3 are indicating that a 55mm-wide band is in focus (a depth of 39mm). This is really getting sloppy for focus. Just imagine if the target was a single vertical structure; the “in focus” feedback is just too inaccurate. If I were to photograph a flat subject parallel to the camera sensor, then my focus would probably be really bad. Actual resolution measurements using focus-peaking Shown above is an extreme close-up of the target with MTF50-lp/mm resolution measurements included. I used focus peaking level #1 feedback to determine how to manually focus on the black dot. The feedback used to focus was the horizontal band of little rectangles just above the dot, since the target dot didn’t get any peaking feedback itself. I chose the middle of the area that had the red focus-peaking highlights to estimate where to place focus. The final focus was excellent, and about as good as you could ever hope to get. This shows that focus-peaking can achieve excellent focus accuracy, but only when your subject happens to give sufficient peaking feedback. You need to be able to estimate the “middle zone” of focus, which for some subjects won’t exist. The “acceptable” focus depth in these tests for me is actually about 15mm, while the focus-peaking feedback indicated the depth was about 21mm in the best case (peaking level #1). Again, this was using an 85mm lens at f/1.4 from 1.5 meters away. My own level of acceptable focus is based upon resolution loss, and it’s probably a little more picky than most people’s idea of what’s acceptable. Calibrated phase-detect autofocus So, how’s all of this manual focusing compare to simple (calibrated) phase-detect auto-focus? Not much difference, actually. The shot above was made using AF-C focus after fine-tune calibration, which for this lens and camera combination is +2 at f/1.4. It’s just about as accurate as focus peaking, and a whole lot faster and easier to use. For people that don’t carefully calibrate focus, then using focus-peaking will almost certainly achieve better focus than using phase-detect focus. Personally, using Live View and focus peaking is a bit too painful for me, and almost impossible outdoors unless I bring along my LCD viewfinder loupe that shades the screen from sunlight. Mirrorless cameras with in-viewfinder focus peaking are the way to go, at least for manual-focus lenses. The only time I use focus peaking is when I use my manual-focus lenses and I have a static subject (and my screen loupe to block the sunlight). At least I can be pretty confident that this method does in fact help me set optimal focus for most subjects. If I had to choose a single focus peaking level, then I’d say that level #2 is the Goldilocks setting.
- Hand-held Macro Focus Stacking that Really Works
After fussing with tripods and unsuccessfully getting near to low-level macro subjects, I figured there must be better way. I finally found it: how to hand-hold my D850 to get good stacked macro photos. If you have tried to get near to small subjects that are close to ground level using a tripod, you know the pain. Tripods are too unwieldy for most macro shooting outside of the studio. Focus stacking just magnifies the problem. Sorry for the weak pun. For the article that follows, I used the Nikon D850 focus-shift shooting feature. Not many cameras offer this functionality, but if you like to do focus stacking then you might want to consider this feature in your next camera purchase. Even if you only do single-shot macro photography, the gear idea shown may still prove useful to you. Hand-made rifle stock This isn’t a brand-new idea, but I decided to see if I could make a rifle stock that could hold my D850 with the Micro Nikkor 105mm f/2.8 lens. It’s just too hard to hold the camera/lens combination steady enough for macro photography without some help. I found that I could hold the camera “reasonably” steady using a custom rifle stock, but by no means rock solid. There are a few variations on this rifle stock idea out there on the internet you might be able to purchase if you don’t want to try to make one yourself. My design allows enough clearance to attach my LED ring light onto the front of the lens. I got hardware that acts like a tripod screw (1/4-20 thread) to attach the camera to the rifle stock. I attached a littled wheel to the screw to use as a tightening knob. You can take a look at regular tripod screws to see how the hardware works. Again, you can do web searches for ready-made parts if you don't want to make anything yourself. The camera grip base sits in a shallow depression that prevents any camera rotation on the stock. I use the free Windows-based CombineZP program to perform focus-stacking, and I have learned through experience that it’s remarkably good at aligning a stack of photos that have significant side-to-side misalignment. What it can’t do well (and no software can) is fix uneven front-to-back focus shifting. There’s no correction for gaps in a stack of photos where nothing is in focus. It’s crucial that you have overlapping sharp-focus slices in your photos, or else the stack will be ruined. Your main enemy outside is invariably the wind buffeting your subject. I found that my 105mm at f/8 (infinity focus) needs a focus shift size of ‘6’ to always get proper shot overlaps with the D850 using focus-shift shooting. The rifle stock with a little monopod-style front attachment lets me easily control and nearly eliminate the front-to-back wobble problem. I still get a fair amount of side-to-side wobble, but that’s almost no problem at all for CombineZP using its “Align and Balance Used Frames (Quick)” macro. If the subject is a little higher off of the ground, then I sit on the ground and rest the little monopod piece on my leg. With the monopod piece resting on something and the back end of the stock resting against my shoulder, it’s enough to mostly eliminate front-to-back motion. And using the rifle stock, I can get as close to my subject as I need. This scheme depends upon the D850 focus-shift shooting feature, however. I give the camera the go-ahead, and it takes all of the shots automatically while I just hang on for the few seconds it takes to take the stack of photos. If I had to manually either shift focus or move the camera forward shot-to-shot, I don’t think I would ever get a suitable focus stack. I used to get focus stacks using my Nikon PB-4 bellows that has a focus rack. This setup demanded a steady tripod and careful, even turns of the focus rack adjustment knob to get an acceptable focus stack. It was slow and tedious, but it worked. The D850 makes this task trivial in comparison. But the proof is in the pudding, as they say. The following example is using a stack of 20 photos, shot using the rifle stock. The CombineZP program can’t use RAW photos, so I first convert them into TIF format (I used CaptureNX-D to batch-convert them). CombineZP sometimes has problems with full-size FX images in the TIF format (around 350MB each!), which changing to DX mode solves. Set up CombineZP program to show its menus Click on File | *New to select the TIF file stack folder Pick the photos to stack CombineZP dialog after photos are loaded Select the “macro” that aligns your shots Select the macro to stack the aligned shots Draw a rectangle to select the stacked result portion to keep Use the mouse to select a rectangle around the final stacked image that avoids the portion that looks like a reflection. Select File | Save Rectangle As and save the result as TIF format for the best quality. There are other file formats, such as jpeg, that can be used, too. The finished stack of 20 shots The methods I have outlined make it easy and flexible to get your stacked photos. Let’s face it: unless it’s reasonably convenient to do, you’re going to avoid making stacked shots. My D850 on a rifle stock has made shooting these shots really easy.
- Nikon D850 Focus-Shift-Shooting Step Width Calibration
The Nikon D850 has a focus-shift shooting feature, but they provide no concrete information about how much of a “Focus step width” to use. Instead, they only give you a step-size to select, ranging from 1 (small steps) to 10 (big steps). 105mm Micro Nikkor at f/8.0 15 stacked shots, shift 6, 0.4X For a shot like the kangaroo paw above, how do you determine what focus-shift step size to use? How do you determine how many shots to stack? What aperture should you use? If you have ever tried a macro shot with the level of magnification like this photo, you know that you can’t get this much depth of focus with a single shot. Before you go out into the field to shoot macro subjects, it would be worth your time to know to configure your camera and lens. The following article shows you how to calibrate your focus-shift shooting for an optimum shift step-size. The Focus shift shooting menu D850, 105mm Micro Nikkor, and LED ring light I used the gear shown above to take the close-up shots for the photos that follow. The battery-powered LED ring light provides really excellent shadow-less illumination. This setup works well even at 1.0X magnification. A tripod isn’t strictly necessary at long focus distances to do focus-stacking, but it (or some other camera support) certainly is required at high magnifications. You should use the “Silent photography” setting whenever possible, to minimize vibrations. I did some testing with my Micro Nikkor 105mm f/2.8 lens on the D850 to dig a little deeper into these “Focus step widths”. It turns out that those Nikon engineers did some pretty smart engineering. Although focus-shift shooting can be done with any autofocus Nikon lens at any distance, the main reason for this camera feature is for macro photography. Focus depth is incredibly small at high image magnifications, and most subjects turn out to be very disappointing with only a miniscule region in sharp focus. Nikon partially fixed this narrow-focus-depth problem with the ability to take a requested number of shots while automatically changing the focus slightly between shots. A problem arises with the “slight” focus change you want to specify to the camera. When you change lenses and/or apertures, the amount of focus change is different with every combination. To some degree, Nikon simply punted and came up with a dimensionless step value that you can request. Nikon only partially fixed the shallow-focus problem, because they don’t actually stack the photos. I’ll discuss later in the article how that problem can be rectified. 10 Stacked photos, Micro Nikkor 105mm at f/8, 1X It’s hard to believe, but the shot above is actually a stack of 10 photos. The smallest divisions on the ruler are actually 1/100”. This means that the region in focus is about 0.15 inches (3.8 mm) along the ruler. Since this is a stack of 10 shots, a single shot has only about 0.015 inches in focus! The ruler was rotated to 70 degrees, so the actual focus depth is even a little less. The combined stacked shots above, shot at f/8 with the Micro Nikkor 105mm, are at life-size magnification. Now, try to imagine if the lens focused down to maybe 2X magnification; almost nothing would be in focus. I chose f/8, since it’s the best combination of focus depth and resolution. The f/8 I mention throughout this article is the infinity-setting f/8, and it doesn’t take into account the increasing f-number as magnification increases. Micro Nikkor 105mm at f/8, 1X single frame The shot above is a single frame taken with the Micro Nikkor 105mm at f/8 and 1X magnification. There’s almost no depth of focus at all! Now you see why focus stacking is gaining in popularity. I did a number of tests to find out how much the focus-shift “step size” should be to guarantee focus overlap, but not to overlap focus any more than necessary. With the 105mm at f/8 at this focus distance, the largest focus step width size that would still have a frame-to-frame focus overlap was 7. If I stepped larger than that value, then I was left with unacceptable bands of out-of-focus in the stacked photo. If there was any wiggle in the camera or subject, I once again had a ruined shot stack. I determined that the optimal step size for life-size magnification with the 105mm at f/8 is 6. This gives a very slight safety margin for vibrations or image movement. I used a tripod for all of my testing, so the Silent photography is a great option to minimize vibrations. If you try hand-holding shots instead, turn the Silent photography option off (always use a tripod or some other device to help steady your camera for really close shots). After I had my desired test settings, I just pressed the “Start” option to begin automatically shooting the series of shots. After a brief “Processing” message, the D850 would then take the series of shots.You can also press the center button on the multi-selector to start shooting, once "Start" is highlighted. 10 Stacked photos, Micro Nikkor 105mm at f/8, 0.5X My next set of testing was conducted at 0.5X magnification, with the same 105mm at f/8. Guess what? The optimal step size was 6 again! Stacking 10 shots, the range shown in focus on the ruler was about 0.65 inches, or 0.065 inches per shot. This shows that the depth of focus went up by more than 4X at half-life-size, compared to life-size. For typical subjects, you’d probably want to stack more than 10 shots at this magnification and f-stop. All that you would need to do is increase the “No. of shots” in the menu to maybe 20 or 30. Micro Nikkor 105mm at f/8, 0.5X, single frame I’m showing a single shot at 0.5X magnification above, using the 105mm at f/8. This single shot still isn’t enough to focus the width of most bugs, but the stacked shot of 10 would have been just fine. 10 Stacked photos, Micro Nikkor 105mm at f/8, 0.25X Switching to 0.25X magnification, my testing showed that the optimal focus shift step size should be 6 once again. Simply amazing! Those Nikon engineers designed a system where a single focus shift step size would work at that whole range of distances! At 0.25X magnification, the 10 stacked shots above now shows an in-focus range on the ruler of about 2.5 inches. The depth of focus for the 105mm at f/8 for 10 stacked shots is getting into a really useful range for many subjects. Micro Nikkor 105mm at f/8, 0.25X, single frame Even at 0.25X magnification and f/8, the depth of focus is still too shallow to be very useful for this 105mm without focus stacking. Micro Nikkor 105mm f/8, 1/10X through infinity For testing something on the scale of landscape photos, you could extend my concept to use a subject like a fence. This would make it easy to evaluate shot-to-shot focus overlap. When you take the shots, the camera will simply stop shooting once it reaches infinity focus (or the end of focus travel), so you don’t have to worry about requesting too many shots in the sequence. Unsurprisingly, the same focus step shift size of 6 worked yet again for f/8. This stack took 29 shots to cover 1/10X through infinity. The camera took a few extra shots beyond infinity, stopping when it got to the end of focus travel. Remember to delete these “beyond infinity” shots before focus-stacking! This shot above demonstrates a major weakness of stacking shots for a landscape: wind. You can see some little ghost branches, etc. It’s a cold reality that you’ll usually end up using things like a healing brush in your editor when stacking shots from the outdoors. Micro Nikkor 105mm f/8, 1/10X. First shot of stack Until you see individual frames from a focus stack, it’s hard to appreciate how much focus depth can be obtained. It’s kind of like getting cataract surgery. How I stacked the test shots I used the free CombineZP program, created by Alan Hadley, to stack all of the shots shown in this article. I used Windows10; you’re out of luck on Apple computers. Something like Helicon Focus (not free) should work on Apple systems. Before the D850 “Focus shift shooting” feature existed, I used my Nikon PB-4 bellows for macro focus stack shooting. In that case, each photo was shot at exactly the same magnification. Using the D850 focus-shift shooting, the photos need to get “scaled” to be the same magnification. The CombineZP program has a few different macros that can solve this ‘magnification change’ problem. If you choose DX mode shooting versus FX mode, you’ll find that the stacking process is maybe 4X faster. Also, CombineZP sometimes has problems with full-size FX images in the TIF format, which changing to DX mode solves. Align (and scale) the shot stack in CombineZP To make a stacked shot, there are basically 6 steps I followed. 1 Convert the raw shots into TIFF format. (I use 16-bit) 2 Open the shots in the CombineZP program 3 Run the Align and Balance Used Frames (Quick) Macro 4 Run the Do Weighted Average Macro 5 Draw a rectangle around the finished stacked shot to trim it 6 Save the rectangle in jpeg (or TIFF) format Because the D850 does focus-shift shooting to create the photos to stack, each focus distance change causes a different magnification. If you merely combined the shots into a stack, none of the shots would match each other in size. The CombineZP program can fix this “scaling” problem, and simultaneously align the shots as well. The CombineZP program doesn’t understand the D850 raw photo format, so I use the free Nikon Capture NX-D program “batch process” feature to easily convert the shots into TIFF format. There are several stacking macros to choose from in this program; you can simply try another macro (or all of them) to see which one you prefer. Thank you Alan Hadley for this excellent program! I do have to mention that the CombineZP program can save images in TIF format, but some of my other editing programs don’t like those files; that’s why I recommend that you additionally save into jpg format, just in case. At least try out your favorite image editor with a file saved as TIF from CombineZP to verify it works okay. By the way, I run the CombineZP program under 64-bit Windows 10. There are other stacking program offerings out there, but I can’t comment on their relative ease or capabilities. You’ll need some other stacking software, such as Helicon Focus for Apple products. Summary For any given lens and f-stop, it’s pretty straightforward to take a series of focus-shifted shots using the Nikon D850 to find an optimal step size. By looking at neighboring shots afterward at 100% magnification, it’s easy to see if the shots share a common zone of focus. If the shots are shifted too much, simply decrease the shift step size and try shooting again. Once you have a “calibrated” step width for your lens and f/stop, it simply becomes a set-and-forget scenario. You can shoot with the confidence that your stacked shots should combine perfectly. If the last shifted photo hasn’t yet gotten enough of your subject into focus, then you can simply command the focus-shift “Start” option again, and the D850 will pick up focus where it left off. You can always increase the total number of shots to take, especially if your estimate was way too low to cover the whole subject. Focus stacking is pretty slow, so you want to minimize how many shots you try to stack. You will find it much easier and quicker to take shots at a lesser magnification (e.g. 0.5X instead of 1.0X) and simply crop the final stacked photo. The D850 has such high resolution that cropping is almost never a problem. If you’re lucky enough to have the 105mm Micro Nikkor, it’s very, very sharp. If you change your shooting to the DX crop mode, the stacking will be much faster, and it will take a fraction of the disk space. I’m amazed that the Nikon engineers designed a “Focus step width” algorithm that would allow a single setting to work with this 105mm lens at any distance for a given f/stop. This feature is going to revolutionize macro photography, which has historically been a very slow and tedious chore. 105mm Micro Nikkor f/8 shift=6, 12 shots, DX mode, 0.25X I tend to use my LED ring light with my macro photos instead of a flash. I really like how smooth the lighting results are, compared to flash.
- Optimizing Autofocus Efficiency in Nikons
The upper-end Nikons DSLRs, such as the D6, D850, and D500 have some pretty confusing jargon for their autofocus configuration. The enthusiast Nikon camera focus jargon is perhaps even worse. Nikon’s menu option descriptions tend to keep people from getting the best performance from their cameras. This article explains how I set up my cameras to optimize autofocus, and why. Keep in mind that your camera might be waiting around for a cheap/old lens to respond to its focus commands. To properly evaluate the following suggestions, you will need to select a lens that can “keep up” with your camera. Don’t blame your camera for something that your lens can’t do. And for heaven’s sake, do your testing in sufficient light. In all the tests that follow, I just used the center (cross-type) focus point. My test setup is plenty challenging without introducing off-center focus point comparisons. AF-ON Button (pro-level Nikons) First things first: set up your camera to strictly focus using the “AF-ON” button via your thumb for phase-detect photography. If you have stayed with the shutter button half-press to focus, you need to get over it. Pressing a button with your thumb to focus is simply superior. And stick with continuous autofocus (AF-C); single-focus is totally pointless after you configure your AF-ON button. It should take less than 5 minutes to fall in love with the AF-ON button. Configure your AF-On button You can configure the “AF-ON” button under the “Custom Settings” (pencil) menu, “Controls”, “Custom control assignment”. Specialize the AF-ON button I like to assign both “AF-area mode” and “AF-ON” to my button, and typically assign “D25”. Note in the screen above I have also assigned AF-ON to my depth of field preview (Pv) button with group-area focus. The joystick center button is additionally assigned AF-ON with single-point focus. Where to combine the AF mode with the AF button The dynamic-area focus option prioritizes distant subjects, while the group-area focus option prioritizes the nearest subject. I have a total of three buttons assigned focus duty, with three different ways to autofocus. AF-C Priority Selection Since it’s settled that you should stick with using the AF-ON button for focus (right??), the next setting is the AF-C priority selection: stick with “release priority”. The camera won’t stop you from taking the shot in release-priority mode. If you set the “focus priority” instead, the camera won’t let you take the shot unless it decides the subject is sharp enough. You want to be making this decision yourself and not the camera. Digital is cheap; you can delete the shot later if it’s really out of focus. AF Activation Make sure you make this AF-ON only. Don’t let the shutter button mess with focusing any more. Focus Tracking with Lock-On The Nikon “Custom Settings” (pencil) menu is where you configure autofocus “logic”, which they call Focus tracking with Lock-on. Where to assign the autofocus logic Block shot response ‘Delayed’, motion ‘Steady’ The first topic here is the option “Blocked shot AF response”. I equate this feature to “attention span”. The settings for this option range from “Quick (1)” to “Delayed (5)”. I always leave mine on “Delayed” or 5. With the “Quick” setting, if your subject escapes outside of your collection of focus points, such as the 25 points in “D25”, then your camera will immediately focus on whatever random subject is presently under the middle focus point. This is nearly always bad. If you have your camera “blocked shot AF response” set to “Delayed” or 5, then you’re given some grace time to re-locate your subject and get it back inside your focus point collection. If you can successfully re-locate the subject in time, then your subject focus-tracking simply resumes. This is good. This also assumes you’re pressing the “AF-ON” button the whole time. If you are busy tracking your subject and suddenly notice Bigfoot walking in the background, then all you have to do is briefly stop pressing the AF-ON button and then re-press it after centering your focus sensor over Bigfoot. You have become the master over your attention span, and are no longer at the mercy of your camera. Your camera will now immediately start tracking Bigfoot and forget all about the old subject it was tracking. This is good. I know that people want their focus system to be purely automated, but forcing you to control the “AF-ON” button will get you superior results compared to using the “Quick” blocked-shot response. The second topic here is the option “Subject motion”. The settings range from “Erratic” to “Steady”, and are just beneath the ‘Blocked shot AF response’. Now, you’d think that “Steady” would mean slow, versus “Erratic” meaning fast or quick. After many tests tracking subjects coming straight at the camera, I have found that “Steady” gives slightly more reliable results, and it seems plenty fast, too. This subject motion option means toward/away from the camera. I found that the “Erratic” setting tended to exhibit some focus hesitation or hiccups while tracking subjects moving toward me. The “Steady” setting almost never did, until light levels got too low. I couldn’t find meaningful differences in the speed of focus ability between the two modes. Before I ever tested this configuration, I had assumed that “Erratic” would obviously win for focus speed, but the testing results forced me to change my mind. How I test Focus Tracking I have done lots of tests with a setup that lets me look at frame-to-frame sharpness and also overall lens focus scale behavior during shooting. My tests let me vary the subject speed and light levels. Low-elevation shooting My setup includes using a tripod with a reversed center column holding a lens that has a tripod ring. This hardware lets me rotate the camera into any orientation and keep very low to the ground, so that my (short) moving target comes straight at the camera. Rotating with the tripod ring lets me see the lens focus scale (to record video of its motion). The setup above is testing a Nikon D500 with the Sigma 70-200 f/2.8 Sport lens. This is a very quick-focusing lens, which should be able to keep up with the camera. I use a second camera to record video at 120fps while being pointed at the Sigma’s lens focus scale. The video camera uses a wired remote to let me easily trigger recording start/stop. The video lets me closely analyze how the lens focus can hesitate and even exhibit forward/reverse/forward hiccups while tracking a moving subject. This focus action is faster than what people can follow, but reviewing the high-speed video after the fact makes it easy to analyze. Movie mode: assign the shutter release to record movies To enable my wired remote release to start/stop recording video, I have to assign the shutter release to record video as shown above. This only reassigns the shutter button functionality while in video mode. My moving target My moving target with a better focus target on its face To track focus, I get my helper to pull the toy straight at the camera at different speeds and in different light levels. I start the video recording (of the lens focus scale) and then start high-speed shooting (10 fps) as the target gets pulled toward my camera. The flat target on the toy’s face makes it easy for the camera to track the subject. I don’t want to use an ambiguous target distance that will just muddy the results. Before you snicker too much about using this toy target, read on. There’s method to my madness. With this rig, I get to monitor the resolution of each frame to evaluate the quality of focus. I know the exact distances involved, to calculate just how fast the subject is moving (using 10 frames per second shooting), and the video of the focus scale lets me review the smoothness of the lens focus tracking action. Lenses have to work much harder to focus at close distances, because they have to move their glass over larger distances inside the lens. My little tracking rig really stresses the camera focus capabilities, compared to distant subjects. Focus errors are much more obvious at close distances, too. My tests started at about 14 feet from the subject and finished at 4 feet (the minimum focus distance for this lens). The focus system has to work very hard in this scenario, due to moving the internal lens elements so far and also because of the percent distance change to the subject. Because of this, the target doesn’t have to move at blinding speeds (it was moving typically at about 6 feet per second). The depth of focus (135mm f/2.8) at 14 feet is 0.53 feet and it narrows down to just 0.04 feet (12mm) at the 4-foot-away finishing distance. Performing autofocus tests at long distances isn’t nearly as stressful for a camera or the lens. Depth of focus is relatively huge and the internal lens elements have to be moved much less to track the subject. For distance testing, your subject has to move at very high speeds to be as challenging as doing close-up testing. Shooting with this D500 at light levels down to EV 5.9 I didn’t see any slowdown in focus tracking, compared to bright light levels. The “Erratic” subject motion setting had more focus failures than the “Steady” setting did, although it generally recovered focus within 1/10 second (I didn’t get 2 frames in a row out of focus at 10 fps). The differences I noted between Erratic/Steady are subtle. To be honest, I would be hard-pressed to guess at which “Subject motion” setting was being used by conducting these tests. There just wasn’t that much of a difference; both settings generally produced excellent responses that went well beyond my initial expectations. I’d be wary of reviewers claiming obvious differences between the “Subject motion” settings without knowing just how controlled their focus-tracking tests were. Enthusiast Nikons For Nikons like the D610 and the D7000-series (and the current Z cameras), the focus tracking configuration options decrease. You can still assign a button (AE-L AF-L) to give you “AF-ON”, which should be your first priority. Again, stick with AF-C focus. Focus configuration Nikon D610 To adjust the camera’s response to a moving subject, you need to select the “Focus tracking with lock-on” option. Quick subject distance change response is ‘Short’ (1) There isn’t a pair of configuration options like the pro-level Nikons provide. Instead, the options are reduced to a single selection. The Nikon explanation isn’t entirely helpful. Nikon’s focus help The explanation above indicates that you would like to set it to “Short” to quickly react to something coming toward you or away from you. So far, so good. You need to select “Long” to prevent re-focus if you briefly have your subject get outside of your focus point collection (the same as ‘blocked’). The “help” also indicates you need to turn this option off altogether if you are switching between subjects at different distances. (Remember my discussion above about assigning “AF-ON” to a button so that you can handle this task?) These two Nikon explanations are at odds with each other. You really want both quick response to subject distance changes and slow response to re-focus if you briefly lose the subject from your focus point collection (side-to-side motion). Since you can’t have both, I feel the best compromise is the “1 Short” choice. You want the camera to react quickly if your subject suddenly comes towards you or away from you. This choice is a higher priority than having the camera give you a longer grace period to re-acquire your subject. You’re now faced with the added pressure to never let your subject get outside of your focus point collection. You can, of course, change to a larger dynamic area (number of focus points in your collection) to lessen the chance of having the subject escape outside of the focus point box. Now you can see why the ‘pro’ cameras give you a pair of choices for the autofocus logic. After lots of tests using a D610, I am more convinced than ever that it should be relegated to landscape photography. It was woefully inadequate at tracking focus in my tests, unless the target was moving fairly slowly. It didn’t matter which “Focus tracking with lock-on” values I chose; it seemed equally inept at any setting. The contrast to tests done with the D850/D500 was stark, and really makes me appreciate the pro-level autofocus that those cameras possess. My D7100 consistently seems more adept at autofocus than the D610, even though the two cameras are supposed to be roughly equal at autofocus, and they both sport the Expeed 3 processor. My little focus test toy was just too much for the D610 to cope with. I realize I’m overreacting to the D610 results. I just remember the high percentage of lost shots of moving animals and how frustrating that was. My D500 and D850 are so far above its focus capabilities, it’s hard to believe they were all made by the same manufacturer. Conclusion People have very strong opinions when it comes to autofocus. Rather than taking my suggestions at face value, I’d suggest you try some tests on your own. While pressing the AF-ON, try panning your camera off and then back on a static subject to get a feel for the focus “attention span” duration. As you may have inferred, it’s much trickier to evaluate near/far focus behavior. I always try to show how you test something, and not just give you "results" or opinions or regurgitate marketing literature. There are so many elements that go into autofocus results (including practice). To me, this is the most complicated aspect of mastering a camera. The camera models that let you assign different autofocus modes to different buttons are golden, but you still have to train yourself to use them I can’t stress enough that you need to get comfortable with using the AF-ON button (or an assigned button for this purpose). Use your thumb to control when to focus on a different subject; don’t get trapped into the notion that you have to wait for your camera to decide when to refocus on a new target.
- Neewer R-160S LED Ring Light Review
I submit for your approval (as Rod Serling used to say) the Neewer R-160S LED ring light. I’d like to bring to your attention a battery-powered LED ring light that was designed for macro photography. The first thing I did after I got it, of course, was to try to misuse this light for portrait photography with an unanticipated lens (the Nikkor 85mm f/1.4). I have used an LED ring light for my macro photography for many years. This particular LED is built like a tank out of anodized aluminum and has to be powered from a voltage supply plugged into a wall socket. To attach this light, there are three tightening screws to press against the macro lens barrel. It’s very limited in which lenses it can be used with, and you have to stay relatively near to a wall socket. The Neewer LED ring light is none of these things. Which is why I got it. It’s really light, portable, and all plastic. Come to think of it, though, how many flashes are made out of metal? Neewer R-160S and Micro Nikkor 105mm f/2.8 on D850 The Neewer LED R-160S is powered by 6 AA batteries (I use rechargeable batteries). It, in fact, comes with a little adapter plug that can be used with an external DC power supply (6-17 volts) that I will never use. The 6 “flower petals” around the ring light house the 6 AA batteries in little slide-open drawers. The Neewer LED is pure plastic (for light weight) and has 160 dimmable LEDs (100% through 10%) that have an advertised color temperature of 5600 Kelvin. It produces up to 1200 Lumens (more than enough power at full output to make models quite angry with you). Little +/- buttons on the rear of the unit control the brightness. Press “-“ before pointing it at a model. This ring light can be mounted three ways: onto your lens filter thread, onto the camera hotshoe, and onto a tripod. The hotshoe/tripod attachment is also included. Its light is specified to cover 45 degrees. I have only tried it on 35, 50, 85, and 105mm lenses so far. Forget 35mm; edges were dark. At 50mm with longer focus distances, you’ll need to fix edges being dimmer with your photo editor; macro range lighting is fine. Illumination is perfect corner-to-corner with lenses longer than 50mm. The provided (anodized aluminum) filter thread attachments come in 49mm/52mm/55mm/62mm/67mm sizes. Personally, I just use the largest provided 67mm adapter and then attach it to either my step-up or step-down rings to use it with my lenses ranging from 52mm to through 77mm filter threads. And now for the bad news. Here’s why I bet at least half of these lights will get returned for a refund: the inner ring lights shine directly into your lens! This is a glaring design faux pas (pun intended). This problem took maybe 2 seconds to discover after I turned on the ring light after mounting it onto my Nikkor 85mm f/1.4 lens. It took maybe another 10 seconds to figure out a cheap and quick fix for this inner-light flare problem. All I had to do was spray black paint over the inner portion of the ring light. For extra credit, you could first spray the inner ring with silver paint and then give it a second coat of black paint. The silver paint would reflect the light back out to your subject, and the black paint coat acts like a lens hood. The finished product is shown in the shot at the top of this article. Neewer light out-of-the-box condition In the shot above, you can see that the inner portion of the ring light is just transparent plastic, lined by many LEDs. This inner portion of lights causes massive lens flare, since the LEDs shine directly into most lenses! What were the designers thinking??? For macro lenses with a deeply-recessed front element, this inner-circle light probably wouldn’t be a problem, and you could leave the ring light unpainted. If you tried using a reverse adapter on the lens, however, this flare problem will really bite you. Some painter’s tape masking I traced and then cut out a circle of painter’s tape to put over the outside of the ring light. I also masked further back where my fingers are seen. Just the inner portion of the ring light is exposed before unleashing the (plastic-compatible) spray paint. Ring light after two coats of black spray paint The shot above shows the ring light post-spraying. After the first coat, I turned on the ring light and discovered that light was still getting through the paint. Those LEDs are really powerful. Two coats of paint stopped any light leaks. Problem solved. As I mentioned earlier, I wanted to see if this ring light would work with my Nikkor 85mm f/1.4 lens (filter thread 77mm). Before the paint spraying, this combination was a disaster of light flare. Tripod/Hotshoe mount is included You can mount this light above your camera onto its hotshoe, if you wish. You can also mount it onto a tripod with an attachment that can pivot to aim the light. I’d be careful with this attachment, since it didn’t seem very robust. Nikkor 85mm f/1.4 with 77-72, 72-67 step-down rings Shown above, I attached a pair of step-down rings to connect my Nikkor 85mm f/1.4 lens onto the Neewer’s 67mm attachment ring. The 85mm lens has a 77mm filter size. To test how this combination would work, I photographed a blank wall at f/1.4 and saw NO corners cut off and the shot was evenly illuminated. And zero flare from the ring light. Stopping down the lens, the illumination got even better, since the 85 has a fair amount of built-in vignetting when shot wide-open. 85mm f/1.4 with Neewer LED ring light mounted onto the lens The ring light works really well as both a primary and a fill light. Compared to a flash (even with most flash diffusers) the light is just so smooth. Shown above, the light was used to fill the shadows. It’s so nice to see the lighting before the shot instead of after the fact when using a regular flash unit. Note the neutral-gray vase shown above stayed neutral using this light. 105mm f/2.8 Micro Nikkor with Neewer ring light The sunflower was lit entirely by the ring light. It just looks different than using a flash. Focusing is really easy, compared to using a flash. The ring light makes shots look more like they were done in a studio, and they don’t scream “flash”. Macro shot from 15-shot focus stack using Neewer LED light The macro shot above (105mm Micro Nikkor at f/8) at about 0.25X magnification is made from 15 stacked shots. I used the Neewer LED light to provide much more even lighting than a regular flash would have provided. In times past, I would have had to use a different lens to get this shot, because my metal riing light wouldn't fit onto the 105mm Micro Nikkor. In addition, I didn't have to bother with any power cables. Conclusion I bought this light to use for macro photography, so that I won’t have to be tied to a wall outlet anymore with my old ring light. After trying this for more general-purpose photography, I’ve decided it’s going to also get used for portraits; the lighting really minimizes wrinkles. If you haven’t yet noticed, people don’t like their wrinkles showing any more than they have to. Reflections off of the eyes look good, too (no doughnuts). This Neewer R-160S LED ring light definitely isn’t built as robustly as my metal ring light is. I’m pretty careful with my equipment, so that’s not much of a concern for me. If you’re rough with equipment, then you probably shouldn’t get this light. If you are reasonably careful with your equipment, I think that this light can be really useful. If you’re not up to the challenge of a little spray painting project, then you probably won’t be happy with it.
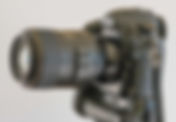
- Movo GH-700 Gimbal Head Review and Tutorial
The Movo gimbal head is the perfect partner for your big telephoto lens. It’s essentially identical to the well-regarded Wimberley WH-200 gimbal head II, for a fraction of the price. I’m not trying to sell these Movo gimbals, but I thought you should know. If you feel that your reputation would be ruined if somebody sees “MOVO” on your gimbal, then consider buying the Wimberley instead. Gimbal heads are designed to let you easily track moving subjects with the lightest of a touch. All of the weight is supported by your tripod or monopod, so you don’t experience any fatigue trying to hold large and heavy telephoto lenses. You really don’t need a gimbal for small, light lenses; if your lens doesn’t have a tripod foot, then don’t use a gimbal. Gimbals in some ways operate the opposite of a conventional tripod head or a ball-head. You could face a nightmare if you loosen a ball-head and then let go of your camera with a heavy lens on it, causing it to instantly flop to the side. With a gimbal, after you loosen its tilt/pan knobs and let go of your camera, nothing happens! Movo GH-700 Gimbal Head US $100.00 The Movo GH-700 gimbal has a 30 pound load limit, which should be enough for virtually any lens/camera combination that you would ever put on it. It comes with an Arca-Swiss lens mount. The gimbal weighs 3.1 pounds (1.4KG). It’s about 10 inches tall and 10 inches wide, which is necessary to accommodate big-diameter telephotos. As is always the case, this means you need to get an Arca-swiss plate to put on the tripod foot of any Nikkor telephoto. You can find carbon-fiber gimbals to save some weight, but they’re pricey. Wimberley WH-200 Gimbal Head II US $595.00 If you can tell the difference between the Movo and the Wimberley gimbal, aside from the Movo giving you a marked height scale on it, then you have better eyes than me. I’m not saying the Wimberley is inferior in any way, I’m just saying the Movo is an equivalent product for much less money. You should note that gimbal heads for still photography are different than gimbal heads for video. The Movo and Wimberley are for still photography. I almost always use my Movo gimbal on a Feisol carbon-fiber monopod (CM-1471), since it’s a much more mobile combination than using a tripod. This is an ideal wildlife photography rig. The gimbal has a 3/8” female tripod thread, instead of the more-common ¼-20 thread. If you prefer a tripod, it works equally on those, too. Gimbal heads enable you to perfectly balance your camera and big lens, so that it will maintain the position wherever you have aimed your lens when you let go of it. This balance makes for an ideal shooting situation, where your gear feels weightless and moves fluidly in any direction. You can follow subjects easily, because you can both pan and tilt the lens simultaneously. You can spend hours shooting with the heaviest of lenses and still not experience any arm fatigue. The main thing to tire you out is walking from one spot to another. I use a sturdy strap to connect my photo backpack to my monopod when I’m walking, so that the weight is transferred to my backpack across my chest. All of my big, heavy telephotos have an Arca-swiss mount, so they mount quickly and easily onto the gimbal. I have been using my Movo gimbal for over 5 years now, and it works as well as the day I got it. It’s all metal, except for the heavy-duty plastic knobs on it (the same as the Wimberley). This is one piece of gear you don’t need to pamper. Attach the Arca-swiss lens foot to the gimbal You can mount the lens onto the gimbal with the tilt knob either on the right or left side of the camera. I prefer to mount the lens so that the tilt knob is on the camera right-hand side (shutter button side). This lets me use my left hand to zoom and manually focus the lens without any obstructions. The gimbal itself works equally well in either mounting configuration. How to adjust the gimbal for proper balance Start by loosening the ‘Tilt knob’, so that the lens can easily tilt up and down while mounted on the gimbal. Loosen the ‘Height knob’ and (temporarily) lower the Arca-swiss lens platform to the bottom position. Get a good grip on your lens while doing this height adjustment, so that it doesn’t suddenly drop to the lowest position. You need to adjust the front-back balance of your camera and lens by sliding the lens foot along the Arca-swiss mount, just like you do when using a tripod head. With just this balance adjustment, the lens should come to rest in a horizontal position if you tilt it and then let it swing back. Lock the lens foot with the Arca-swiss knob after it is balanced. Tilt axis should intersect Lens axis You also need to adjust the height of the lens (loosen the ‘Height knob’), to make sure the ‘Lens Axis’ intersects the upper pivot point (‘Tilt Axis’) of the gimbal. On most lenses, the center of gravity is the same as the lens optical axis center. This vertical gimbal adjustment (locked with the Height knob) enables the camera/lens combination to stay in the same position as you let go of your camera, even when the Tilt tightening knob on the gimbal is loose. You may have to slightly raise or lower the lens height, depending upon the center of gravity of the lens, to achieve perfect balance. Now, you should be able to tilt the lens up or down and have it stay there after you let go of the lens. The Movo has a handy vertical scale on it, so that you can note the proper height for a given lens/camera combination. If you have other lenses that you use on the gimbal, you can then quickly adjust to the proper height for that combination using the scale. When properly balanced, you shouldn’t need to tighten the tilt axis knob. The tilt and pan only need to be locked when you want your camera/lens rigidly locked into position like on a conventional tripod head. You may find that with very light cameras on big lenses that you can’t slide the lens back far enough on the Arca-swiss mount to achieve balance. A camera battery grip can really help here, providing the needed extra weight to balance. A longer Arca-swiss plate on your lens tripod foot may help, unless it starts to hit the tripod/monopod when you tilt the lens on the gimbal. I suppose you could attach extra weights to the camera tripod socket, like metal plates or washers held with a ¼-20 bolt. Be aware that zooms can shift the front/back balance of the lens as you zoom. Try to balance your rig at your most-used zoom position. Shooting While shooting, you typically don’t need to tighten the tilt or pan knobs. I generally leave vibration reduction active on my lenses, since I’m still holding onto the camera. I don’t use the “panning” mode of vibration reduction, since both axes are usually in motion. If you mount the gimbal onto a tripod for static shooting, go ahead and tighten the tilt and pan knobs after aiming the lens. Balanced camera and lens Gimbal mounted on monopod Summary For the price, it would be hard to beat this gimbal. It’s rugged and very smooth in operation. It’s such a pleasure to be able to concentrate on shooting instead of struggling with the weight of a heavy telephoto. There’s a world of difference between using a conventional tripod head and the freedom of a gimbal. Once you use a gimbal, you’re going to want one.
- Silver Efex Pro 2 and the Zone System
If you love black and white photos as much as I do, then you should consider using Silver Efex Pro 2. This plug-in can convert your color photos into black and white with an extraordinary level of flexibility. Plug-ins like Silver Efex Pro 2 can be used in conjunction with many editing programs, and even stand-alone. I’ll be showing you how I use it starting from within Lightroom. There are many photographic subjects that simply aren’t enhanced by viewing them in color. Many subjects can be given a timeless quality by turning them into black and white. As a photographer, you should at least consider whether your subject might be made more special by a black and white transformation. So, what’s that reference to the Zone System? The Zone System was invented by Ansel Adams, and it subdivides the light levels of a photograph into ‘zones’, where each neighboring zone number differs by one f-stop of brightness. In Ansel Adams’ day, film and paper could capture about 9-stops of light at most. If you throw in total blackness (Zone 0) and total whiteness (Zone 10), the Zone system refers to 11 zones. Ansel created a system using these light levels to calibrate exposure, developing, and printing to control the results he wanted to get. Silver Efex Pro 2 includes the Zone System in their program. You can use it to see qualitatively how changes in presets, exposure, film emulation, highlights, shadows, contrast, etc. will place areas of your photos into these zones. If you do any inkjet printing, then you should know that any photo areas that land in zone 10 will not only be pure white, but they can also have a different “gloss” than the rest of the print, which generally means that the print is ruined. If you don’t use this Zone System for anything else, then use it for this problem as a sort of early warning system. You probably already know of this problem as “blown highlights”. Laser printers don’t suffer from this effect. Some newer inkjet printers actually have a ‘white’ ink, which also eliminates the ‘zone 10’ problem. Invoke Silver Efex Pro 2 from Lightroom As shown above, you can start up Silver Efex Pro 2 from Lightroom via the “Photo” menu, selecting “Photo | Edit In | Silver Efex Pro 2”. Editing options The editing dialog options before Silver Efex Pro 2 opens up allow you to decide if you want to modify the original or a copy, and you can also decide if you want to retain the edits you have already made. The Silver Efex Pro 2 main screen Silver Efex Pro 2 of course has the standard editing options to adjust highlights, shadows, contrast, etc. after making a ‘neutral’ conversion of your photograph into black and white. Besides being presented with a large list of preset styles (with thumbnail previews), you also have a sizeable library of film-type emulation, such as various Kodak, Agfa, and Ilford films. Under the heading of “Toning” (inside “Finishing Adjustments”), you also have the ability to adjust the hue/tone of the “silver” in the image (ala silver halide crystals of photo paper) and the “paper” hue/tone, as well. Sepia Toning #20 Another “Toning” feature is available if you click the little drop-down control next to the default “#1” neutral value just to the right of the “Toning” label. You will find options for all of the standard darkroom coloring chemicals, such as “Sepia” and the very toxic “Selenium”. You can adjust the strength of these effects, of course, using the slider just underneath the “Toning” label. The main talking point of this article (the Zone System) is fairly well hidden, however. To locate the Zone System features, you need to scroll down to the bottom of the right-hand menu and expand the “Loupe & Histogram” option. Place the mouse cursor into the Histogram plot area, and the little square ‘Zone’ icons with numbers (0 through 10) suddenly appear. If you hover the mouse cursor over any Zone number icon, you will see colored highlights appear in your photograph that represent that light value. Each zone number has a different highlight pattern/color to identify itself. Viewing “Zone 8” values in the photo The screen shot above shows what happens when you hover over the “Zone 8” icon. You get a red cross-hatched pattern over all areas that contain the Zone 8 light value. If you move the cursor away from the icon, the highlight pattern will disappear. If you click on one of the Zone icons, then the highlight pattern will stay on the photograph until you click that same Zone icon again. You can click on multiple icons, although the display gets confusing in a hurry. Once a Zone is selected, then moving a slider such as “Highlights” causes that Zone number pattern to dynamically change in the photo. Zone 0 shows up as yellow cross-hatching Since it’s usually visually important to have at least some of Zone 0 (total black) in most photos, leaving this Zone clicked while editing the photo is very common. It will help keep you from accidentally getting rid of all of the Zone 0 areas. It’s also very common to leave the ‘Zone 10’ icon clicked, in order to ensure that it never shows up in your photo unless you have something intentionally blown out like the sun or a specular reflection. Conclusion If you’re interested in black and white photography, then you really should try out Silver Efex Pro 2. Once you use it, I think you’ll find that general-purpose photo editors will disappoint you with their limited repertoire of black and white editing features. You’d swear that the author of this little plug-in must have worked in a darkroom. I for one sure don’t miss those nasty chemical smells, or having to maintain 20 degrees C.
- Extreme Accuracy Focus Fine-Tune Calibration
If you take lens focus calibration seriously, then you might want to consider changing from mere visual inspection to doing it by the numbers. Computer analysis is far more discriminating than what people can accomplish via judging sharp focus by eye. Let your computer help you calibrate your focus Some newer cameras can focus-fine-tune using built-in features, but the results aren’t quite as precise as they can be. Estimating focus by using “slanted ruler” targets (or picket fences) will only typically get you within about 10 or 15% of optimal. I think it’s about time to describe in painstaking detail a method to get the best focus calibration possible. In many previous articles I mentioned the benefits of focus calibration, but I never went into much detail about the procedures to actually do it. I hope that this article will rectify that situation. I’m going to show you a technique that is incredibly accurate, but it will require a little bit more effort on your part. This procedure involves using the free software called MTFmapper. The same web site that offers this software also provides various focus target files (and resolution charts, too). Some cameras only let you choose a single focal length or focus distance for calibration; for these, you should pick your most-used lens settings for measurements. The Focus Target You need an excellent focus target of appropriate size to get the best results. If you have to get really close to a focus target, yet you always shoot subjects from much farther away, the results are sub-optimal. The focus target (from the MTFMapper site) The image above shows you what the target looks like after you have rotated it by 45 degrees, with the left-hand side farther away than the right-hand side. The bands of little squares appear to be constrained into the shape of a rectangle, but this is an optical illusion. They’re actually constrained into the shape of a trapezoid, where the left side is taller than the right side. The lens perspective distortion makes the trapezoid appear to be a rectangle (or nearly so). The red square shown above represents where you point your camera’s focus sensor. It needs to be over the large right-hand side edge of the big “target” rectangle. This makes for an easy, unambiguous focus target for your camera. There’s no doubt where your camera is trying to focus. Focus chart for shooting close The focus chart above is called “perspective_a0_distance_1500.pdf”. This chart would ideally be printed on “a0” size paper shot from 1500mm away. It’s an example of the many charts the MTFMapper site offers. Different lenses (e.g. telephoto, normal, wide-angle) can have vastly different perspective distortion. Because of this, the MTFMapper web site offers multiple target files that have different levels of distortion. You need to pick the target that most nearly matches the lens/distance being tested. If you shoot a target that has large perspective distortion trapezoids with a telephoto, some program analysis features will probably fail. The rotated targets in your viewfinder should look like rectangles when you properly match the target to the lens and focus distance. I sometimes grossly violate the recommended shooting distances/charts for focus testing (see below). Some software analysis features may be unavailable or limited if you do this. I make these violations to get more precise information about where the lens is focusing. You should print and mount the target(s) onto something like poster board or wood. I have different sizes of printed targets, depending on the lens being tested. I use spray-on adhesive to mount the paper target completely flat. Dry-mounting services at art stores work extremely well for mounting larger-sized prints. I make target prints out of both Laserjet and Inkjet. If you’re shooting in infrared, only Laserjet will work; inkjet inks are generally invisible to infrared. I have a range of printed focus targets from as small as 8 ½ by 11 inches to as large as 4 feet by 5 feet. This gives me a lot of options when calibrating anything from a super-wide to a long telephoto. My larger targets are properly framed and have proper mounting hardware, but I keep some targets un-framed and just temporarily tape them up for a quick test. Shooting the Target I mount my camera (or the lens) onto a heavy-duty tripod, and I use a bubble-level to make sure the camera is perfectly level, with the frame left/right edges perfectly vertical. It’s important to get your lens axis at the same elevation as your focus target center. The analysis software will indicate you have a proper setup by color-coding the measurements in yellow where it sees near-perfect verticals and horizontals (see the ‘annotated’ plots below). The other edges in the analysis will be labeled in cyan (typically edges that are slanted by about 5 degrees). The “little” target rectangles above and below the big rectangle should have cyan measurements on them, since they’re slanted at about 5 degrees. If you don’t get your camera and target properly leveled, then you will end up getting focus plane measurements that have a ‘tilt' to them, which makes for an ambiguous focus plane and confusing results (and will likely make the software unable to produce correct result plots). On many Nikons, you can use the “virtual horizon” to get your camera leveled pretty well. Make sure you have good illumination; you don’t want to make your camera have to hunt for focus. It’s important feedback that the large target rectangle resolution value displayed in the “annotated” plot is yellow and not cyan. Both the camera frame edge and the target large rectangle edge need to be vertical and parallel. The yellow color confirms this alignment. It’s unfortunate that you have to wait until you run the analysis program to see if the ‘annotated’ plots display this target edge measurement in yellow. Depending on your camera, you might get better results in you use about a +0.7 stop exposure compensation when shooting the chart. This will often get the white target background to look white; camera meters are still pretty easy to fool. I take multiple shots of this target, and I de-focus the lens between each test shot and force the camera to re-focus using continuous auto-focus. This simulates exactly how the camera will be used in “real” shooting conditions. Each shot will be focused slightly differently, due to natural camera focus variation, and I’m after the “average” focus distance. I like to use continuous-focus mode and a “single point” focus sensor; this is closest to my own shooting conditions for regular subjects. When I use long lenses, I leave vibration reduction active (the lens still shows a small amount of wiggle as I press the shutter). In the following example, I set up my focus chart at 48 feet (14.6m) and shot it at 600mm. I use the MTFMapper program to analyze the chart shots, so that I get very precise answers about what’s in focus and what’s not. I found out that yes, indeed the focus calibration was off. Not by a huge amount, but it was generally focusing too far by about an inch (25mm). The lens used in this example is the Sigma 150-600mm zoomed to 600mm. It lets me calibrate at multiple focal lengths and distances, so I’m testing the calibration combination of 600mm at 48 feet. A really small target to find small focus errors The target above is printed and mounted on an 8 ½ by 11 inch piece of poster board. I used spray-on adhesive to attach a Laser-jet print onto the board. It’s a very temporary setup, so I just used painter’s tape to hold the target against a wall. I used a bubble-level to ensure the target is mounted with the big central target rectangle vertical edge perfectly vertical. The target shown above is intentionally quite small in the frame. I’m testing a 600mm lens here, and I am looking for really small focus changes from really far away. The measurement software is so capable that this scenario works fine for analysis. Your own eyes aren’t good enough for this analysis task, but the software is. Again, the lens axis is rotated 45 degrees relative to the target face, with the target left side farther from the camera. This shot shows a pretty gross violation of the MTFMapper program expectations. The program expects a shot that mostly fills the frame and is at the specified distance (2.5 meters for this particular chart). Instead, the chart only fills a fraction of the frame and is shot from much, much farther away than the program expects. The software can actually analyze target rectangle edges down to about 40 pixels, but of course more pixels will give better results. For wide angle lenses, you wouldn’t want to have a target this small in the frame. The depth of focus on this kind of lens will be deeper and will have a more gradual sharpness change than for telephotos. You’ll want to print and mount as large of a target as you can reasonably make when testing this lens type. For large targets (my largest target is 4 by 5 feet) you’ll get the best results by mounting and hanging them like a large photograph. My large targets have conventional picture-hanging hardware on their backs. Analyzing the Focus Chart Photo The MTFMapper program can give you focus chart results in a variety of ways and in a variety of measurement units. To get my preferred “MTF50 lp/mm” resolution units, you need to set your program preferences to match your camera sensor pixel size (in microns). After the preferences are set/verified, run the focus analysis via the “File | Open” menu option in MTFMapper. Tell the program where your “raw” format photos of the focus chart reside. Set your camera sensor pixel size Access the Preferences dialog via the menu “Settings | Preferences” option. Note that both the “Profile” and “Annotation” options are also checked. MTFMapper ‘annotated’ plot screen selection The screen shot above is slightly zoomed in to show target measurement details. In this program, you can zoom in by holding down the Control key while using the mouse scroll wheel. Notice that the shot is transformed into black and white. Here’s your chance to verify that the big target rectangle right-hand side shows an MTF50 measurement displayed in yellow. If the measurement is cyan instead, you should realign the target and/or camera and try again. MTFMapper Profile plot screen The Profile plot is generated using the edge resolution measurements of rectangles from the focus chart shot. The vertical blue line represents the right-edge of the large target rectangle. This plot makes it easy to see where peak focus is located, relative to the blue target line. Focus target detail with MTF50 edge measurements The (cropped) shot above shows the center of my focus chart, shot at 600mm from 48 feet away. This is a screen shot of the “annotated” plot from the MTFMapper program. The numbers on the little black trapezoids are resolution measurements in units of MTF50 lp/mm. I always shoot in ‘raw’ format; measurements using jpeg files are vastly different. Again, the left side of this chart is farther from the camera than the right side, rotated by 45 degrees. I used phase-detect focus and aimed my focus sensor at the right-hand side of the large black rectangle (where it’s showing the yellow measurement of “43.8”). The highest resolution edges in this example are generally about 3 “little” rectangles to the left of the big rectangle right edge. This focus error is only about an inch along the lens axis. In this shot, the measurements that are displayed in yellow indicate that those edges are perfectly vertical or horizontal, versus the cyan-color measurements on edges having a slight slant to them. At this scale, your own eyes are incapable of discerning the edges with best focus with any degree of certainty. To the software, however, it’s easy and totally repeatable. Don’t place too much confidence in the MTF resolution numbers in this shot, since this isn’t a proper resolution-measuring plot, the target is only a small part of the image frame, and the target (on purpose) isn’t parallel to the image sensor. It’s fair to compare these resolution numbers to other shots taken in the same shooting conditions, however. I have larger focus targets than the one shown above, but focus targets with smaller rectangles (trapezoids, actually) give me a better idea of exactly where the best focus is located. The measurements show that best focus is further away from the vertical edge I aimed at, and I need to use a “-” focus calibration shift to get the lens to focus closer to the camera. The “large” rectangle is only 2 inches (50mm) tall, and I remind you that I’m shooting this from 48 feet away! My larger focus targets are generally to be used when I’m calibrating a wide-angle lens. Profile plot of target from MTFMapper The profile plot shown above makes it easier to see where the focus lands (at the green line peak). The blue line indicates where the right-hand side of the target rectangle edge is (where I pointed the camera focus point). Clearly, the lens is back-focusing. The little red dots represent each measured tiny rectangle edge resolution, and the green line is a smoothed plot of these measurement averages. The focus calibration fine-tune will require a (-) adjustment to pull its focus closer to the camera to fix this focus error. If you don’t have an accurate setup while shooting (or you mismatch the target perspective to the lens), the profile plot might fail to render properly; in those cases, you can just go by the “numbers” on the rectangle edges in the “annotated” plot results to judge where the best focus is, versus where the target vertical edge is. Note in the plot above that the intersection of the blue line and the green line has a resolution around 44, versus the green line peak of around 54, showing resolution loss of about 10 lp/mm at the desired focus plane. As I mentioned, these resolution numbers aren’t strictly reliable for this style of chart, but they’re at least representative of the loss in resolution. Who could have imagined that a focus miss of about an inch would result in such a big resolution loss on the intended target? It’s worth noting that some lenses (usually the super-fast lenses) can also shift focus with an aperture change. On these lenses, you need to set the desired aperture for calibration. On most lenses, you just need to set the widest aperture for testing. Sigma was a pioneer in the sophisticated lens focus calibration arena. They let you calibrate zooms with 16 different focal length/distance combinations. Tamron now provides a very similar calibration feature for their newer lenses. Canon typically only lets you calibrate at two focal lengths on their zooms, while Nikon only gives you a single fine-tune calibration setting (their D6 does allow a ‘wide’ and ‘telephoto’ calibration pair on zooms). Neither Canon nor Nikon let you save any calibration settings within the lens itself. The Sigma lens focus-fine-tune firmware (and also the Tamron firmware) is smart enough to interpolate all of the in-between calibration settings for the lens focal length and the focus distance. The 500mm calibration would be affected by both the 400mm and 600mm calibration values. Canon cameras that have two-calibration settings can also interpolate, but they have a lot less information to work with. Sigma Optimization Pro calibration settings As seen in the sample above, I now have an updated focus calibration for the 600mm setting at 48 feet (-6) and a new setting for the 400mm setting at 20 feet (-9). These two small tweaks got my Sigma perfectly focus-calibrated again at all focal lengths and distances. If you’re using a Nikon or Canon lens, you have to use the camera focus fine-tune to fix the problem instead of the lens firmware that Sigma/Tamron have. For my other Nikon cameras, I still have to set the single focus fine-tune value when I mount the Sigma onto them. I can pick any distance or focal length and then run through the same calibration procedures discussed above for that zoom/distance setting; all of (16) Sigma internal lens calibration settings will “go along for the ride”. Each of my cameras is a little different, so even with a calibrated Sigma lens on a different camera, it will still require me to enter the camera fine-tune setting, versus the internal Sigma fine-tune settings. Only the camera that I calibrated the Sigma internal fine-tune settings on will get a “0” camera internal fine-tune value; none of my cameras are calibrated exactly the same. Improved focus accuracy with new fine-tune calibration The shot above shows the analysis of the focus target using the new focus fine-tune calibration settings. The focus (and highest resolution measurements) is shifted back to the correct distance. You always need to take several shots and re-focus between each shot. There is a small shot-to-shot variation, and you need to determine where the “typical” focus lands. Profile plot with new fine-tune calibration You can see in the plot above how focus has shifted back to where it should be. The expected focus point (blue line) now coincides with the smoothed actual best-focus green-line peak. If you make a similar plot using a wide-angle lens, the bump in the green line won’t have as steep of a peak in it, since focus changes more gradually. Conclusion Focus calibration can get fairly involved, but it’s not rocket science. It is important, however, to get more sophisticated than just manually inspecting the results of a slanted-ruler target photo to calibrate lenses with high precision. You might also find that your lens will shift focus in temperature extremes. All I can suggest in that case is that you save calibration settings for “cold” and settings for “hot” days. I tape a little piece of paper inside my lens cap with little facts that I’d otherwise forget. In this case, you’d just change the ‘camera’ fine-tune value and leave the ‘lens’ settings alone (on Sigmas or Tamrons). A small focus error gives you a big resolution penalty. Long lenses in particular need to be calibrated incredibly well, or the intended subject (e.g. the near eye) resolution will pay a terrible price. If quality images are important to you, then spending the time to calibrate lenses properly will reward you with significantly better shots.
- Hand-held Focus Stacking with the Nikon D850
The Nikon D850 includes a “Focus Shift Shooting” feature for focus-stacking, but it doesn’t give you any guidance on how to stack the shifted photos it captures into a “stacked photo”. This is a nice camera feature, but if you have to use a tripod to take the shots, not many people are ever going to use it. How many photographers have you seen walking around hauling a tripod? What follows is a technique to let you hand-hold your D850 and still accomplish focus-stacking. It involves the use of the free Nikon Capture NX-D and CombineZP programs to make a perfect stacked image. You can also use the CombineZM program (both programs were written by Alan Hadley) using the same procedures as with the CombineZP program. It has fewer stacking macros, but otherwise has about the same abilities as the CombineZP program. I’m running the program(s) under Windows 10. If you’re interested, “combine z” means combine shots in the ‘z’ (vertical) direction, and the ‘p’ is his “pyramid” algorithm for his latest technique to combine the sharp parts of each shot. There are, of course, focus-stacking programs that you can buy (such as Helicon Focus and Photoshop) if you’d rather pay for a stacking program. Personally, I have found that Photoshop fails quite often during the stacking operation, but the CombineZP program succeeds. I haven’t tried Helicon Focus. The D850 can take the shifted photos at a rate of 5 frames per second, so you can get your pictures for stacking at a very quick pace. This pace means that most subjects won’t move very much before you have captured your photos. This also means that most times you don’t even need a tripod to do focus-stacking. It’s not fool-proof, but this procedure will get you better results than you might think. Even if you use a tripod, wind is still the enemy for doing focus stacking with flowers. The alignment capabilities of CombineZP can even help in this case (within reason). This doesn’t mean you can be careless while shooting the pictures; you should always endeavor to hold as still as you can. Since it’s only a few seconds, it shouldn’t be too much of a burden to do this. The free Capture NX-D program is used here to easily convert your raw shots into TIFF format, using its batch-processing feature. The free CombineZP/ZM program performs the photo alignment and focus-stacking operations. D850 Focus shift shooting menu To get your shots, you use the Photo Shooting Menu “Focus shift shooting” option in the Nikon D850. For this article, I used the default “No. of shots: 20”, “Focus Step: 3”, “Interval = 0”, “Exposure smoothing = ON”, and “Silent Photography = OFF”. I used my Sigma 70-200 f/2.8 with Sigma TC-1401 1.4X teleconverter at f/5.6, 280mm, and about 4 feet from the target. These conditions result in a very narrow depth of focus for each shot. I had my camera set to continuous-high speed shooting and aperture-priority. If you want minimal camera vibrations and happen to have a tripod handy, then the “Silent Photography” option is really good. Also, if you’re not looking through the viewfinder while shooting, remember to use the eyepiece shutter to block any light from entering the camera. After I had the desired “Focus shift shooting” camera settings, all I had to do was select “Start” and hit the middle button of the multi-selector to accept the settings. Following a brief message that said “Processing” in the rear camera display screen, the D850 took the 20 shots and stopped automatically. The 20 shots were all captured in 4 seconds, just as advertised. The top LCD screen shows a frame countdown while shooting. I was reasonably careful to not move too much, so that the alignment software used later on would have a better chance of success. Let’s not press our luck. First shot of the stack The shot above is the first exposure in the sequence, showing how only a couple of the succulent leaves are in focus. Yes, I could have stopped down the lens to get more in focus, but there’s no way to get the depth I wanted at any aperture. The stack will rectify this. I reviewed the last shot taken to verify that the focus had shifted sufficiently to capture the depth of focus I was after. It seemed fine, so I didn’t have to repeat the shooting session after changing either the “focus step” size or the number of shots to take. It’s also possible, if the last shot in the sequence hasn’t focused far enough, to just repeat the shooting without changing any settings at all. The camera will pick up where it left off and simply add to the sequence. This assumes the step size of each shot is suitable (there’s focus overlap shot-to-shot) and doesn’t need to be changed. The D850 engineers did their best to figure out what the focus change per-shot should be, even though you can have an extra measure of control with the “focus step width”. If you stop down the lens more, the per-shot focus change will increase; it will decrease if you open up the aperture. They were also smart enough to make the shooting automatically stop if the lens reaches infinity focus, and not just keep shooting the rest of the requested shots stuck on infinity. I put the 20 raw-format shots into a folder on my computer, and then I used the Capture NX-D batch-processing feature to convert the shots into 16-bit TIFF format with LZW compression. I did this step, because the CombineZP program doesn’t know how to use raw-format pictures. Run Capture-NXD to convert Raw into TIFF Tell Capture NX-D to run a batch process Select the desired conversion options in Capture NX-D It’s a bit time-consuming to convert lots of images, but Capture-NX-D will keep you updated with its progress. The top of the program window will show a ‘batch progress’ indicator with a count-down of pictures left to convert. Align and stack the TIFF images using CombineZP The CombineZP startup dialog The CombineZP program startup screen doesn’t have any menu bar. If you want conventional menus, like me, then you should click on the “Enable Menu” icon. The shot above shows the “menu” view enabled. Select the files to process Next, select the “File | *New” option and select the photos in the folder with the TIFF pictures that Capture NX-D just made. File dialog while loading selected TIFF images After all of the files get loaded, the first shot in the set of images will be displayed on the screen. Align pictures from a hand-held focus-shifted collection Since I didn’t use a tripod, I next selected the “Macro | Align and Balance Used Frames (Thorough)” option. This is where the magic happens to fix your unsteady hand. The program then proceeds to analyze, align, and exposure-balance the shots. The photos are shifted/rotated/scaled in order to prepare them for stacking. A message “Finished Executing Align and Balance…” is displayed when this step completes. Be patient. If you happened to have used a tripod for the focus-shift shooting, then you could simply skip the step above and go straight for the “stacking” step that follows. Depending upon your lens, however, you may elect to do this step even when using a tripod (focus-breathing, etc. may happen). Wind happens, too. Do Weighted Average macro selection Next, select the “Macro | Do Weighted Average” option. The program will proceed to focus-stack the aligned images. The “Weighted Average” algorithm is one of a few different ways that focus-stacking can be performed in this program. Did I mention that patience is a virtue? Do Weighted Average macro complete dialog When processing completes, crop the central portion of the finished picture. The stacked image borders have a sort of mirror-image effect, which needs to be cropped from the final picture. Aligned, stacked photo with unwanted edges The shot above shows how much more of the scene is now in focus, but there are stacking artifacts all around the border of the frame. It usually looks like the original image is floating on a pond. Use the left-mouse to draw a rectangle around the portion of the stacked image you want to save. Then, select the “File | Save Rectangle As” option and save the final cropped image into a “jpeg” file with the desired quality. If you want to edit the shot further, you can also save the shot in TIF format or BMP format. The un-cropped stacked shot will be automatically saved in a sub-folder called “Output”. Finished hand-held stack result “Do Weighted Average” Depending upon your image, you might want to try some of the other stacking macros. Some stacked images have a small amount of ghosting, and either a different stacking macro or selecting a subset of the input images may help rid the ghosting. Most artifacts show up on the edges of the frame, so if the main subject fills a little less of the frame, you may have less editing work to do later. Depending upon the subject, the fineness of the focus shift per shot and other factors, different macros will perform better than others. You’re encouraged to try each to see what works best. If you end up with a small amount of edge ghosting, you can use a ‘healing brush’, clone-stamp, etc. to fix up the final image. The worse you are at holding still while shooting hand-held, the better the chance of having some little ghosts haunting your stacked photo. Notice above how much more of the scene is in focus, compared to the shot at the top of this article. What you don’t notice is that the hand-held stack is perfectly aligned; it looks like I must have used a tripod to get that perfect alignment. Tripod-mounted stack For comparison purposes, I’m showing a 20-shot focus stack of the same subject that I did while using a tripod in the photo above. Unless I told you which stack was which, I’ll bet that you couldn’t tell. I was able to skip the “Macro | Align and Balance Used Frames (Thorough)” step, since the tripod retained the shot-to-shot alignment (and I didn't have to contend with wind). It is, of course, helpful when you can use a tripod. Critical framing is much easier, and generally your shots will be a bit sharper. The shot-to-shot focus plane step sizes will be more consistent, too. Conclusion This procedure frees you from having to use a tripod with focus-stacking images. It may not work in all cases, but it’s more robust than you might think. I have tried stacking shots taken both with and without using a tripod several times, and usually I couldn’t tell a difference in the results. If you try shooting highly-magnified photo stacks, then you will unfortunately need to use a tripod. Focus-shift shooting should always be in the back of your thoughts while shooting suitable subjects, if your camera supports it. Since you don’t necessarily need a tripod, why not take the shots just in case? You can also try ‘manual’ focus-shift shooting, if your camera doesn’t support doing it automatically (I have done this for years using a close-up bellows). The same goes for high-speed hand-held exposure bracketing for HDR. Digital shooting is cheap, so take advantage of that fact. Someday, Nikon may just do all of this stacking work in-camera, but I’m not holding my breath. They should also be able to calculate the exact focus-shift values automatically, since the camera already knows the starting distance, aperture, and focal length. Someday.
- Sigma TC-1401 Teleconverter and 105mm f/2.8 Micro Nikkor
Nikon tells you this combination won’t work. Sigma tells you this combination won’t work. Let’s see how this stacks up against reality. A big problem in macro photography is “working distance”. Lots of insects are fraidy cats, and simply won’t hang around if you get close. Long macro lenses are quite expensive, and big telephotos don’t focus close enough. What to do? Micro-Nikkor 105mm f/2.8 with Sigma TC-1401 I recently tried the forbidden combination of the 105mm f/2.8 Micro-Nikkor AF-S VR lens with the Sigma TC-1401 1.4X teleconverter. Would it fit? Would I lose autofocus? Would resolution be terrible? Do you get a 40% longer working distance? Does vibration reduction fail? Is cropping a shot better than using a teleconverter? Is camera focus fine-tune available? Does the camera see this combination as 147mm f/4.0 or does it still see 105mm f/2.8? Lots of questions. Lots of testing to be done. Notice in the shot above how small the teleconverter is. You can barely even tell that it’s attached. By the way, attach the teleconverter to the lens before attaching it to the camera. First things first. I checked the clearance between the back of my 105mm lens and the front of the teleconverter. My micrometer said they shouldn’t crash into each other. I couldn’t see any fundamental incompatibilities, so I tried to connect them together. Success. Autofocus Impact I had read about autofocus going crazy when you connect this combination to a camera and turn power on. I attached the pair to my D850 and turned on power. No problem. The internet seems to be wrong about that particular issue. The Nikon D850 is guaranteed to autofocus with lenses as slow as f/8.0. The 105mm, when focused down to 1:1 magnification, has the marked f/2.8 reduced to f/4.8. This means that minimum focus would now get you f/6.7 with a teleconverter (or f/4.0 when focused at infinity). So far, it seems like autofocus could still possibly work. Next, I tried pressing the AF-ON button. Lo and behold, it could focus. I walked into a dim room and tried to focus again; again it succeeded, but it did quite a bit of focus-hunting. Pressing my luck, I also tried the teleconverter on my D610: autofocus still works, but it hunts a bit more on that camera. Even in bright light, phase-detect focus is noticeably slower and the lens makes a sort of clicking sound while focusing on any camera. Focus takes about ½ second, versus near-instant without the teleconverter. Trying Live View contrast-detect autofocus, I found that it behaves flawlessly, just like the lens does without the teleconverter attached. The focus chattering didn’t change with either AF-S or AF-C. It was worst with single-point focus, and chattered the least with group-area focus. I couldn’t find a way to stop the chattering entirely. Contrast-detect definitely works better than phase-detect with this teleconverter. Forget about birds in flight. I don’t think that you’d want to use this combination with regular-distance shooting, such as portraits, while using phase-detect autofocus. For those non-macro scenarios, I’d recommend you simply remove the teleconverter. Everything will work using the teleconverter, but the extra focus hunting and chattering sounds are annoying. Manual Focus Focus peaking with Live View manual focus on Nikon D850 Most people probably switch to manual focus with macro lens close-ups, including me. Autofocus at such short distances can be an exercise in futility with any hand-held macro lens. If you haven’t tried focus-peaking mode in Live View and your camera supports it, you should check it out. Just like with other lenses, you need to switch the lens to “manual” to enable focus-peaking. Outdoors, I often use my LCD viewer/magnifier to get a great screen image while also shielding the screen from bright light. Holding the viewer against both my eye and the camera can be helpful for keeping things more steady, too. Focus-peaking makes critical manual focus quite easy. Mirrorless users are spoiled, getting this feature inside the viewfinder. Vibration Reduction What about using vibration reduction? This 105mm VR should get me about 4 stops of shake reduction, or shots down to about 1/8 second. I set my camera to use manual exposure with auto-ISO, and set 1/8 shutter with and without VR active. Using VR, the shots are sharp; without, they’re total mush. VR works with the teleconverter just fine. Lens Exif Data How about lens information? I tried to set the aperture to f/2.8, which shouldn’t be possible (f/4.0 should be the maximum). Oops. I can set it to f/2.8. The Nikon D610 doesn’t know the teleconverter is attached, and neither does the D850. But I couldn’t help but notice that exposures are perfect, regardless. The photo exif data incorrectly shows “f/2.8”, “105mm” and also notes (correctly) when VR is enabled. Exif distance data with the teleconverter is also incorrect. Focus Fine-Tune What are the implications for focus fine-tune? Since the camera doesn’t know a teleconverter is connected, it means that you’d end up overwriting the fine-tune calibration for the 105mm lens without the teleconverter. Not terrible, but certainly not ideal, either. If you want to use phase-detect autofocus, though, you will almost certainly need to set the focus fine-tune for this combination. Remember to set it back to the old value when you remove the teleconverter… Working Distance What kind of working distance (from the front edge of the lens) do you get at the minimum focus distance? You get 6.0 inches. That’s the same as no teleconverter, but the lens is at what’s now 1.4X magnification instead of 1.0X. For life-size magnification, you can back off to about 8 inches, or 40% further away. D850 Focus Shift Shooting (Focus Stacking) The D850 can help with a major problem in macro photography: depth of focus. The D850 can automatically take shots for focus-stacking. “Focus shift shooting” does work with the teleconverter attached. The lens needs to be kept in auto-focus mode, and the lens needs to be pre-focused onto the target (or a little in front of it). As a test, I chose to NOT use Live-View for these shots. I use aperture-priority mode, and I definitely put the camera onto a tripod for macro shooting. Lens VR is turned off, single-shot mode, and I closed the eyepiece shutter. For the test, I chose 20 shots, with a focus step width of 3, an interval of “0” until the next shot, exposure smoothing ON, Silent photography ON, and hit the multi-selector middle button after selecting “Start”. Because of selecting “silent photography”, the only vibrations during the automatic shooting sequence were due to the automatic focusing steps of the lens (full electric shutter). Nice. Getting further from the subject, thanks to the teleconverter, was quite helpful with lighting in this little test. You can, of course take the series of shots manually in place of using this particular camera feature. The D850 doesn’t actually do any photo stacking, it just makes the shots to stack. I used the free CombineZP to stack the shots, after using Nikon CaptureNX-D to batch-convert the raw shots into tiff format (CombineZP can’t use raw-format shots). I chose to try the “Pyramid Weighted Average” macro to see what it could do. "Macro" here means running a little program to do a task. After that, I tried the “Do Stack” macro. I prefer the “Do Stack” result. There are several macros to choose from. First shot of a stack of 20. Skinny focus. f/8 ‘Pyramid Weighted Average’ macro stack. ‘Do Stack’ macro. Resolution Impact Now, for the biggest question. What happens to resolution? I have read that a Sigma Teleconverter/Nikkor lens combination is very bad for resolution, and the frame edges are horrific. I don’t have any facilities to measure lens resolution in the macro region, so I’m just going to show resolution results at conventional distances (around 5 meters). You’ll have to infer that the teleconverter resolution impact at regular distances is similar to the macro distance impact. If the resolution loss using the teleconverter is less than 40%, then it means that using the teleconverter is better than merely cropping the shot. Since it’s a 1.4X teleconverter, the focal length is increased by 40% from 105mm to 147mm. The following measurements are done using the Nikon D850. As always, my shots are done using un-sharpened raw format. All resolution measurements are in units of MTF50 lp/mm. The resolution plots separate out meridional (tangent) and sagittal (wheel spoke) direction measurements. MTF50 lp/mm with teleconverter, 147mm f/4.0 The 105mm lens was set to the marked f/2.8 aperture. The ‘exif’ data should have noted a focal length of 147mm and f/4.0. Peak resolution is about 41 lp/mm. Notice that the edges of the full-frame aren’t degraded, compared to the lens center, even wide-open. Already, the resolution is fine (I measure ‘fine’ as being above 30 lp/mm). MTF50 lp/mm, no teleconverter, 105mm f/2.8 The wide-open resolution plot for the 105mm without a teleconverter is shown above. Peak resolution is about 53 lp/mm at f/2.8. The resolution loss when attaching the teleconverter is 41/53 = 0.77, or a 23% drop at f/2.8. MTF contrast plot, wide open with teleconverter The plot above is the traditional wide-open MTF contrast plot, using the teleconverter. This is 147mm, f/4.0. MTF contrast plot, 105mm f/2.8 , no teleconverter The plot above is the traditional wide-open MTF contrast plot, without the teleconverter. This is 105mm, f/2.8. Overall contrast is nearly 10% higher than with the teleconverter attached. MTF50 lp/mm with teleconverter, 147mm f/5.6 MTF50 lp/mm, no teleconverter, 105mm f/4.0 Attaching the teleconverter at f/4.0 (now 147mm f/5.6) drops the resolution by 49/57 = 0.86, or a loss of 14%. MTF50 lp/mm with teleconverter, 147mm f/8.0 Nice and sharp at this aperture, with better depth of focus. MTF50 lp/mm, no teleconverter, 105mm f/5.6 Attaching the teleconverter at f/5.6 (now 147mm f/8.0) drops the resolution by 51/62 = 0.82, or a loss of 18%. MTF50 lp/mm with teleconverter, 147mm f/11.0 Diffraction is starting to set in and messing with resolution. MTF50 lp/mm, no teleconverter, 105mm f/8.0 Attaching the teleconverter at f/8.0 (now 147mm f/11.0) drops the resolution by 49/61 = 0.8, or a loss of 20%. MTF50 lp/mm with teleconverter, 147mm f/16.0 Please ignore the left-side dimple in the meridional-direction plot above. I didn’t realize a shadow had been cast onto the edge of the target, which affected the left edge measurements. Resolution is still okay, but diffraction is getting much heavier. MTF50 lp/mm, no teleconverter, 105mm f/11.0 Attaching the teleconverter at f/11.0 (now 147mm f/16.0) drops the resolution by 42/53 = 0.79, or a loss of 21%. MTF50 lp/mm with teleconverter, 147mm f/22.0 Please ignore the left-side dimple in the meridional-direction plot above. I didn’t realize a shadow had been cast onto the edge of the target, which affected the left edge measurements. MTF50 lp/mm, no teleconverter, 105mm f/16.0 Attaching the teleconverter at f/16.0 (now 147mm f/22.0) drops the resolution by 29/41 = 0.71, or a loss of 29%. The teleconverter at this aperture (f/22) is getting into heavy diffraction, so the resolution loss gets much worse. I consider this aperture to be unacceptable for teleconverter use. In summary, the resolution drop by attaching the teleconverter is typically about 20%. Since the focal length was increased by 40%, this is definitely superior to merely cropping the picture to get the same field of view. Frame edges are quite good, thus disproving lots of the internet hearsay about the resolution disaster. Your shots can be tack sharp with or without the teleconverter. Your camera support, accurate focus, and lighting will impact getting sharp photos at least as much as the raw lens/teleconverter resolution. You also probably want to look into focus stacking, since depth of focus is one of the biggest issues in macro photography. Conclusion Here’s an “impossible” combination that does the impossible. Aside from stressing the phase-detect autofocus system a bit, you probably won’t even notice if the teleconverter is attached or not. If you’re willing to stick with either contrast-detect focus or manual focus, you’ll be very happy with the shots from this combination. If you’re hooked on phase-detect focus at all times, then you won’t be happy with this combo. But you won’t be complaining about sharpness. I’m glad I finally got around to testing this setup. I had fallen into the trap of believing what I read on the internet. I intend to use the Sigma TC-1401 and Micro Nikkor 105mm f/2.8 team quite often in the future; it may help a bit with those shy bugs. Lighting is simpler at these longer distances, too. Sample Photos Coin at 1.4X magnification. D850 147mm f/14.0 1/30s Even at f/14.0, the shot above strains to have enough depth of focus at the minimum focus distance. It’s pleading with me to use focus stacking. Nonetheless, it looks pretty sharp to my eye. The coin is 6 inches from the front of the lens. I used Live View contrast-detect focus here, to prove it works, but normally I’d be using manual focus with focus-peaking. Coin at 1.0X magnification. D850 147mm f/16.0 1/20s At 1.0X magnification, you get about 8 inches working distance from the front of the lens. Compared to this, the US $1,400.00 Canon 180mm f/3.5L USM lens gets you about 9.5 inches working distance; not that much different. I used Live View contrast-detect autofocus for this shot, too. Fairy Duster, D850 147mm f/4.0 (wide open) 1/500s Aside from having almost no depth of focus at this distance, the 105mm wide open with the teleconverter up close is quite nice. I even used phase-detect focus here, just to see if it would work properly.